Part 3 :: Establishing site-to-site VPN between OpenSwan And VyOS
Hello Guys
Welcome to the final part of our series on establishing a VPN between Azure and AWS using Openswan and VyOS. This is where the real thing happens. I know if you were like me , you would already be itching to dive into the subject ASAP. Your prayers have been answered. Below is what’s about to go down 😀
- Fill the site-to-site Form
- Firewall Rules
- Route Table Rules
- configure Openswan
- configure VyOS
- Test Connectivity
Fill the site-to-site Form
Here is a mere formalization that you see more and more in the corporate world where a Company A will send to Company Z a form to be filled where all the specifications about the VPN is captured. Let’s simulate one ourselves. Our Company A is AWS and Company Z is Azure. Here is a VPN form of our project.
Basically we will have:
Azure endpoint: 52.168.163.62
Aws endpoint: 34.204.104.232
Phase 1
encryption algorithm: aes-256
hashing algorithm: sha1
main mode: yes
DH: group 2
ikelifetime: 3600s
Phase 2
encryption algorithm: aes-256
hashing algorithm: sha1
Perfect Forward Secrecy : yes
salifetime: 1800s
VPN Access
Azure encryption domain: 10.10.0.5:8888
AWS encryption domain: 172.20.0.10:80/172.20.10.5:8080
Let’s set up firewall Rules
Azure
OpenSwan Firewall
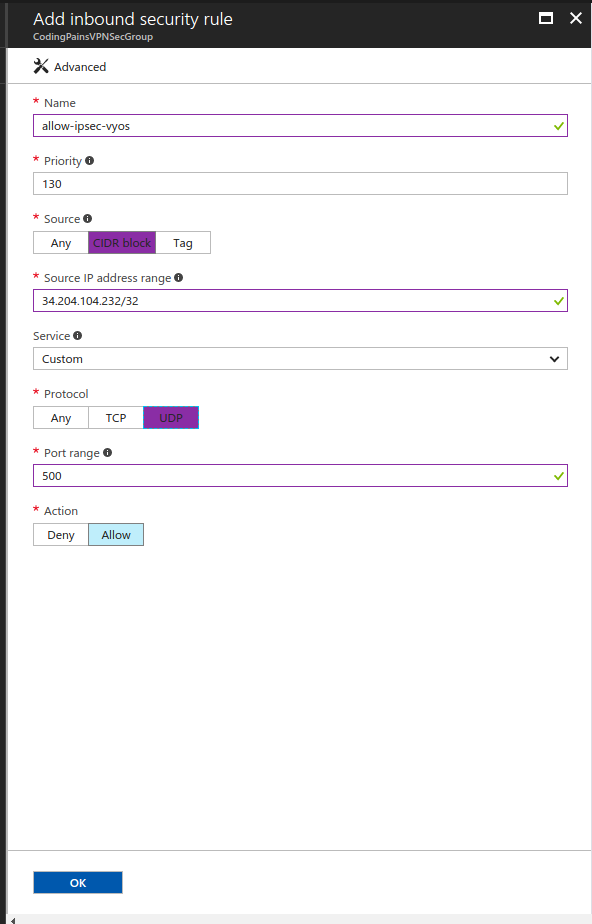
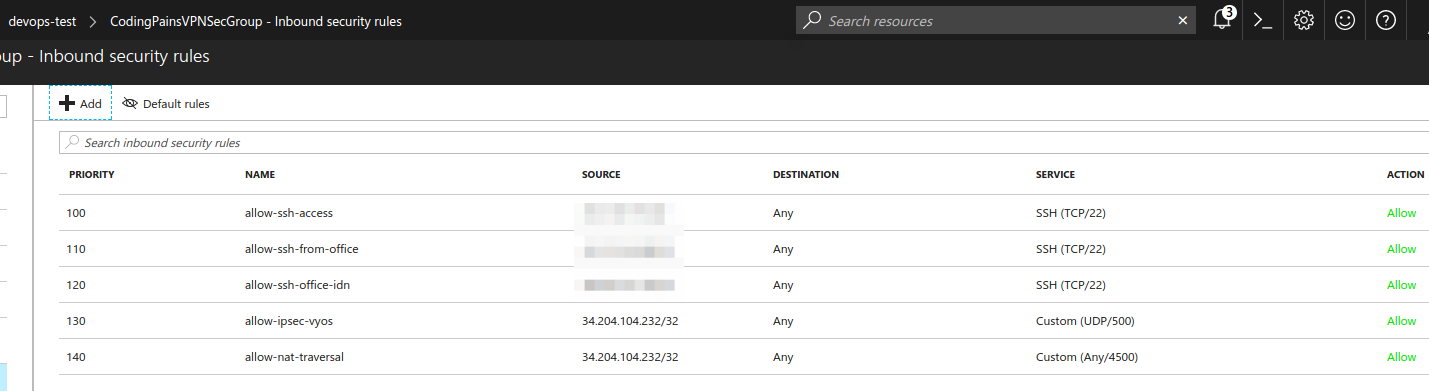
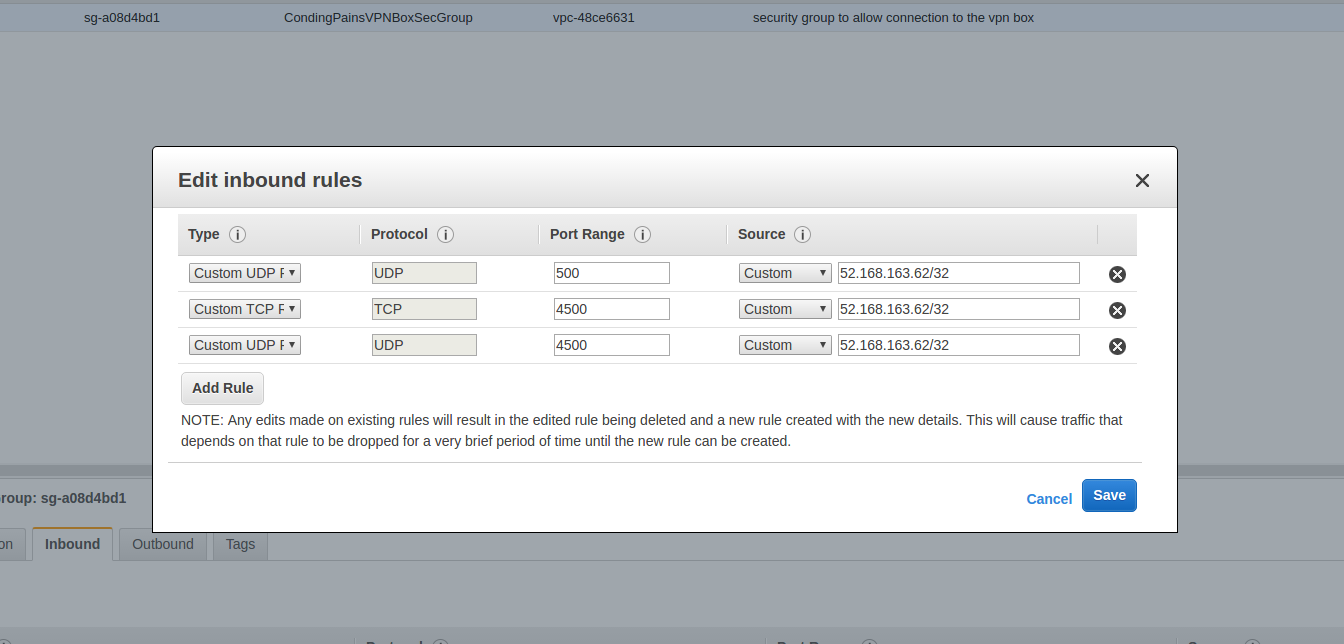
To allow ipsec connection (ISAKMP) we need to open UDP port 500 and to allow ipsec NAT traversal we need to open UDP and TCP 4500 for VyOS endpoint :34.204.104.232
Application Box Firewall
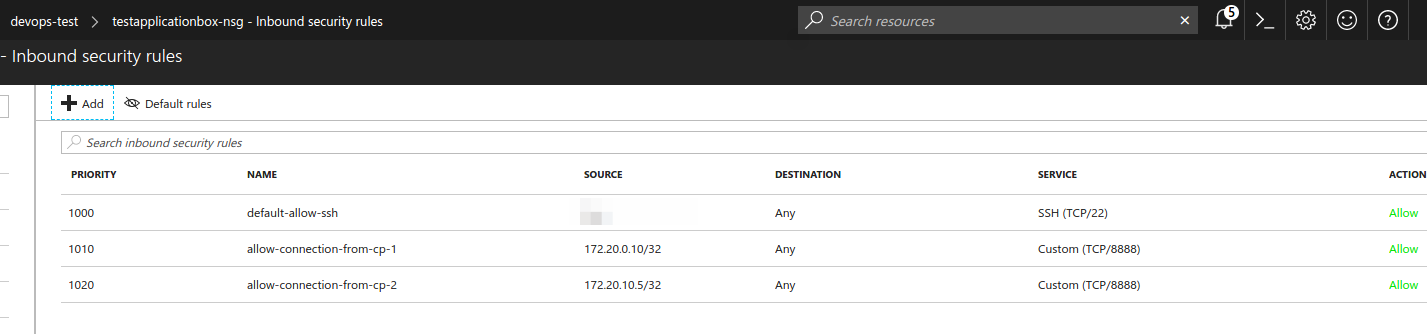
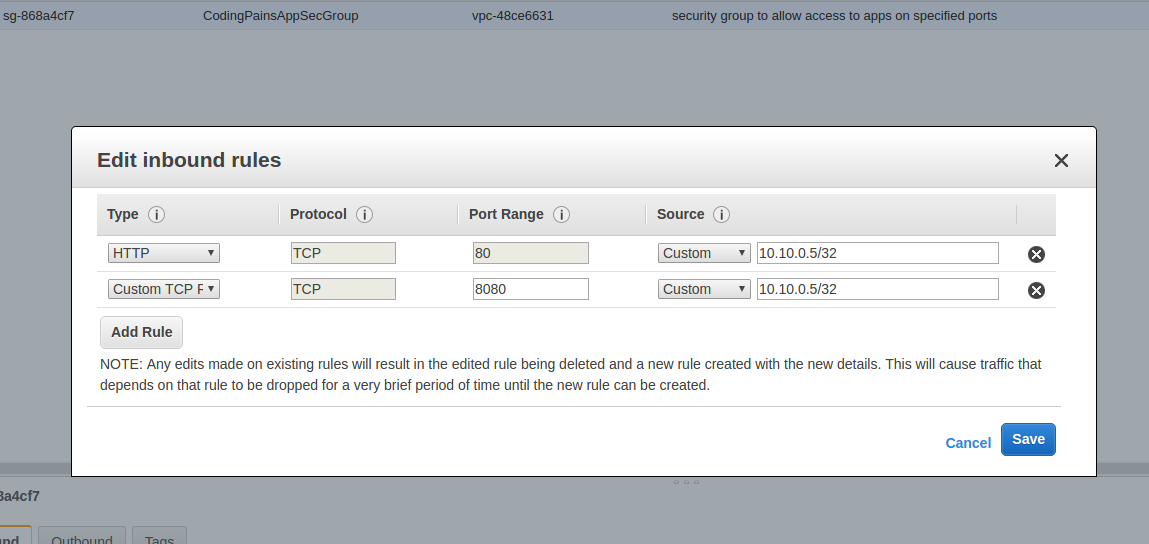
As per VPN form , we need to allow traffic from 172.20.0.10 and 172.20.10.5 to the application box with IP 10.10.0.5 on port 8888
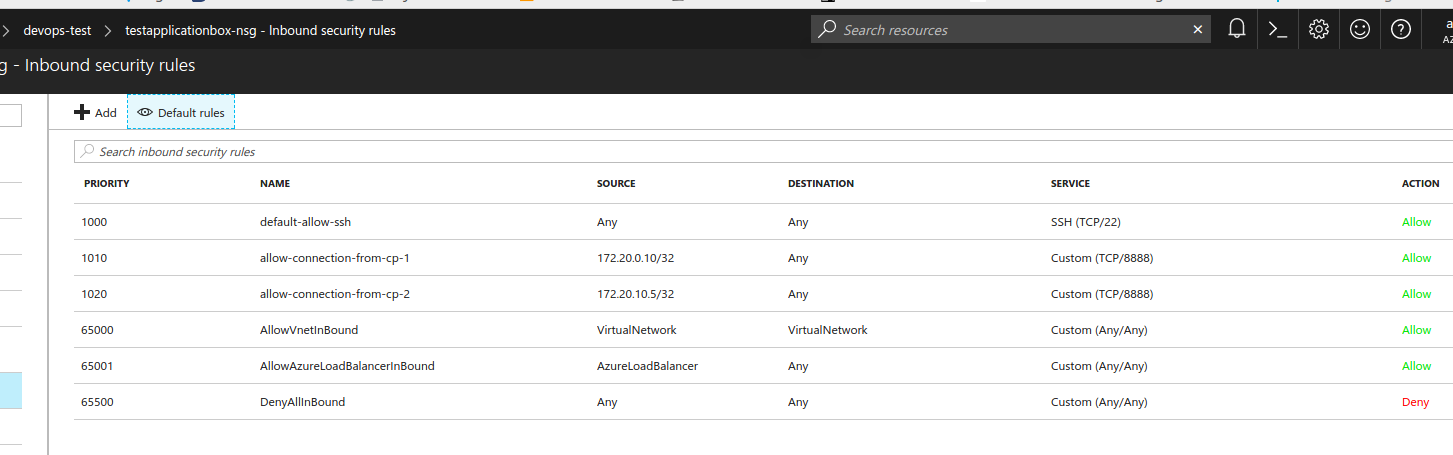
Allowing traffic between the openswan box and its side kick application box is important here. Fortunately for us, we won’t need to write any rule there as Azure default “hidden” rule already allow inbound vnet any to any traffic. To view default rules, click on Default rules beside the “+Add” button
AWS
VyOS Firewall
Similarly to azure, we needed to allow ipsec connection and nat traversal on UDP 500 and TCP/UDP 4500 for openswan IP 52.168.163.62
Codingpains application 1 and 2 Firewall
Here as well we needed to allow access on ports 80 and 8080 to our azure app box 10.10.0.5
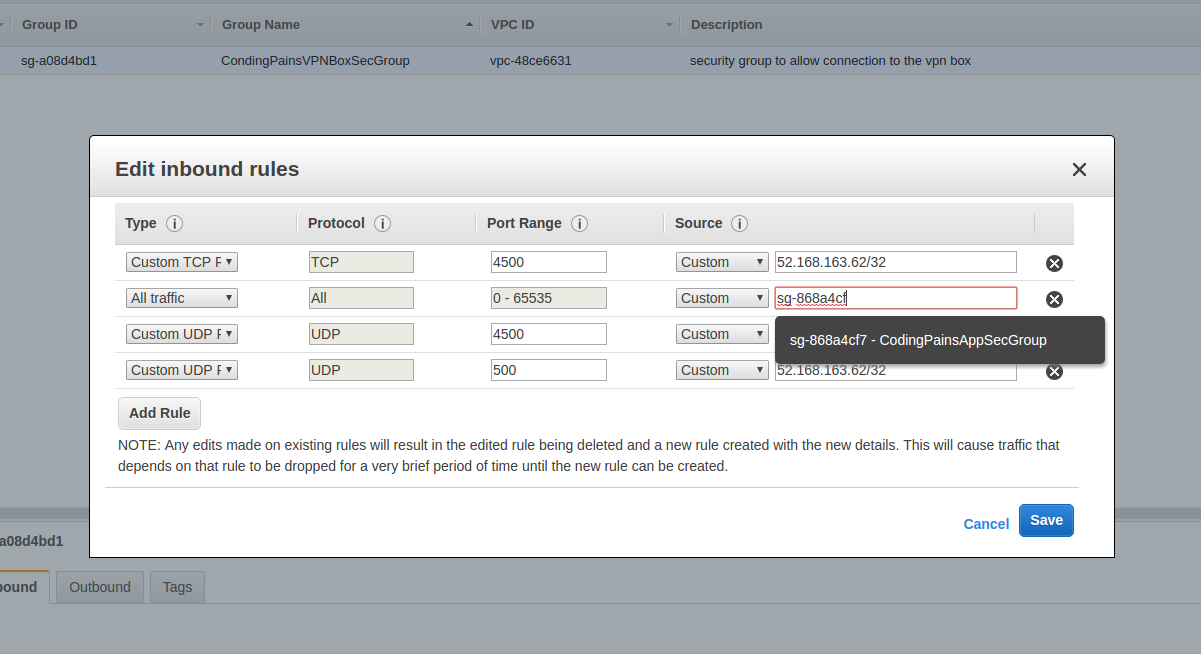
It’s also important here to allow traffic from the vyos box to flow to the app box and vice versa. Generally I allow all traffic and in aws, we are allowing any box with the same Security groups as the VyOS one to send any traffic to the app box.
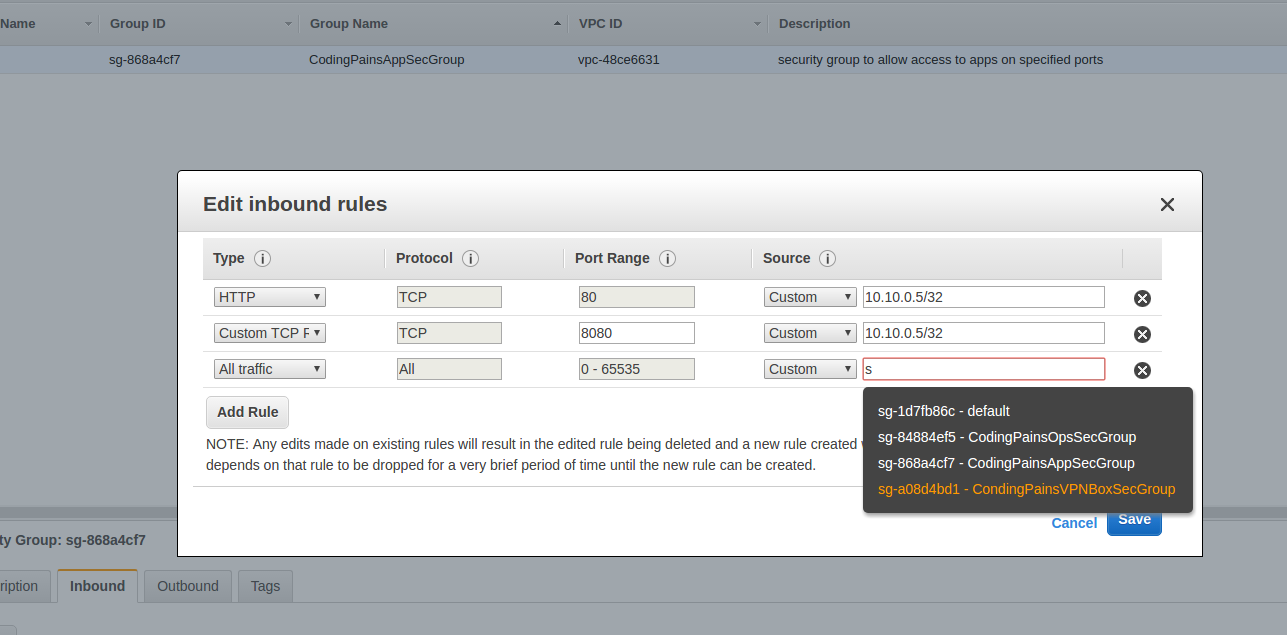
We are doing the reverse as well allowing any box with the application sec group to send to the VyOS.
Route Table Rules
This part is more of showing the way to our packets. Since our azure vnet is 10.10.0.0/16, packets to anything within that ip range know very well how to go about but not when they are asked to to go IPs falling under 172.20.0.0/16(AWS subnet). So we need to show the way on how to get there. Same way for amazon 172.20.0.0/16, we need to show the way to 10.10.0.0/16. We could do that on each boxes involved here but that will become very quickly a bad idea when a lot more boxes are involved. So we will do this at a networking or subnet level.
Azure
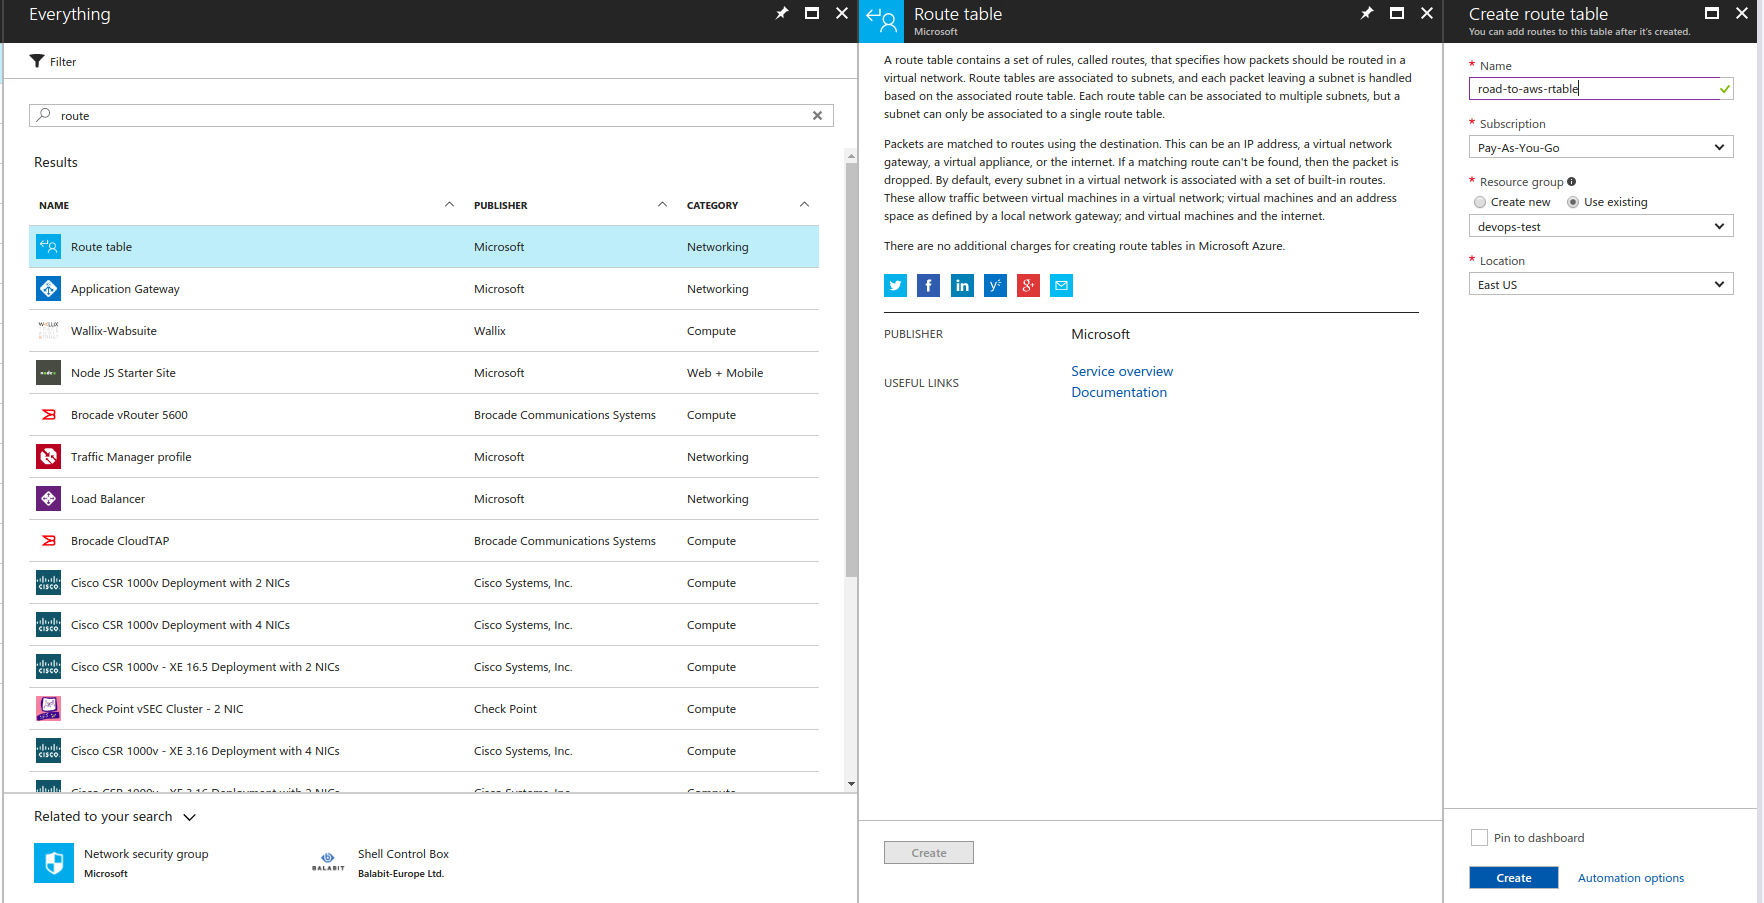
Let’s create a route table and add the rules to it. Like in part 2 we can just do a search for route and create the route table like shown below. I gave it the name road-to-aws
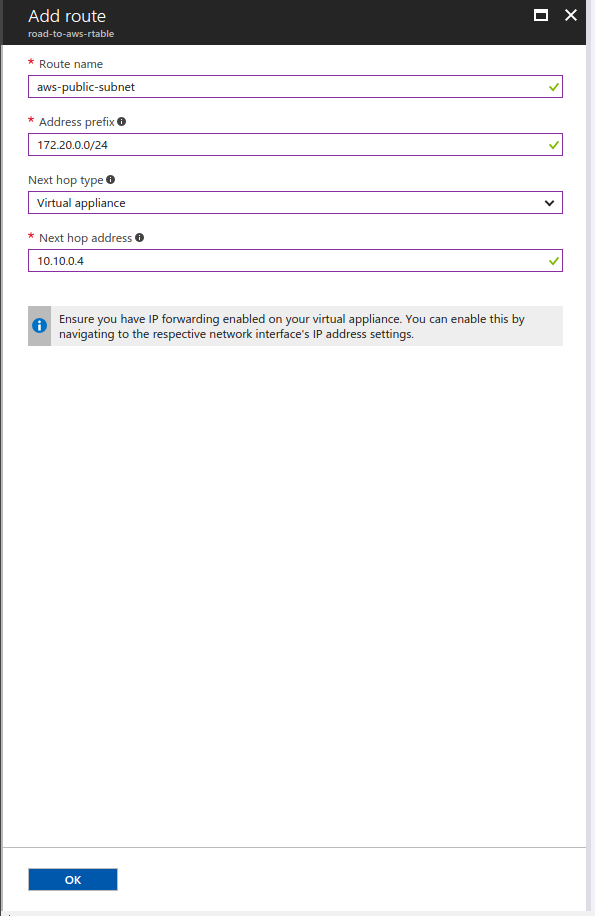
Let’s create a route to both aws public and private subnets. You can use either an IP or a full subnet, since this is the only VPN we will be creating I just use the networks instead. I will show how to create the rule for aws public subnet only then the rest would be self explanatory.
When done the route table should look the like the table below
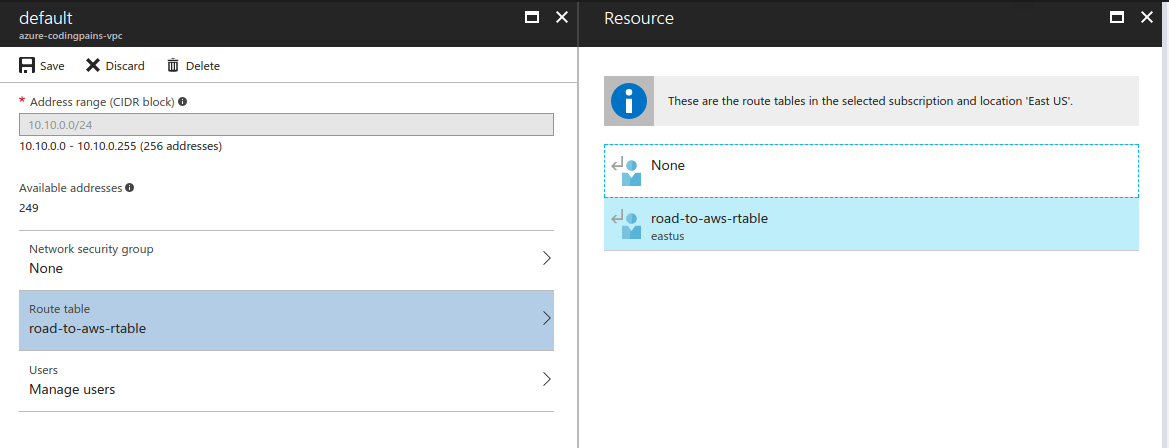
Before the routes become effective, we need to assign it to our azure subnet. If we have had a node inside the private subnet we would have used the same rules. But let’s assign it to the public subnet (default) only. To do that, locate your vnet, look for the subnets, choose the actual subnet and choose the route table like shown below

AWS
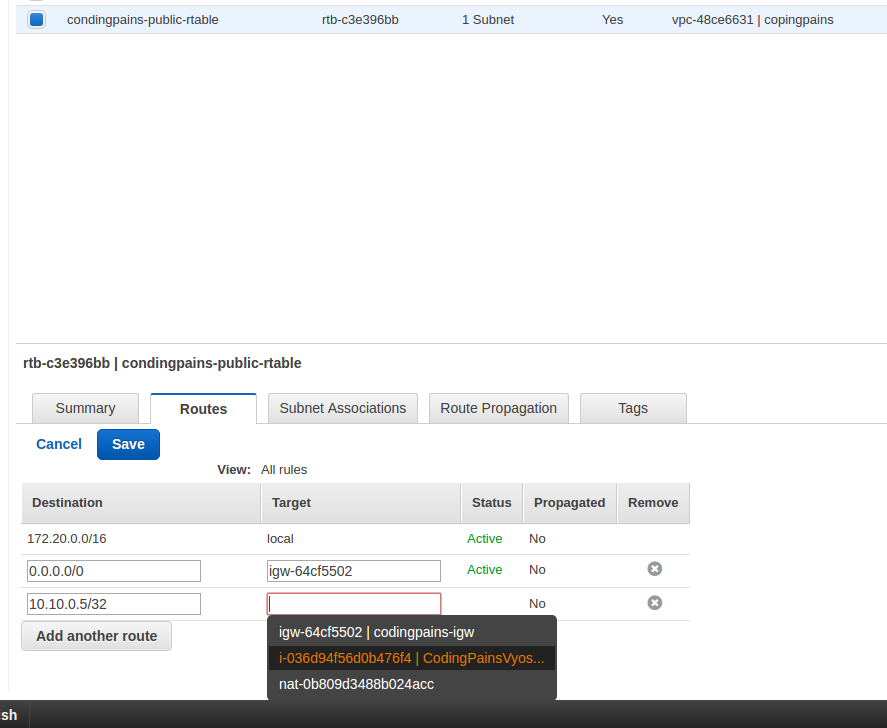
In AWS we have already created the route tables, let’s go ahead and edit them with new routes. Basically the same rule for both public and private route table
configure Openswan
Let’s start the configuration by making sure the /etc/ipsec.conf file has the lines shown below
|
1 2 |
protostack=netkey plutostderrlog=/var/log/ipsec.log |
Now let’s configure our connection in /etc/ipsec.conf let’s make sure we have our connection similar to what’s below using your own IPs etc of course. Usually left side is where we are and the right side is the other side of the VPN. For example since we are connecting to openswan on azure. Left is openswan or azure and right it vyos or aws.
|
1 2 3 4 5 6 7 8 9 10 11 12 13 14 15 16 17 18 19 20 21 22 |
# Add connections here conn awscodingpainsvpn authby=secret forceencaps=yes auto=start left=%defaultroute leftnexthop=%defaultroute leftid=52.168.163.62 leftsubnet=10.10.0.5/32 leftsourceip=52.168.163.62 right=34.204.104.232 rightid=172.20.0.5 rightsubnets={172.20.0.10/32,172.20.10.5/32} pfs=yes aggrmode=no ike=aes256-sha1;modp1024 phase2=esp phase2alg=aes256-sha1;modp1024 ikelifetime=3600s salifetime=1800s # sample VPN connection # for more examples, see /etc/ipsec.d/examples/ |
Once that’s done let’s put in our secret /etc/ipsec.secrets and restart openswan .
|
1 |
52.168.163.62 172.20.0.5: PSK "A!eGhaed8zie3da2E" |
Type sudo service ipsec restart to restart openswan, you will notice that it will throw an error like:
“/var/lib/openswan/ipsec.secrets.inc” line 1: error loading RSA private key file
I can’t remember what the issue it but have done some search about it and here was the cure. Rewrite the private key to be of the pem format
|
1 2 3 4 |
openswan@openswanbox:~$ sudo cp /etc/ipsec.d/private/{openswanboxKey.pem,openswanboxkey_copy.pem} openswan@openswanbox:~$ sudo openssl rsa -in /etc/ipsec.d/private/openswanboxkey_copy.pem -outform pem -out /etc/ipsec.d/private/openswanboxKey.pem writing RSA key openswan@openswanbox:~$ sudo service ipsec restart |
configure VyOS
Let’s start VyOS configuration, those using Juniper should feel at home
|
1 2 3 4 5 6 7 8 9 10 11 12 13 14 15 16 17 18 19 20 21 22 23 24 25 26 27 28 29 30 31 32 33 34 35 36 37 38 39 40 41 42 43 44 45 46 47 48 49 50 51 52 53 54 55 56 57 58 59 60 61 62 63 64 65 66 67 68 69 70 71 72 73 74 75 76 77 78 79 80 81 82 83 84 85 86 87 88 89 90 91 92 93 94 95 96 97 98 99 100 101 102 103 104 105 106 107 108 |
vyos@VyOS-AMI:~$ show interfaces Codes: S - State, L - Link, u - Up, D - Down, A - Admin Down Interface IP Address S/L Description --------- ---------- --- ----------- eth0 172.20.0.5/24 u/u lo 127.0.0.1/8 u/u ::1/128 vyos@VyOS-AMI:~$ configure vyos@VyOS-AMI# set vpn ipsec ipsec-interfaces interface eth0 vyos@VyOS-AMI# set vpn ipsec nat-traversal enable vyos@VyOS-AMI# set vpn ipsec ike-group Azure-Vyos proposal 1 vyos@VyOS-AMI# set vpn ipsec ike-group Azure-Vyos proposal 1 encryption aes256 vyos@VyOS-AMI# set vpn ipsec ike-group Azure-Vyos proposal 1 hash sha1 vyos@VyOS-AMI# set vpn ipsec ike-group Azure-Vyos lifetime 3600 //Let's verify our IKE settings vyos@VyOS-AMI# show vpn ipsec ike-group Azure-Vyos +lifetime 3600 +proposal 1 { + encryption aes256 + hash sha1 +} vyos@VyOS-AMI# set vpn ipsec esp-group Azure-Vyos proposal 1 vyos@VyOS-AMI# set vpn ipsec esp-group Azure-Vyos proposal 1 encryption aes256 vyos@VyOS-AMI# set vpn ipsec esp-group Azure-Vyos proposal 1 hash sha1 vyos@VyOS-AMI# set vpn ipsec esp-group Azure-Vyos lifetime 1800 //Let's verify our ESP settings vyos@VyOS-AMI# show vpn ipsec esp-group Azure-Vyos +lifetime 1800 +proposal 1 { + encryption aes256 + hash sha1 +} //There is another way of doing what's below but you will end up typing more vyos@VyOS-AMI# edit vpn ipsec site-to-site peer 52.168.163.62 vyos@VyOS-AMI# set authentication mode pre-shared-secret vyos@VyOS-AMI# set authentication pre-shared-secret A!eGhaed8zie3da2E vyos@VyOS-AMI# set default-esp-group Azure-Vyos vyos@VyOS-AMI# set ike-group Azure-Vyos vyos@VyOS-AMI# set local-address 172.20.0.5 vyos@VyOS-AMI# set tunnel 1 local prefix 172.20.0.10/32 vyos@VyOS-AMI# set tunnel 1 remote prefix 10.10.0.5/32 vyos@VyOS-AMI# set tunnel 2 local prefix 172.20.10.5/32 vyos@VyOS-AMI# set tunnel 2 remote prefix 10.10.0.5/32 vyos@VyOS-AMI# top vyos@VyOS-AMI# commit vyos@VyOS-AMI# show vpn ipsec { esp-group Azure-Vyos { lifetime 1800 proposal 1 { encryption aes256 hash sha1 } } ike-group Azure-Vyos { lifetime 3600 proposal 1 { encryption aes256 hash sha1 } } ipsec-interfaces { interface eth0 } site-to-site { peer 52.168.163.62 { authentication { mode pre-shared-secret pre-shared-secret A!eGhaed8zie3da2E } default-esp-group Azure-Vyos ike-group Azure-Vyos local-address 172.20.0.5 tunnel 1 { local { prefix 172.20.0.10/32 } remote { prefix 10.10.0.5/32 } } tunnel 2 { local { prefix 172.20.10.5/32 } remote { prefix 10.10.0.5/32 } } } } } vyos@VyOS-AMI# save vyos@VyOS-AMI# exit |
Checking what’s happening at the log level. I smiled at the sight of “MR3, ISAKMP SA established:
|
1 2 3 4 5 6 7 8 9 10 11 |
vyos@VyOS-AMI:~$ monitor log Jun 21 13:21:53 VyOS-AMI pluto[3408]: packet from 52.168.163.62:500: ignoring Vendor ID payload [draft-ietf-ipsec-nat-t-ike-02_n] Jun 21 13:21:53 VyOS-AMI pluto[3408]: packet from 52.168.163.62:500: ignoring Vendor ID payload [draft-ietf-ipsec-nat-t-ike-02] Jun 21 13:21:53 VyOS-AMI pluto[3408]: packet from 52.168.163.62:500: ignoring Vendor ID payload [draft-ietf-ipsec-nat-t-ike-00] Jun 21 13:21:53 VyOS-AMI pluto[3408]: "peer-52.168.163.62-tunnel-2" #4: responding to Main Mode Jun 21 13:21:53 VyOS-AMI pluto[3408]: "peer-52.168.163.62-tunnel-2" #4: Peer ID is ID_IPV4_ADDR: '52.168.163.62' Jun 21 13:21:53 VyOS-AMI pluto[3408]: "peer-52.168.163.62-tunnel-2" #4: sent MR3, ISAKMP SA established Jun 21 13:21:53 VyOS-AMI pluto[3408]: "peer-52.168.163.62-tunnel-1" #5: responding to Quick Mode Jun 21 13:21:53 VyOS-AMI pluto[3408]: "peer-52.168.163.62-tunnel-2" #6: responding to Quick Mode Jun 21 13:21:53 VyOS-AMI pluto[3408]: "peer-52.168.163.62-tunnel-1" #5: IPsec SA established {ESP=>0x9740cdab <0xc423ad22} Jun 21 13:21:53 VyOS-AMI pluto[3408]: "peer-52.168.163.62-tunnel-2" #6: IPsec SA established {ESP=>0x55156fcd <0xc5b5f775} |
Let’s do further check
|
1 2 3 4 5 6 7 8 9 |
vyos@VyOS-AMI:~$ show vpn ipsec sa Peer ID / IP Local ID / IP ------------ ------------- 52.168.163.62 172.20.0.5 Tunnel State Bytes Out/In Encrypt Hash NAT-T A-Time L-Time Proto ------ ----- ------------- ------- ---- ----- ------ ------ ----- 1 up 0.0/0.0 aes256 sha1 yes 1100 1800 all 2 up 0.0/0.0 aes256 sha1 yes 890 1800 all |
Now let’s do application checks
Connection from aws to azure
|
1 2 3 4 5 6 7 8 9 10 11 12 13 14 15 16 17 18 19 20 21 22 23 24 25 26 27 28 29 30 31 32 33 34 35 36 37 38 39 40 41 42 43 44 45 46 47 48 49 50 51 52 53 54 55 56 57 58 59 |
//call from public box ubuntu@ip-172-20-0-10:~$ telnet 10.10.0.5 8888 Trying 10.10.0.5... Connected to 10.10.0.5. Escape character is '^]'. ^] telnet> quit Connection closed. ubuntu@ip-172-20-0-10:~$ curl http://10.10.0.5:8888 <!doctype html> <title>Azure App</title> <style> body { text-align: center; padding: 150px; } h1 { font-size: 50px; } body { font: 20px Helvetica, sans-serif; color: #333; } article { display: block; text-align: left; width: 650px; margin: 0 auto; } a { color: #dc8100; text-decoration: none; } a:hover { color: #333; text-decoration: none; } </style> <article> <h1>Azure Coding Pains!</h1> <div> <p>This means Azure App is up and working</p> <p>— The killer Team</p> </div> </article> //Connection from private box ubuntu@ip-172-20-10-5:~$ telnet 10.10.0.5 8888 Trying 10.10.0.5... Connected to 10.10.0.5. Escape character is '^]'. ^] telnet> quit Connection closed. ubuntu@ip-172-20-10-5:~$ curl http://10.10.0.5:8888 <!doctype html> <title>Azure App</title> <style> body { text-align: center; padding: 150px; } h1 { font-size: 50px; } body { font: 20px Helvetica, sans-serif; color: #333; } article { display: block; text-align: left; width: 650px; margin: 0 auto; } a { color: #dc8100; text-decoration: none; } a:hover { color: #333; text-decoration: none; } </style> <article> <h1>Azure Coding Pains!</h1> <div> <p>This means Azure App is up and working</p> <p>— The killer Team</p> </div> </article> |
Connection from azure to aws
|
1 2 3 4 5 6 7 8 9 10 11 12 13 14 15 16 17 |
ubuntu@testapplicationbox:~$ telnet 172.20.10.5 8080 Trying 172.20.10.5... Connected to 172.20.10.5. Escape character is '^]'. ^] telnet> quit Connection closed. ubuntu@testapplicationbox:~$ telnet 172.20.0.10 80 Trying 172.20.0.10... Connected to 172.20.0.10. Escape character is '^]'. ^] telnet> quit Connection closed. |
That’s all folks, I hope this has been meaningful to any of you.