Part 1 :: Configuration on AWS: VyOS
Hello Guys,
This is the first part of our tutorial which aims at establishing a VPN between Azure and AWS using Openswan and VyOS. In this tutorial we will only focus on AWS side of things. I will also assume that you have a fair idea of what AWS is and what it offers therefore won’t go too much in details in how to go about basic things.
Here is the plan of actions on AWS:
- Create codingpains VPC
- Create a public and private subnets
- Create a private route table
- Create an Internet Gateway (IGW)
- Attach the IGW to the VPC
- Map route tables to subnets
- Configure public subnet
- Create an Elastic IP (EIP)
- Create Security Groups
- Create and import login keypair
- Launch VyOS into the codingpains VPC
- Assign static EIP
- Upgrade VyOS
- Prepare VyOS box
- Create 2 boxes behind VyOS
Creating coding pains Virtual Private Cloud (VPC)
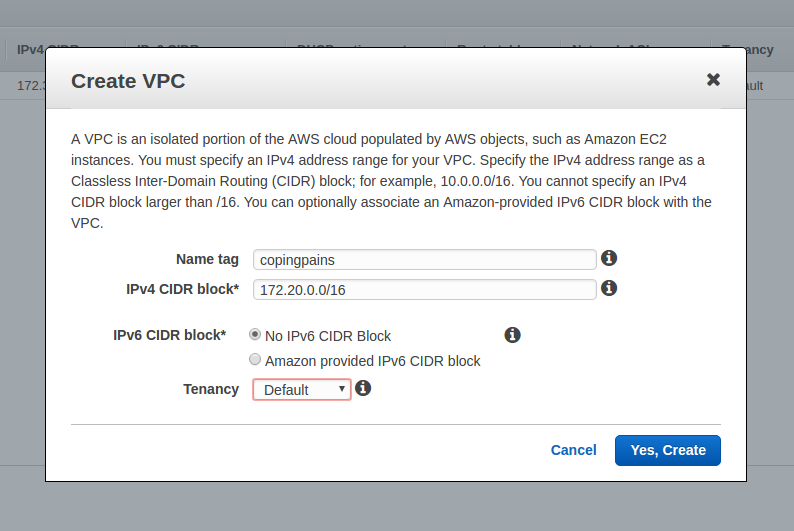
In order to have a VPN working we needed to have a network in the first place. AWS gives that functionality under their VPC offering. We will be creating a 172.20.0.0/16 network (We are in a AWS us-east-1 region but it’s not relevant for our tutorial).
Under VPC click on the button Create VPC and give it the name you want. I have given it codingpains name like shown in the following email
Creating public and private subnets
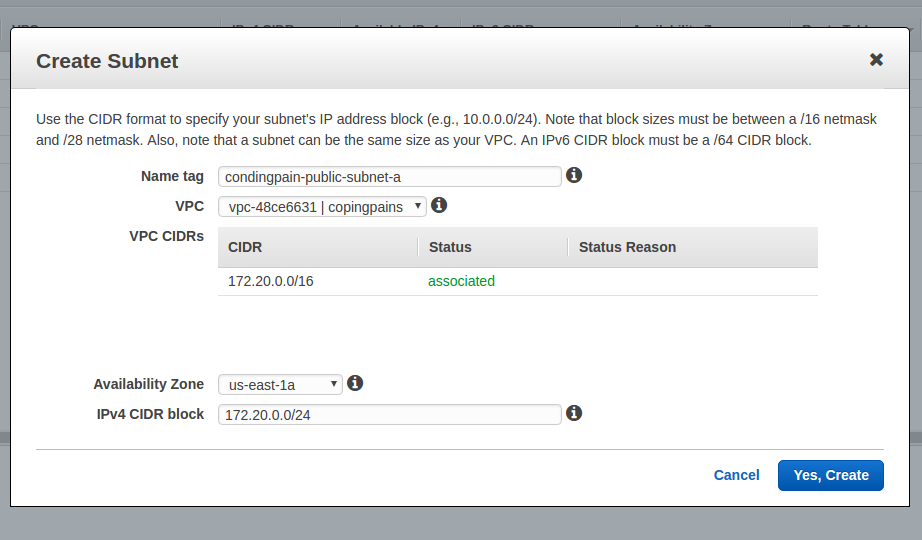
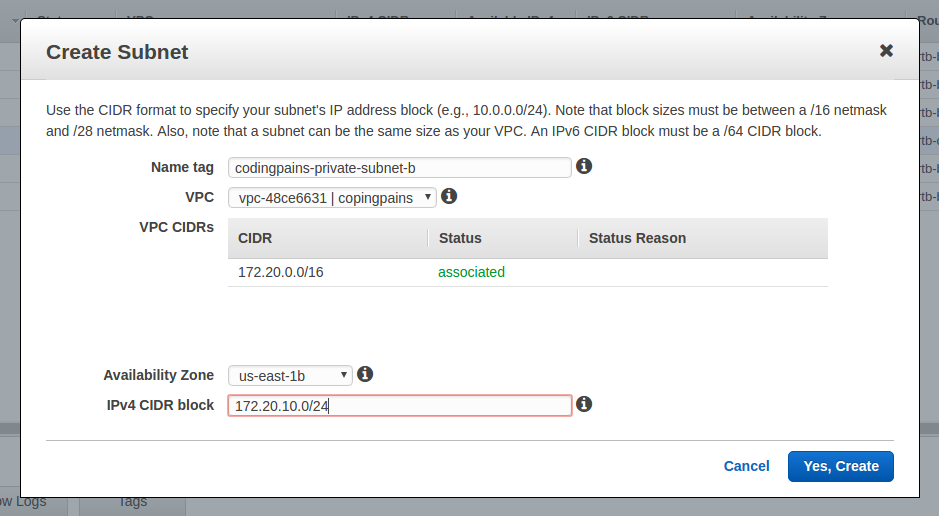
Once we have our network we can start creating different segment of it. We need 2 subnets for this experiment to be realistic enough. A public subnet where our own VPN box VyOS will be launched and a private subnet where we could launch other nodes to be accessible over the VPN Below are the details of the subnets
codingpains-public-subnet-a (172.20.0.0/24)
codingpains-private-subnet-b (172.20.10.0/24)
On the VPC page click on the subnets link and click on the “Create Subnet” button
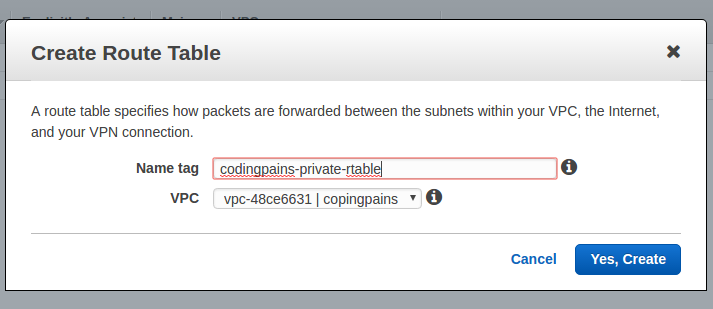
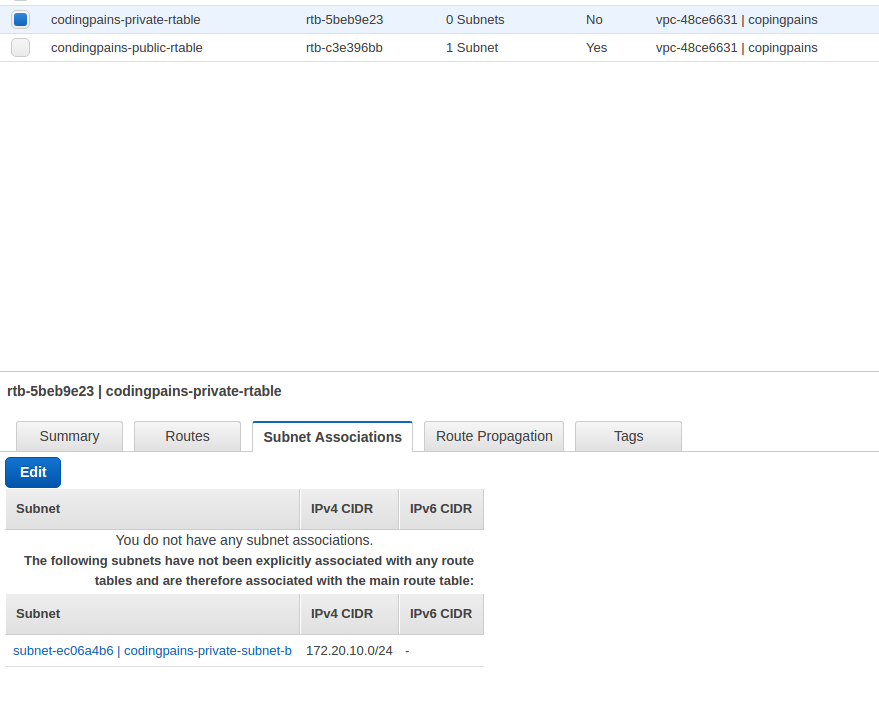
Create route table
Upon creation of the VPC a default route table has been created. We will configure it to be our public table. We will now create another route table that we will attach to our private subnet. Like shown in the picture below the VPC was created with the route table rtb-c3e396bb
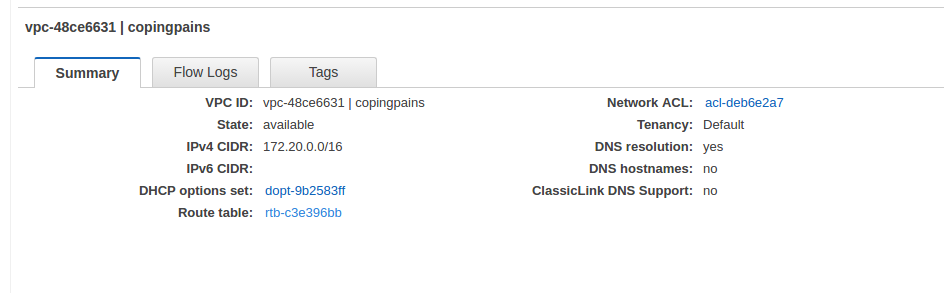
In the same left column on the VPC page, click on route tables link and click on “Create Route Table” button
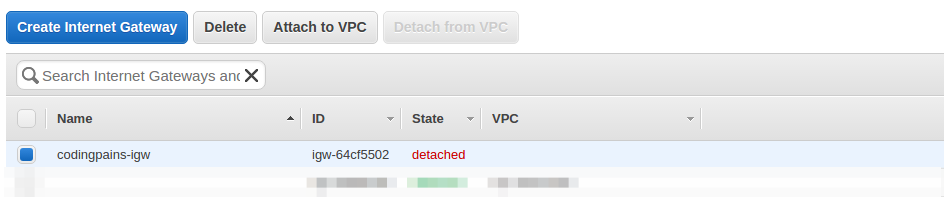
Creating an Internet Gateway
We needed to create this internet gateway in order to have anything in our subnets reachable on the internet. This is what makes our public subnet “public”. Locate and click on “Internet Gateways” link on the left column and click on “Create Internet Gateway” button

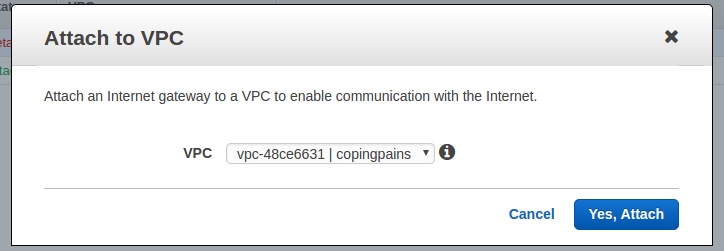
Attaching IGW to the VPC
When the IGW is created as shown above it’s pretty useless unless assigned to a VPC. To have the VPC reachable on the internet, we needed to assign the IGW to the VPC by clicking on the “Attach VPC” and choose our VPC
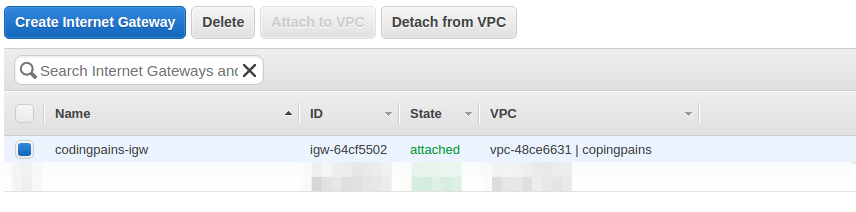
And the image below shows what it should look like after it’s been linked
Mapping route table to the subnets
We will need to assign the route table to their respective subnets
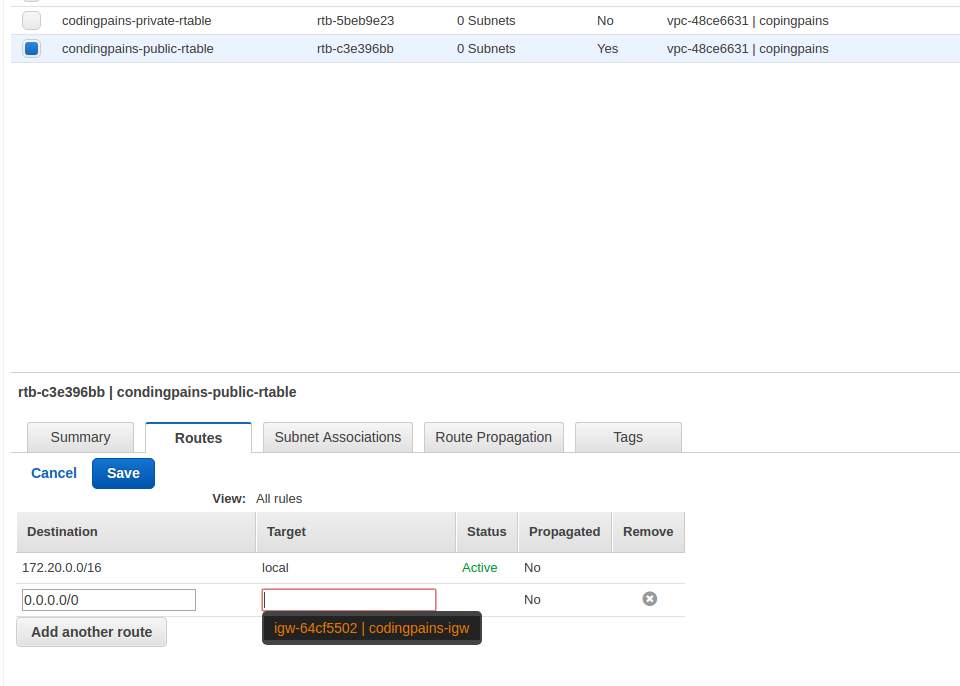
Configuring the public subnet
To make one subnet a public one we needed to create a rule on its route table and attach the destination to our IGW
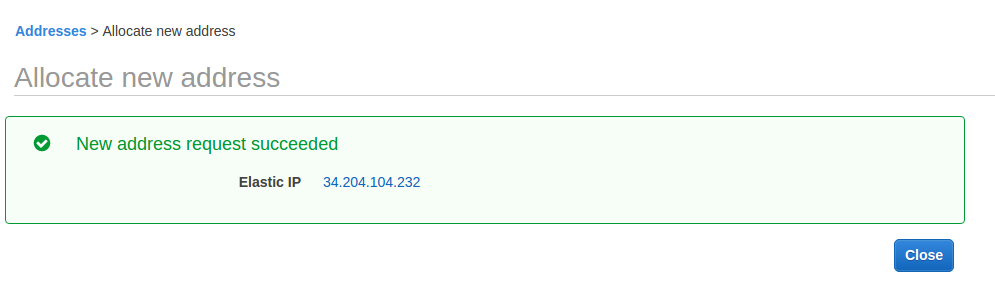
Creating a public static IP
Technically a VPN can still be possible without assigning a static IP but for sake of simplicity we will do what’s common. Locate and click on the “Elastic IPs” link to open the EIP page and click on “Allocate new Address” to sort of “reserve” our IP to be used later on the VyOS box.
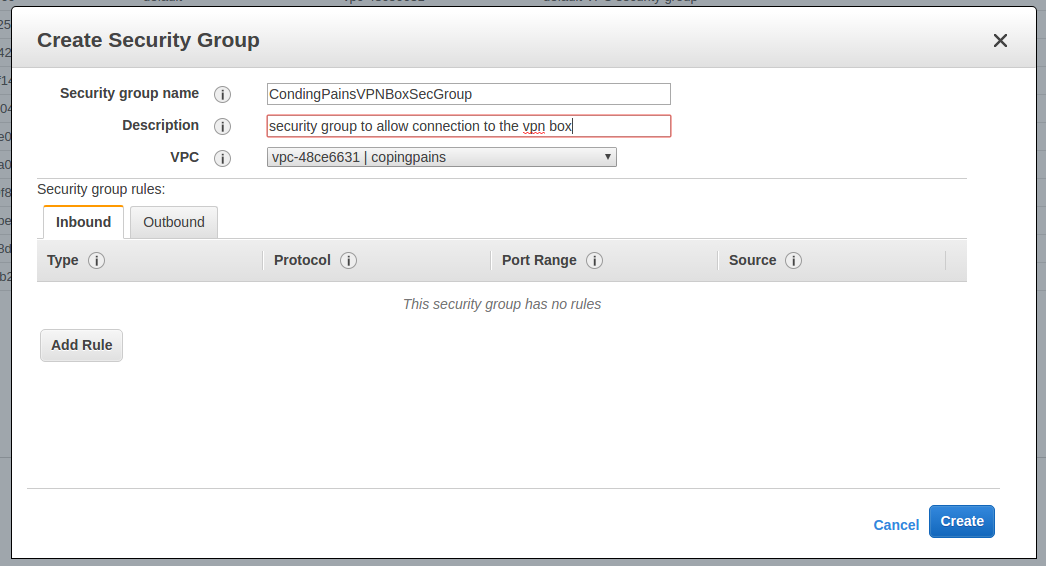
Create Security Groups
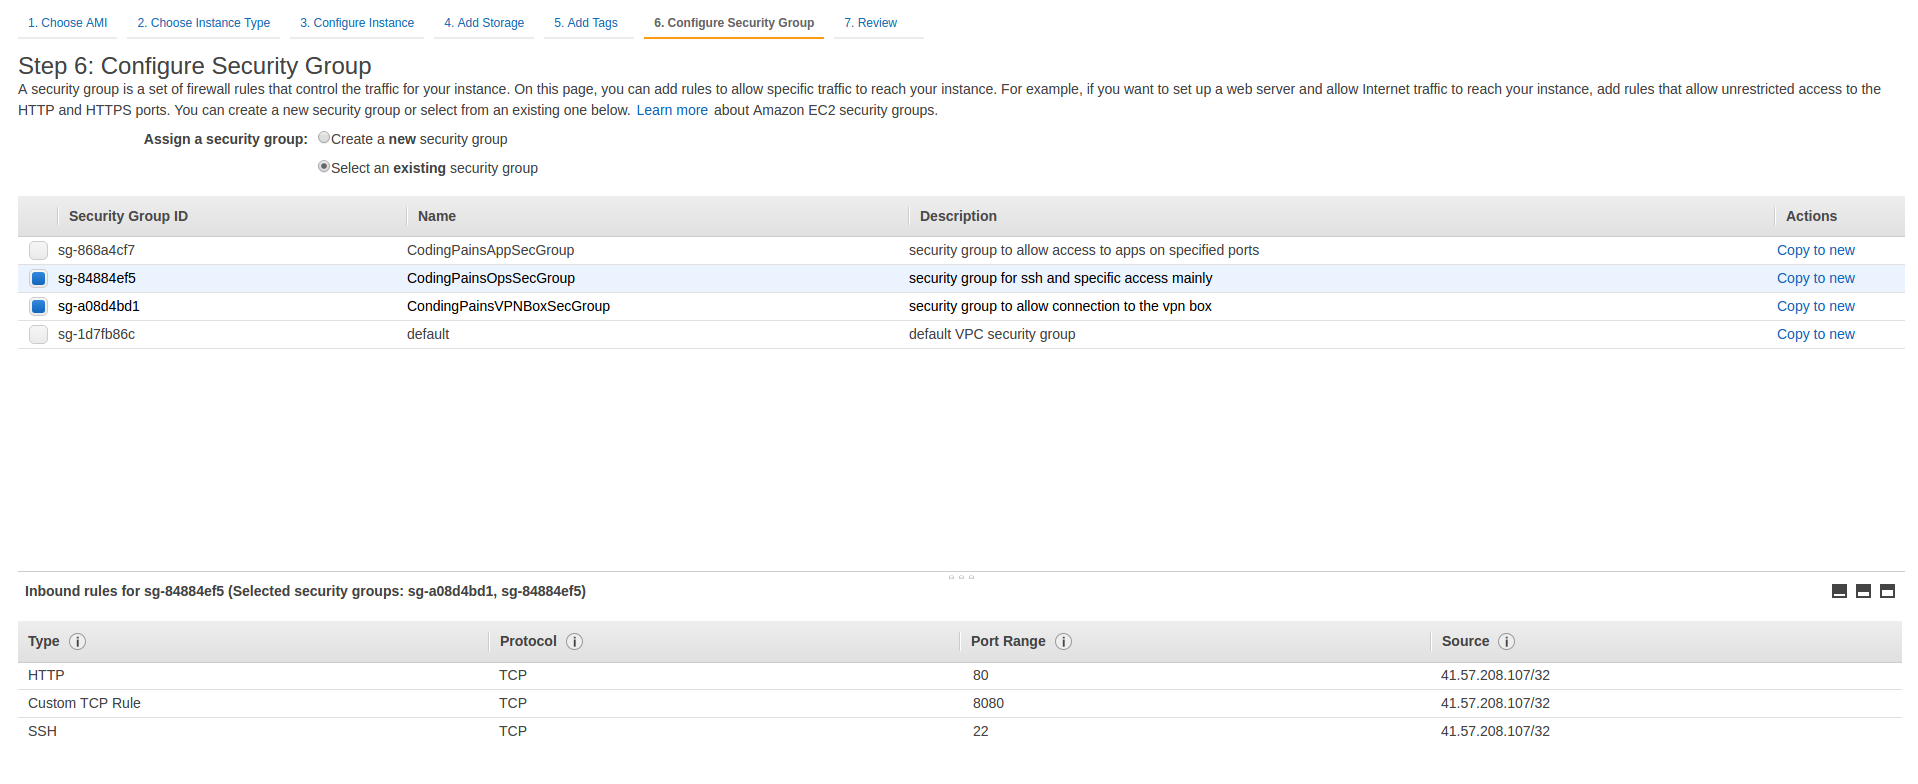
In order to access our VyOS box and subsequent boxes that we might create we needed to plan for how the access will be provided. First of all We will be creating 3 security groups:
- CondingPainsVPNBoxSecGroup: Allows us to configure rules on packet from the Azure VPN
- CodingPainsAppSecGroup: Allows us to configure rules on packet from boxes behind the Azure VPN to reach out to boxes behind our VyOS VPN
- CodingPainsOpsSecGroup: ALlows ssh and various access to all the boxes in AWS
Since we don’t know the static IP on the Azure side yet this security group would be empty
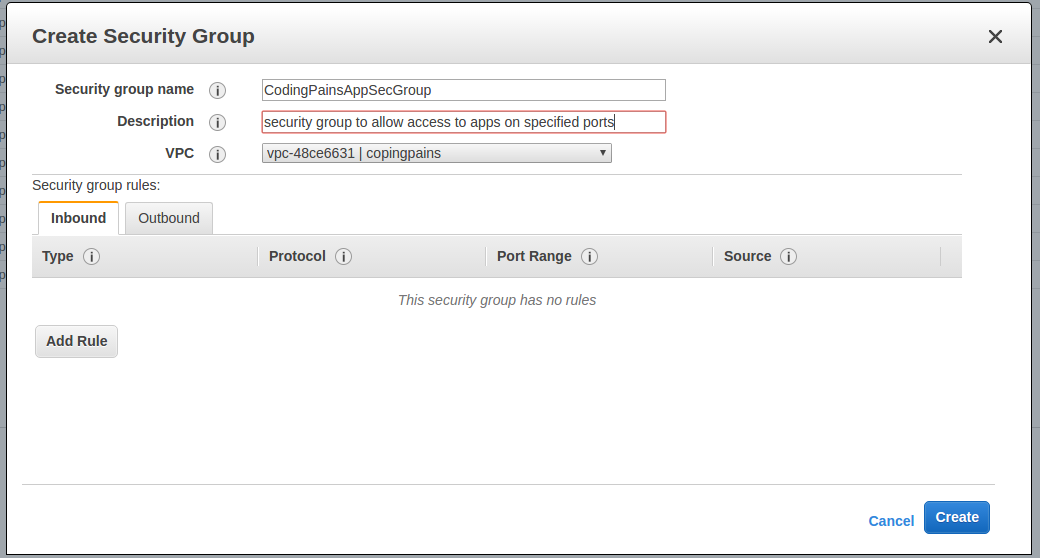
We also don’t know the apps we will be creating on the Azure side so this will also be empty for now
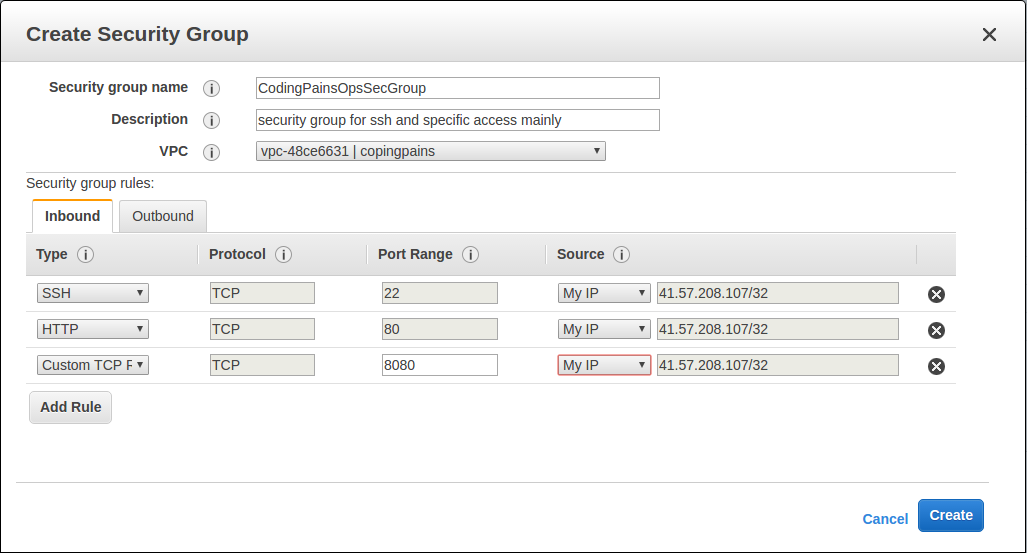
Here we allow access to my temporal static IP from my ISP.
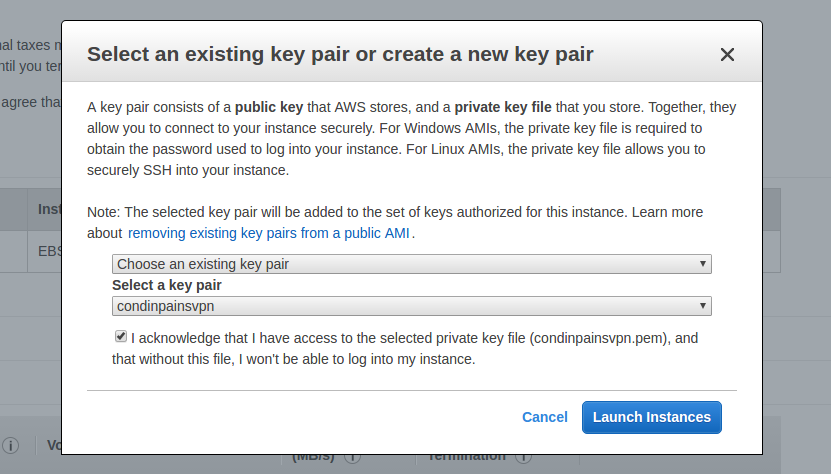
Creating and import pem key for login
For the simplicity sake I plan to use the same key pair for boxes in both azure and aws. AWS would have created one for me to download if I opted to but it’s going to be only the private key I would use for login. But if I planned to use the same key in azure, then I needed to have the public key as well to have it inside the box authorized_keys file. We need to create our own key pair using ssh-keygen utility in linux:
|
1 2 3 4 5 6 7 8 9 10 11 12 13 14 15 16 17 18 19 20 |
ssh-keygen -b 4096 -f condinpainsvpn.pem -C codingpainsexperiment Generating public/private rsa key pair. Enter passphrase (empty for no passphrase): Enter same passphrase again: Your identification has been saved in condinpainsvpn.pem. Your public key has been saved in condinpainsvpn.pem.pub. The key fingerprint is: SHA256:y2emTwIhIlYKpU+RDucyBU0kB6OfQ0M/Kygj/Ubh/fU codingpainsexperiment The key's randomart image is: +---[RSA 4096]----+ |*BBo | |+*Bo | |+O= = . | |+Oo= * . | |=oB + o S . | |o. = + o . | | o = = E | | . B | | ... | +----[SHA256]-----+ |
We also need to to give the file the right permission.
|
1 |
$ chmod 400 condinpainsvpn.pem |
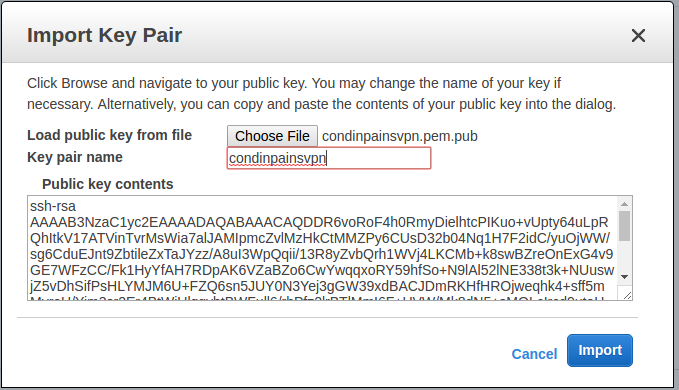
In order to use this key in aws we needed to have imported it. Locate and click onthe keypair link on the left panel of the EC2 page and click on “import key” button. In the panel upload your .pub file (public key) and give it a name like shown on the pick below
Launching VyOS into the codingpains VPC
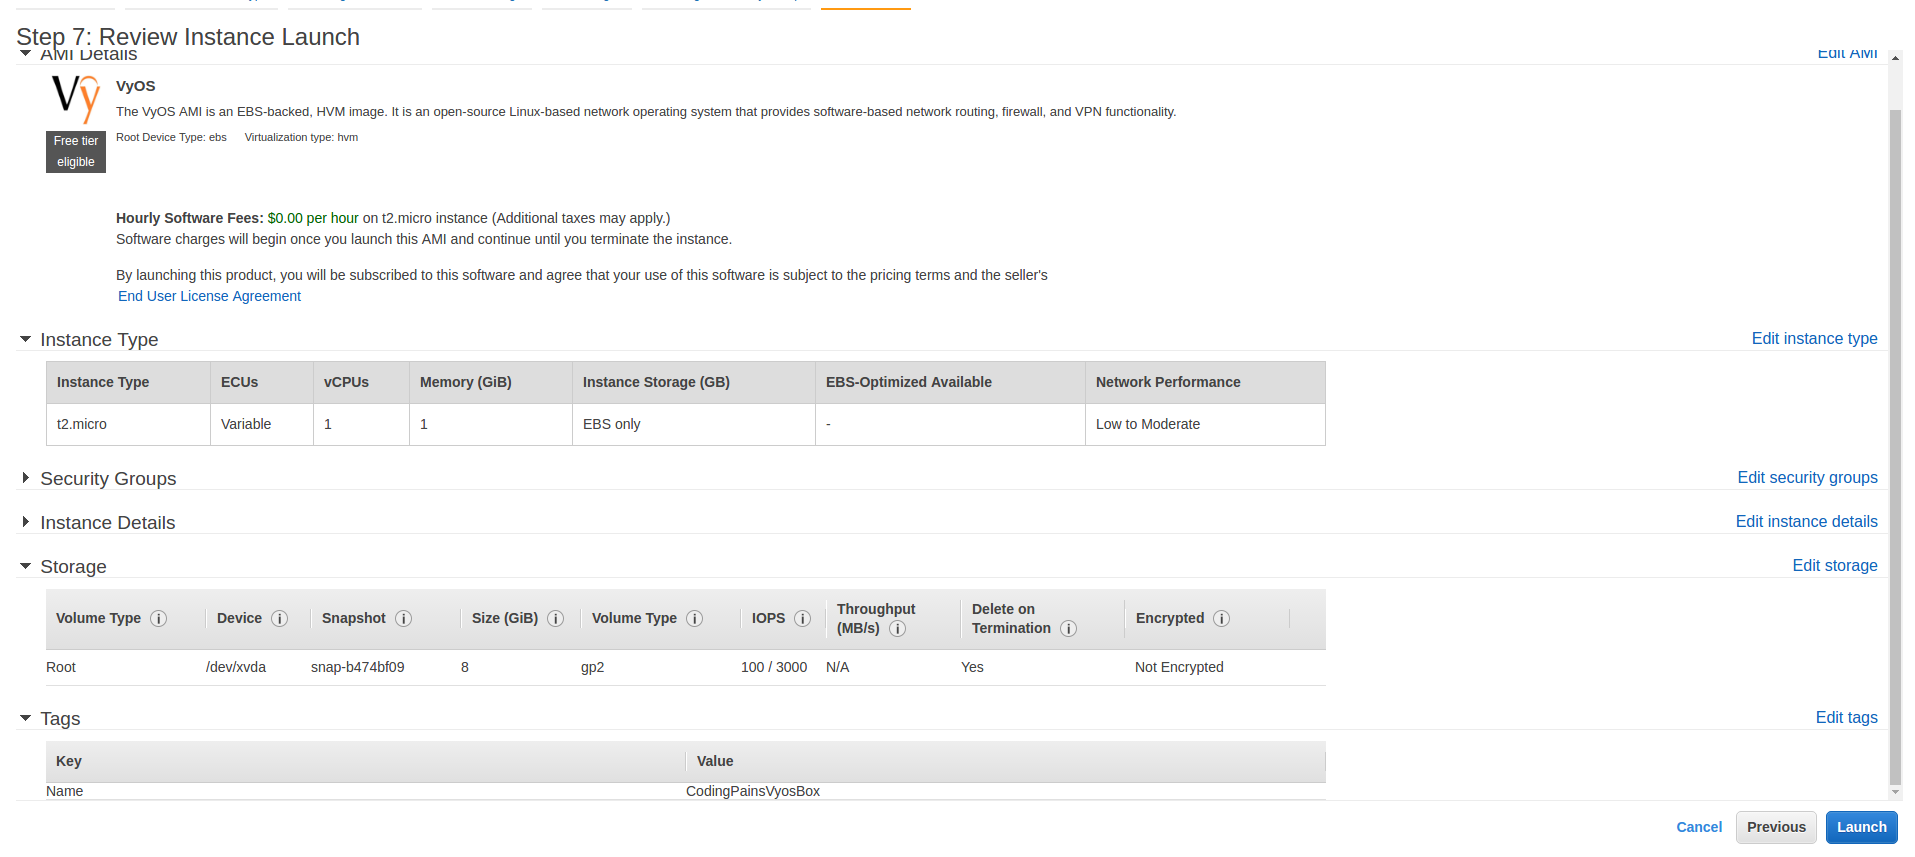
VyOS AMI is available on the AWS marcketplace and for some weird reason, when you search for it at the time of writing this, you won’t find it. That wasn’t the case 2 months ago and I could get the link to the product from a subscription email they has sent me earlier. So click on this aws vyos link to get to the product place. Page should be similar to the image below
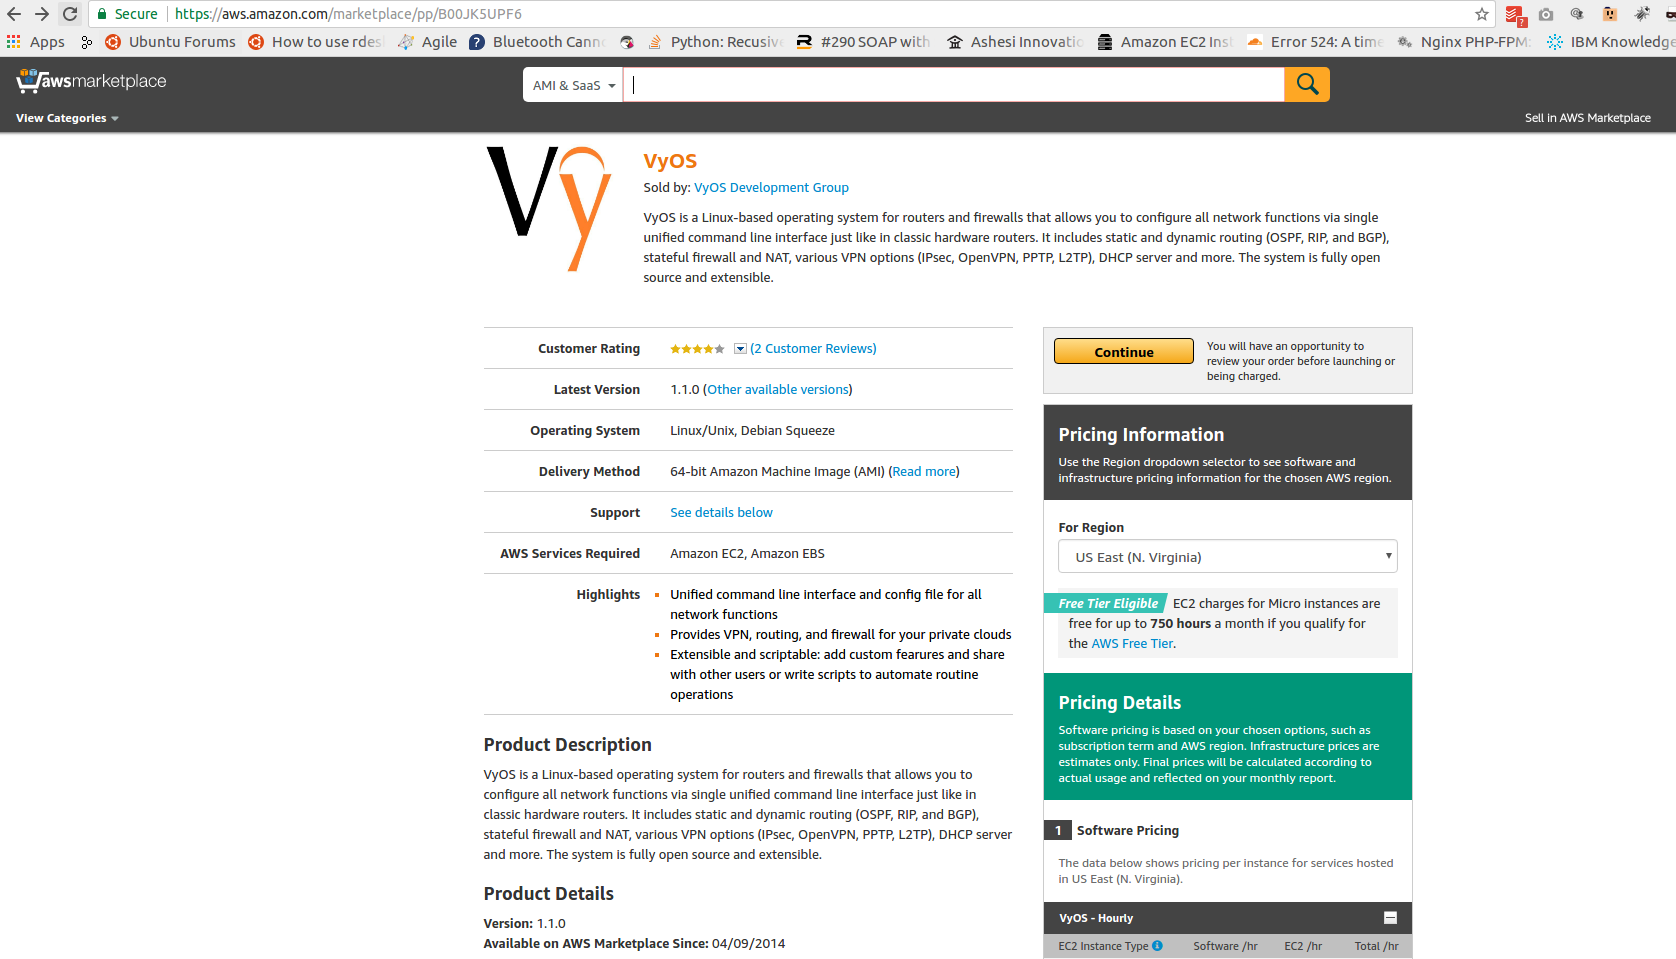
Let’s click on “Continue” button to configure our VyOS box
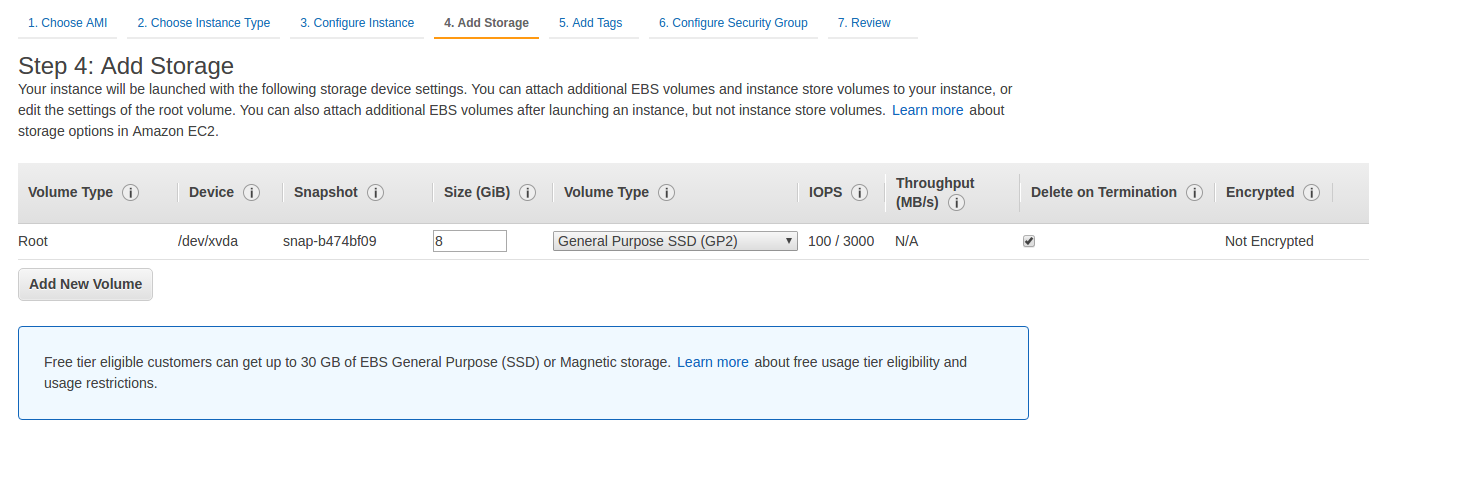
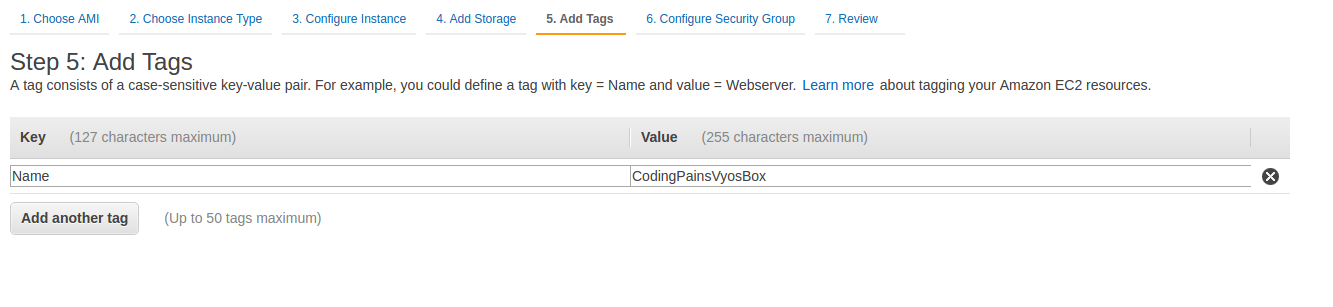
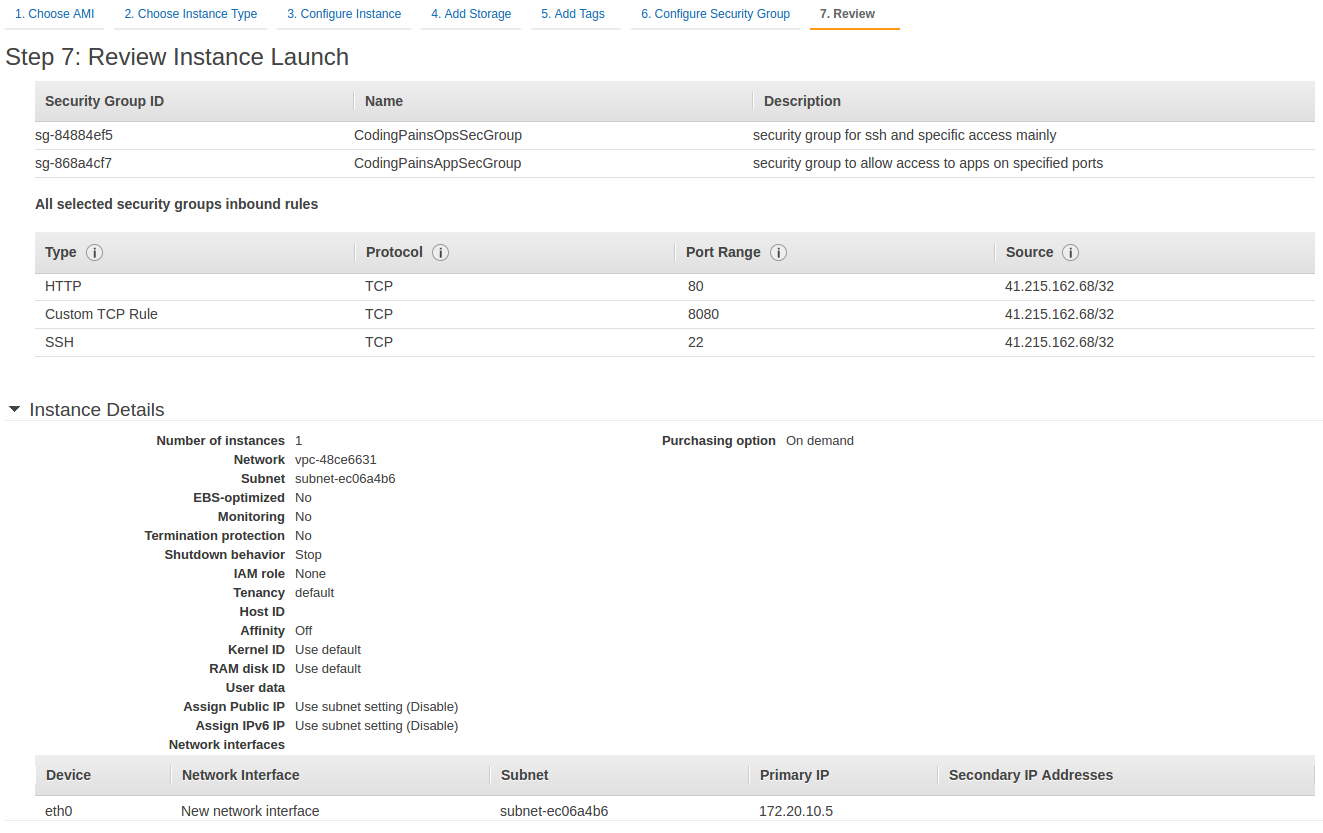
We will be using the “Manual” installation option and below are the settings for each section
|
1 2 3 4 5 6 7 8 |
Version = 1.1.0 Region = Virginia (this could be different for you) EC2 Instance Type = t2.micro VPC Settings VPC = 172.0.0.0/16 VPC subnet = 172.0.0.0/24 (our public subnet) Security Group = CodingpainsVPNBoxSecGroup & CondingpainsOpsSecGroup KeyPair = codingpainsvpn |
Your steps through the wizard should be looking like images below and Oh, it will cost you about $9/month. But you can like me kill this as soon as the experiment is completed at the end of the part 3 of the article

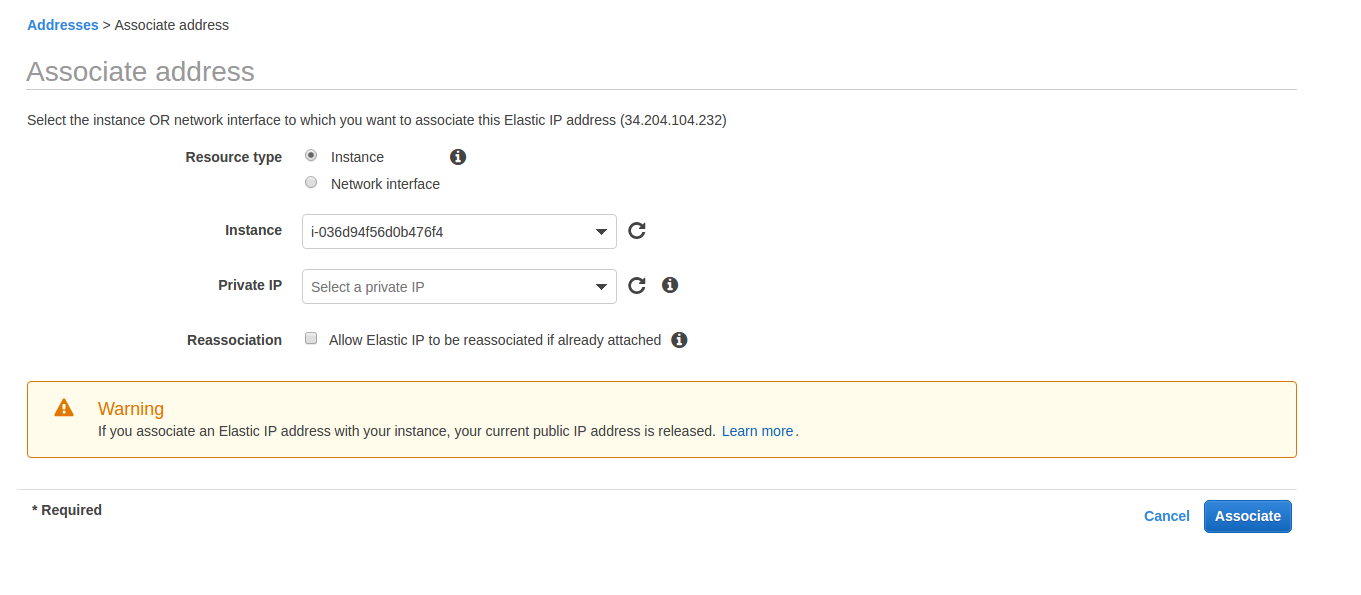
Assigning static IP
Now that our box is up, we will need to assign its public static IP to it. In the Elastic IPs page, right click the IP > click on associate address > choose the Vyos instance on the page like shown below
Upgrading VyOS
We will need to login to the box and attempt and upgrade from version 1.1.0 that was available on the marketplace. From the listing on vyos release page the version 1.1.7 is the latest at the time of writing this tutorial.
let’s log in
|
1 2 3 4 |
ssh -i condinpainsvpn.pem vyos@34.204.104.232 The authenticity of host '34.204.104.232 (34.204.104.232)' can't be established. RSA key fingerprint is SHA256:Ux6E3whud5HhWGD0Nk/VWGGF3L/T1bFWHoAEJIx7bdo. Are you sure you want to continue connecting (yes/no)? yes |
Let’s start the upgrade
|
1 2 3 4 5 6 7 8 9 10 11 12 13 14 15 16 17 18 19 20 21 22 23 24 25 26 27 28 29 30 31 32 33 34 35 36 37 38 |
vyos@VyOS-AMI:~$ add system image http://packages.vyos.net/iso/release/1.1.7/vyos-1.1.7-amd64.iso Trying to fetch ISO file from http://packages.vyos.net/iso/release/1.1.7/vyos-1.1.7-amd64.iso % Total % Received % Xferd Average Speed Time Time Time Current Dload Upload Total Spent Left Speed 100 234M 100 234M 0 0 7214k 0 0:00:33 0:00:33 --:--:-- 8841k ISO download succeeded. Checking for digital signature file... % Total % Received % Xferd Average Speed Time Time Time Current Dload Upload Total Spent Left Speed 100 836 100 836 0 0 5422 0 --:--:-- --:--:-- --:--:-- 10857 Found it. Checking digital signature... gpg: Signature made Wed Feb 17 13:37:47 2016 UTC using RSA key ID A0FE6D7E gpg: Can't check signature: public key not found Signature check FAILED. Do you want to continue anyway? (yes/no) [no] yes OK. Proceeding with installation anyway. Checking MD5 checksums of files on the ISO image...OK. Done! What would you like to name this image? [VyOS-1.1.7]: OK. This image will be named: VyOS-1.1.7 Installing "VyOS-1.1.7" image. Copying new release files... Would you like to save the current configuration directory and config file? (Yes/No) [Yes]: yes Copying current configuration... Would you like to save the SSH host keys from your current configuration? (Yes/No) [Yes]: yes Copying SSH keys... Setting up grub configuration... Installing on VyOS AMI Done. |
We will need to reboot the node in order to have the new image running
|
1 2 3 4 5 6 7 8 9 10 11 12 |
show system image The system currently has the following image(s) installed: 1: VyOS-1.1.7 (default boot) 2: 1.1.0 (running image) vyos@VyOS-AMI:~$ reboot Proceed with reboot? (Yes/No) [No] yes Broadcast message from root@VyOS-AMI (pts/2) (Sun Jun 18 18:35:32 2017): The system is going down for reboot NOW! |
After a reboot this is what we have
|
1 2 3 4 5 |
vyos@VyOS-AMI:~$ show system image The system currently has the following image(s) installed: 1: VyOS-1.1.7 (default boot) (running image) 2: 1.1.0 |
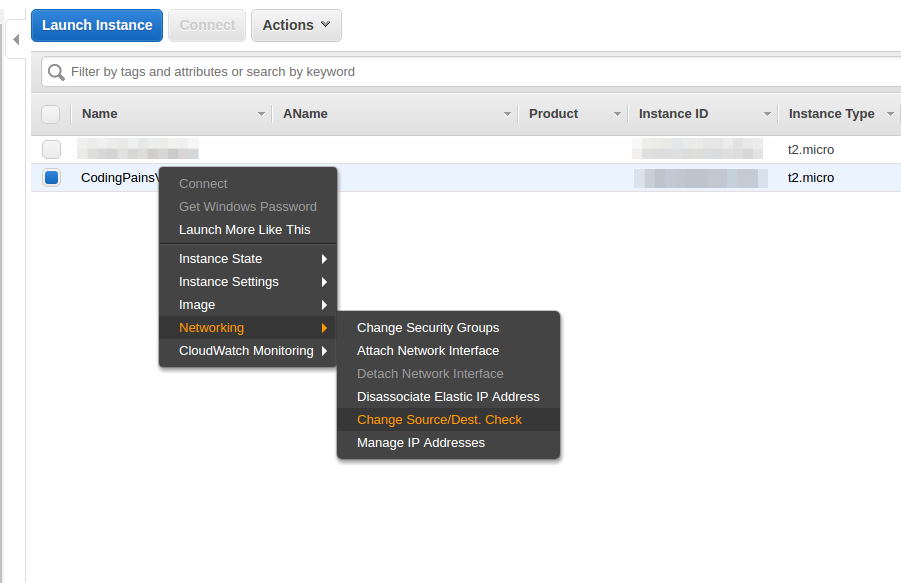
Prepare VyOS box
On aws as well, we needed to allow free flow of packet on the VyOS node
How to disable Source and Destination check on aws is just few click away. When you locate the not from the aws console right right > networking > change src/dest check > Click on Disable.
Create 2 boxes behind VyOS
In order to simulate a multi tunnel VPN I needed to have a more realistic scenario where it’s not always the case where full /24 or /20 network is allowed as encryption domain. To do that let’s create 2 boxes t2.nano boxes to act like applications behind the VyOS box. They will be called codingpains-1 codingpains-2. Below are images of Aws instance summary page to give you an idea. I have specified the private IPs while creating the instances so we have
172.20.0.10 and 172.20.10.5

Setting up codingpains 1 app box
Here again we will use nginx for simple simulation. Nginx will be running on the default port , we will just modify the default index.nginx-debian.html page with our own below
|
1 2 3 4 5 6 7 8 9 10 11 12 13 14 15 16 17 18 |
<!doctype html> <title>AWS App</title> <style> body { text-align: center; padding: 150px; } h1 { font-size: 50px; } body { font: 20px Helvetica, sans-serif; color: #333; } article { display: block; text-align: left; width: 650px; margin: 0 auto; } a { color: #dc8100; text-decoration: none; } a:hover { color: #333; text-decoration: none; } </style> <article> <h1>AWS codingpains-1 App</h1> <div> <p>This means Azure App is up and working</p> <p>— The killer Team</p> </div> </article> |
Let’s install nginx
|
1 2 3 4 5 6 7 8 9 10 11 12 13 14 15 16 17 18 19 20 21 22 23 |
ubuntu@ip-172-20-0-10:~$ sudo apt-get update && sudo apt-get upgrade -y ubuntu@ip-172-20-0-10:~$ sudo apt-get install nginx -y //edit the index.nginx-debian.html file with the html content above ubuntu@ip-172-20-0-10:~$ sudo nano /var/www/html/index.nginx-debain.html ubuntu@ip-172-20-0-10:~$ curl http://localhost <!doctype html> <title>AWS App</title> <style> body { text-align: center; padding: 150px; } h1 { font-size: 50px; } body { font: 20px Helvetica, sans-serif; color: #333; } article { display: block; text-align: left; width: 650px; margin: 0 auto; } a { color: #dc8100; text-decoration: none; } a:hover { color: #333; text-decoration: none; } </style> <article> <h1>AWS codingpains-1 App</h1> <div> <p>This means Azure App is up and working</p> <p>— The killer Team</p> </div> </article> |
Setting up codingpains 2 app box
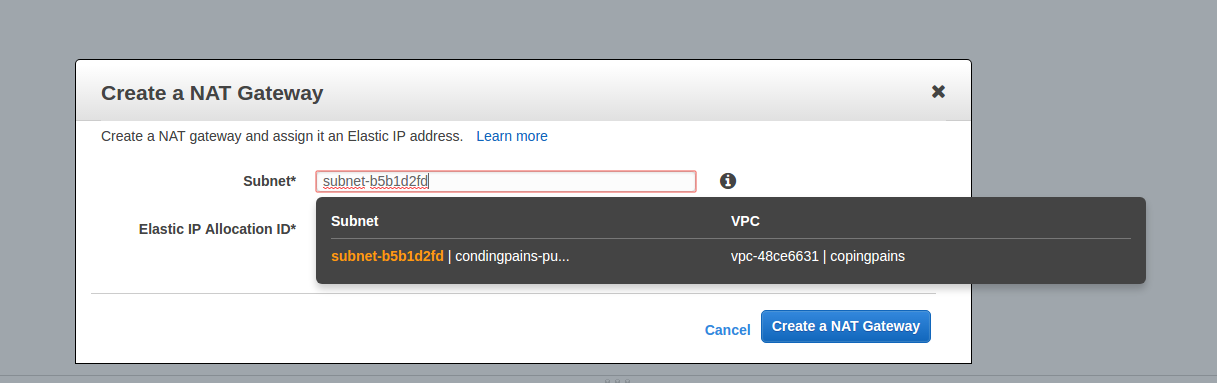
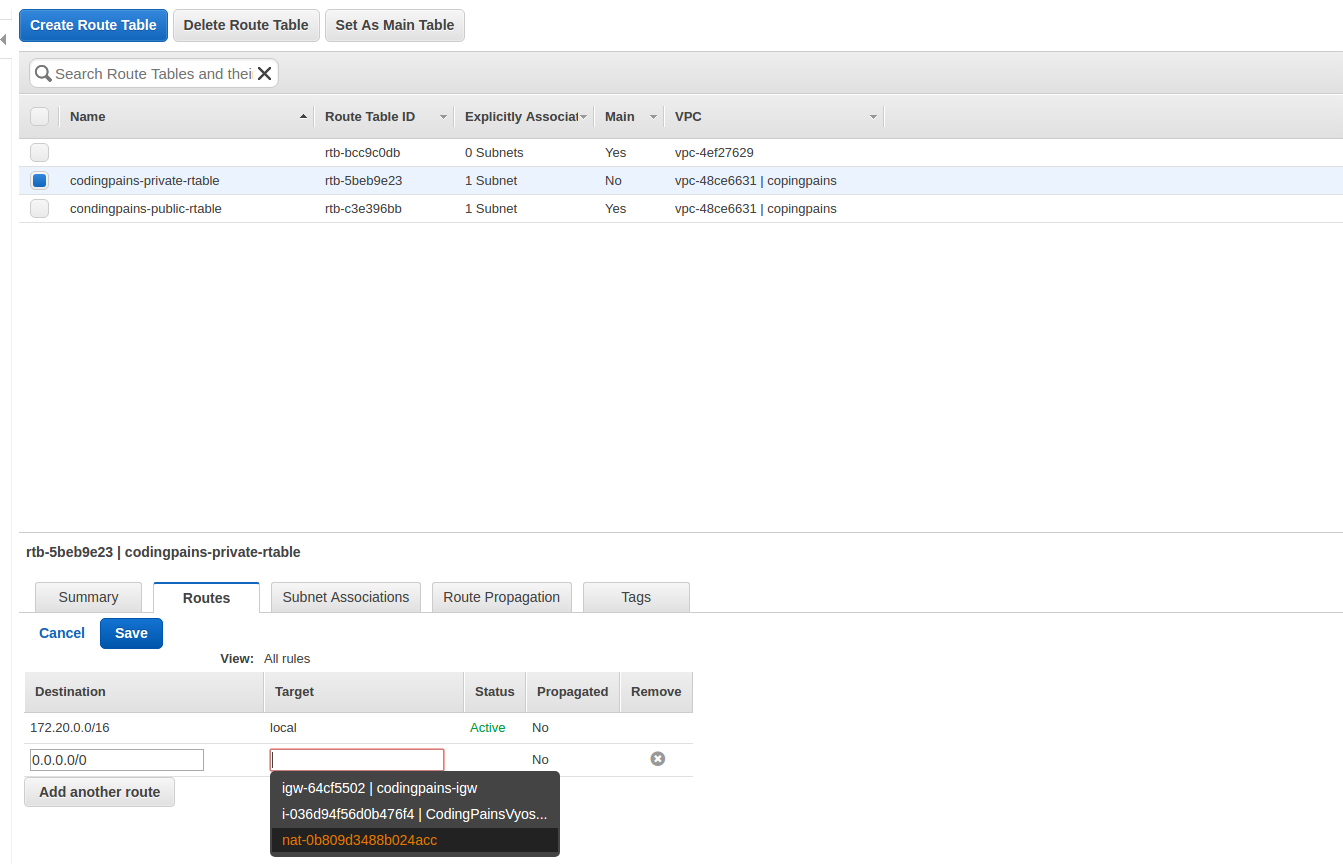
Since this box is not in a public subnet, it can’t be reached as it doesn’t have any public IP. The only way is to use the codingpains-1 box to get there. But again, codingpains-2 won’t know how to make outbound connection to some repos to get nginx installed. For that we needed to have a NAT gateway and assign it to the public subnet, then create a route table rule to forward all outbound request to it. Obviously the NAT gateway would need a static ip and that can be done on the fly while creating the NAT gateway
I have copied the pem key to codingpains-1 box so I can login using the command below
|
1 2 3 4 5 6 7 8 9 10 11 12 |
ubuntu@ip-172-20-0-10:~$ ssh -i codingpains.pem ubuntu@172.20.10.5 // After successful login the notice hostname will change below // I did some internet connectivity ubuntu@ip-172-20-10-5:~$ ping cnn.com PING cnn.com (151.101.1.67) 56(84) bytes of data. 64 bytes from 151.101.1.67: icmp_seq=1 ttl=50 time=3.38 ms 64 bytes from 151.101.1.67: icmp_seq=2 ttl=50 time=2.57 ms ^C --- cnn.com ping statistics --- ubuntu@ip-172-20-10-5:~$ sudo apt-get update && sudo apt-get upgrade -y ubuntu@ip-172-20-10-5:~$ sudo apt-get install nginx -y ubuntu@ip-172-20-10-5:~$ sudo mkdir /var/www/codingpains |
I have a similar configuration like other boxes having nginx to run on port 8080 this time around. Our html and default vhost files are shown below, we will set them up and test them
|
1 2 3 4 5 6 7 8 9 10 11 12 13 14 15 16 17 18 |
<!doctype html> <title>AWS App</title> <style> body { text-align: center; padding: 150px; } h1 { font-size: 50px; } body { font: 20px Helvetica, sans-serif; color: #333; } article { display: block; text-align: left; width: 650px; margin: 0 auto; } a { color: #dc8100; text-decoration: none; } a:hover { color: #333; text-decoration: none; } </style> <article> <h1>AWS codingpains-2 App</h1> <div> <p>This means Azure App is up and working</p> <p>— The killer Team</p> </div> </article> |
|
1 2 3 4 5 6 7 8 9 10 11 12 |
server { listen 8080; server_name _; root /var/www/codingpains; index index.html; location / { try_files $uri $uri/ =404; } } |
Let’s head to part 2 to install openswan on azure