Introduction to Ansible
Hello There,
This is the first article of the series on configuration management with Ansible. I hope this will give you hands on real practice time , working knowledge with Ansible
Using Ansible
Now that we have our default inventory and our infrastructure defined in the mother article, let’s see what we can do with Ansible. Let’s make sure both nodes can be pinged manually on their hostonly IP. We can actually do the pinging using ansible:
|
1 2 3 4 5 6 7 8 9 10 11 12 13 14 |
$ $ ansible all -m ping -u vagrant -s -k The authenticity of host '172.24.14.100 (172.24.14.100)' can't be established. ECDSA key fingerprint is ef:63:2f:70:94:33:24:53:4d:91:75:65:24:78:a4:2c. Are you sure you want to continue connecting (yes/no)? yes 172.24.14.105 | success >> { "changed": false, "ping": "pong" } 172.24.14.100 | success >> { "changed": false, "ping": "pong" } |
Let’s explained that just happened.
Ubuntu the OS I am running on requires a gentlemen handshake between itself and any other guy (nodes) I am trying to do any ssh business with. So I have been prompted to accept the other guy’s Key. So my Ubuntu adds the other guy’s key to it knowns_hosts file so it knows that node 172.24.14.100 is a familiar face so we can do business together. You might be wondering why it didn’t do the same for node 105… well it’s because I made some mistakes so I had to verify few things for the 105 before running the show 😛 so I have already added the key for 105… basically.
On the command front below is what we have passed as arguments.
- all: this targets all nodes in the default inventory file /etc/ansible/hosts
- -m: this is a module switch telling Ansible that we are using ping module
- -u: this is the username switch telling Ansible to use the passed username to connect to the node
- -s: this is the sudo mode switch
- -k: this is the password switch to make Ansible prompt for password of the target nodes. Ansible prefers ssh key based authentication though. So we will get to that
So with our ping, our nodes happily responded with pong through Ansible. This was easy but there is nothing to be excited about. Let’s do a little more interesting job. Let’s use 2 modules : apt and shell.
Using apt module
using Ansible apt module we will be install unzip on both machines with one command. So assuming you have 1000 nodes , this is still done in one command.
|
1 2 3 4 5 6 7 8 9 10 11 12 13 14 |
$ $ ansible all -u vagrant -s -k -m apt -a 'pkg=unzip update_cache=true state=installed' SSH password: 172.24.14.105 | success >> { "changed": true, "stderr": "", "stdout": "Reading package lists...\nBuilding dependency tree...\nReading state information...\nSuggested packages:\n zip\nThe following NEW packages will be installed:\n unzip\n0 upgraded, 1 newly installed, 0 to remove and 101 not upgraded.\nNeed to get 157 kB of archives.\nAfter this operation, 391 kB of additional disk space will be used.\nGet:1 http://archive.ubuntu.com/ubuntu/ trusty-updates/main unzip amd64 6.0-9ubuntu1.3 [157 kB]\nFetched 157 kB in 1s (123 kB/s)\nSelecting previously unselected package unzip.\n(Reading database ... 60972 files and directories currently installed.)\nPreparing to unpack .../unzip_6.0-9ubuntu1.3_amd64.deb ...\nUnpacking unzip (6.0-9ubuntu1.3) ...\nProcessing triggers for mime-support (3.54ubuntu1.1) ...\nProcessing triggers for man-db (2.6.7.1-1ubuntu1) ...\nSetting up unzip (6.0-9ubuntu1.3) ...\n" } 172.24.14.100 | success >> { "changed": true, "stderr": "", "stdout": "Reading package lists...\nBuilding dependency tree...\nReading state information...\nSuggested packages:\n zip\nThe following NEW packages will be installed:\n unzip\n0 upgraded, 1 newly installed, 0 to remove and 101 not upgraded.\nNeed to get 157 kB of archives.\nAfter this operation, 391 kB of additional disk space will be used.\nGet:1 http://archive.ubuntu.com/ubuntu/ trusty-updates/main unzip amd64 6.0-9ubuntu1.3 [157 kB]\nFetched 157 kB in 1s (126 kB/s)\nSelecting previously unselected package unzip.\n(Reading database ... 60972 files and directories currently installed.)\nPreparing to unpack .../unzip_6.0-9ubuntu1.3_amd64.deb ...\nUnpacking unzip (6.0-9ubuntu1.3) ...\nProcessing triggers for mime-support (3.54ubuntu1.1) ...\nProcessing triggers for man-db (2.6.7.1-1ubuntu1) ...\nSetting up unzip (6.0-9ubuntu1.3) ...\n" } |
This will take some time to execute since it will be doing apt-get update (with the argument update_cache=true) on each of the nodes. Let’s see below values we have passed. We will skip those explained before unless it’s necessary.
- -m apt: we are using apt module
- -a ‘pkg=unzip udpate_cache=true state=installed’: The switch a is for passing the used module’s arguments. pkg is the package we are pointing out for Ansible to action on, update_cache=true is to trigger apt-get update on the node and state is to describe what we want Ansible to do with the pointed package.
Using shell module
Say we need to create same file inside every node. We can use the shell module and type our commands as if we are in some terminal.
|
1 2 3 4 5 |
$ $ ansible all -u vagrant -s -k -m shell -a 'touch /home/vagrant/ansible.txt' SSH password: 172.24.14.100 | success | rc=0 >> 172.24.14.105 | success | rc=0 >> |
Playing in the playbook Arena
We have see how helpful Ansible has been. It’s not too far from what we do form terminal. How about executing multiple tasks or even more complex functionalities. To do that, we will need playbooks.
It's important to mention here that playbooks and other instruction files of Ansible are mere yaml files.
Enough with command lines stuff which can still make us miss some steps when setting up complex requirements. Let’s give ourselves some challenge. Let’s use Ansible to download and install wordpress on the webserver and its database on the db server. This will mean we will use the playbook and play the following major tasks:
- Install Apache2 on web
- Install php on web
- Install mysql on db
- Download and setup wordpress on web
The above contains obviously some sub tasks and steps that might be missed when doing it manually. Let’s see how with the help of ansible we can make these tasks deterministic.
Install Apache 2 on web
Let’s start defining our playbook using apt module for the apache. Let’s create our wordpress_on_apache.yml file in ~/ansible/playbooks folder that we created for the purpose.
|
1 2 3 4 5 6 |
--- - hosts: webservers tasks: - name: Install Apache apt: pkg=apache2 update_cache=true state=installed sudo: true |
Please notice that the line 6 above has been highlighted for a reason. The sudo mode is activated so there is no need to pass the switch -s when calling the playbook.
|
1 2 3 4 5 6 7 8 9 10 11 12 13 14 |
$ $ ansible-playbook ~/ansible/playbooks/wordpress_on_apache.yml -u vagrant -k SSH password: PLAY [webservers] ************************************************************* GATHERING FACTS *************************************************************** ok: [172.24.14.100] TASK: [Install Apache] ******************************************************** changed: [172.24.14.100] PLAY RECAP ******************************************************************** 172.24.14.100 : ok=2 changed=1 unreachable=0 failed=0 |
Install php on web
Let’s edit our playbook to add the installation of php on the webserver. Let’s make sure you have the same playbook as shown below:
|
1 2 3 4 5 6 7 8 9 10 11 12 13 14 15 |
--- - hosts: webservers tasks: - name: Install Apache apt: pkg=apache2 update_cache=true state=installed - name: Install bunch of php packages apt: pkg={{ item }} update_cache=true state=installed with_items: - php5 - php5-cli - php5-curl - php5-mcrypt - php5-mysql - php5-gd sudo: true |
On the line 7 , we have used a templating engine syntax. Ok I will tell you what it is… Ansible is built on python so the templating engine that Ansible uses is not other than jinja2. So with the double brackets, we have defined a place holder using the looping syntax of nsible to loop through packages defined under with_items as a list. Let’s run it a see
|
1 2 3 4 5 6 7 8 9 10 11 12 13 14 15 16 17 |
$ $ ansible-playbook ~/ansible/playbooks/wordpress_on_apache.yml -u vagrant -k SSH password: PLAY [webservers] ************************************************************* GATHERING FACTS *************************************************************** ok: [172.24.14.100] TASK: [Install Apache] ******************************************************** ok: [172.24.14.100] TASK: [Install bunch of php package] ****************************************** changed: [172.24.14.100] => (item=php5,php5-cli,php5-curl,php5-mcrypt,php5-mysql,php5-gd) PLAY RECAP ******************************************************************** 172.24.14.100 : ok=3 changed=1 unreachable=0 failed=0 |
Install mysql on db
With retrospect, we will edit our playbook to install mysql-server on the db server and we will install mysql-client on both web and db nodes rather. let’s have our playbook look like below:
|
1 2 3 4 5 6 7 8 9 10 11 12 13 14 15 16 17 18 19 20 21 22 23 24 25 |
--- - hosts: webservers tasks: - name: Install Apache apt: pkg=apache2 update_cache=true state=installed - name: Install bunch of php packages apt: pkg={{ item }} update_cache=true state=installed with_items: - php5 - php5-cli - php5-curl - php5-mcrypt - php5-mysql - php5-gd - name: Install MySQL Client apt: pkg=mysql-client update_cache=true state=installed sudo: true - hosts: dbservers tasks: - name: Install MySQL Client apt: pkg=mysql-client update_cache=true state=installed - name: Install MySQL Server apt: pkg=mysql-server update_cache=true state=installed sudo: true |
We have defined a second host in our hosts list in the yaml file so whatever we instructed there gets applied to the pointed hosts. I could have used the loop syntax for the db node as well but chose not to in order to have a simpler dbservers section of the playbook. Running this new playbook should look like something below:
|
1 2 3 4 5 6 7 8 9 10 11 12 13 14 15 16 17 18 19 20 21 22 23 24 25 26 27 28 29 30 31 32 |
$ $ ansible-playbook ~/ansible/playbooks/wordpress_on_apache.yml -u vagrant -k SSH password: PLAY [webservers] ************************************************************* GATHERING FACTS *************************************************************** ok: [172.24.14.100] TASK: [Install Apache] ******************************************************** ok: [172.24.14.100] TASK: [Install bunch of php packages] ***************************************** ok: [172.24.14.100] => (item=php5,php5-cli,php5-curl,php5-mcrypt,php5-mysql,php5-gd) TASK: [Install MySQL Client] ************************************************** changed: [172.24.14.100] PLAY [dbservers] ************************************************************** GATHERING FACTS *************************************************************** ok: [172.24.14.105] TASK: [Install MySQL Client] ************************************************** changed: [172.24.14.105] TASK: [Install MySQL Server] ************************************************** changed: [172.24.14.105] PLAY RECAP ******************************************************************** 172.24.14.100 : ok=4 changed=1 unreachable=0 failed=0 172.24.14.105 : ok=3 changed=2 unreachable=0 failed=0 |
Download and Setup wordpress on web
Download worpress on web
In order to download wordpress , we will need to leverage on Ansible’s get_url module. Let’s check first where we can get the download url of the currently available version of wordpress. By checking on https://wordpress.org/download/, I get the latest zip url : https://wordpress.org/latest.zip. Let’s then adjust our playbook for this new task to take place:
|
1 2 3 4 5 6 7 8 9 10 11 12 13 14 15 16 17 18 19 20 21 22 23 24 25 26 27 |
--- - hosts: webservers tasks: - name: Install Apache apt: pkg=apache2 update_cache=true state=installed - name: Install bunch of php packages apt: pkg={{ item }} update_cache=true state=installed with_items: - php5 - php5-cli - php5-curl - php5-mcrypt - php5-mysql - php5-gd - name: Install MySQL Client apt: pkg=mysql-client update_cache=true state=installed - name: Download wordpress latest zip get_url: dest=/home/vagrant/wordpress-latest.zip url=https://wordpress.org/latest.zip sudo: true - hosts: dbservers tasks: - name: Install MySQL Client apt: pkg=mysql-client update_cache=true state=installed - name: Install MySQL Server apt: pkg=mysql-server update_cache=true state=installed sudo: true |
This should logically produce the a screen similar to the one below unless some monkeyfication took place along the line 😀
|
1 2 3 4 5 6 7 8 9 10 11 12 13 14 15 16 17 18 19 20 21 22 23 24 25 26 27 28 29 30 31 32 33 34 35 |
$ $ ansible-playbook ~/ansible/playbooks/wordpress_on_apache.yml -u vagrant -k SSH password: PLAY [webservers] ************************************************************* GATHERING FACTS *************************************************************** ok: [172.24.14.100] TASK: [Install Apache] ******************************************************** ok: [172.24.14.100] TASK: [Install bunch of php packages] ***************************************** ok: [172.24.14.100] => (item=php5,php5-cli,php5-curl,php5-mcrypt,php5-mysql,php5-gd) TASK: [Install MySQL Client] ************************************************** ok: [172.24.14.100] TASK: [Download wordpress latest zip] ***************************************** changed: [172.24.14.100] PLAY [dbservers] ************************************************************** GATHERING FACTS *************************************************************** ok: [172.24.14.105] TASK: [Install MySQL Client] ************************************************** ok: [172.24.14.105] TASK: [Install MySQL Server] ************************************************** ok: [172.24.14.105] PLAY RECAP ******************************************************************** 172.24.14.100 : ok=5 changed=1 unreachable=0 failed=0 172.24.14.105 : ok=3 changed=0 unreachable=0 failed=0 |
Setup wordpress on web
You might have noticed that I separated downloading and setting up of the web application. The reason is simple. We will use a simple web deployment process which is just copy and paste but we will need to take care of the MySQL user that wordpress itself will use to connect to the database server. We need to create that database as well as prepare Ansible to contact our MySQL server. According to documentation , Ansible uses the python-mysqldb driver.
The MySQL server installed by Ansible has a little special case. It installs with default root user with no password. It’s done so by design so we will need to use the mysql_user module to create the right root user. That mysql_user module uses login_user and login_password parameters for authentication. Now it uses the default root with empty passwords or read from the my.cnf file.
Since I am not really comfortable putting username and password in the my.cnf file, I will have to find another solution. It’s a simple one though. I will use the mysql_user module to delete the mysql empty user and then check whether that failed or not. I have not provided login_user nor login_password so it will assume the root password has not changed.
If this tasks of deleting empty user has run successfully then it means the task that sets our root with password has not been run so task for setting password for root user should then run.
If the deleting of the empty user task fails then our root with password is set and different from empty string so Ansible won’t run that tasks again.
We have also already downloaded the wordpress zip when we run the playbook again, it won’t try to download it again as far as the destination file exists. But if you are some paranoia guy like K and still want to check by yourself, you might want to use stat module for that. This is just to show how we can handle some of our concerns through Ansible as if we are manually typing commands the old way in a terminal. With the stat module we test if the path exists. If it does exist then our downloading task will be skipped. Below is our new playbook. When run, it will prompt for the new root password of the MySQL
|
1 2 3 4 5 6 7 8 9 10 11 12 13 14 15 16 17 18 19 20 21 22 23 24 25 26 27 28 29 30 31 32 33 34 35 36 37 38 39 40 41 42 43 44 45 46 47 48 |
--- - hosts: webservers tasks: - name: Install Apache apt: pkg=apache2 update_cache=true state=installed - name: Install bunch of php packages apt: pkg={{ item }} update_cache=true state=installed with_items: - php5 - php5-cli - php5-curl - php5-mcrypt - php5-mysql - php5-gd - name: Install MySQL Client apt: pkg=mysql-client update_cache=true state=installed - name: Checking if file already exists stat: path=/home/vagrant/wordpress-latest.zip register: wordpress_file - name: Download wordpress latest zip get_url: dest=/home/vagrant/wordpress-latest.zip url=https://wordpress.org/latest.zip when: wordpress_file.stat.exists != true sudo: true - hosts: dbservers tasks: - name: Install MySQL Components apt: pkg={{ item }} update_cache=true state=installed with_items: - mysql-client - mysql-server - python-mysqldb - name: delete anonymous mysql user mysql_user: name="" state=absent register: command_result ignore_errors: true - name: install Percona Root user mysql_user: name=root host={{ item }} password={{ mysql_root_password }} login_user=root login_password= when: command_result|success with_items: - 127.0.0.1 - ::1 - localhost vars_prompt: - name: "mysql_root_password" prompt: "Please enter the root password" private: yes sudo: true |
Upon first run we should be having some output similar to below:
|
1 2 3 4 5 6 7 8 9 10 11 12 13 14 15 16 17 18 19 20 21 22 23 24 25 26 27 28 29 30 31 32 33 34 35 36 37 38 39 40 41 42 43 44 |
$ $ansible-playbook ~/ansible/playbooks/wordpress_on_apache.yml -u vagrant -k SSH password: Please enter the root password: PLAY [webservers] ************************************************************* GATHERING FACTS *************************************************************** ok: [172.24.14.100] TASK: [Install Apache] ******************************************************** ok: [172.24.14.100] TASK: [Install bunch of php packages] ***************************************** ok: [172.24.14.100] => (item=php5,php5-cli,php5-curl,php5-mcrypt,php5-mysql,php5-gd) TASK: [Install MySQL Client] ************************************************** ok: [172.24.14.100] TASK: [Checking if file already exists] *************************************** ok: [172.24.14.100] TASK: [Download wordpress latest zip] ***************************************** skipping: [172.24.14.100] PLAY [dbservers] ************************************************************** GATHERING FACTS *************************************************************** ok: [172.24.14.105] TASK: [Install MySQL Components] ********************************************** ok: [172.24.14.105] => (item=mysql-client,mysql-server,python-mysqldb) TASK: [delete anonymous mysql user] ******************************************* ok: [172.24.14.105] TASK: [install Percona Root user] ********************************************* changed: [172.24.14.105] => (item=127.0.0.1) changed: [172.24.14.105] => (item=::1) changed: [172.24.14.105] => (item=localhost) PLAY RECAP ******************************************************************** 172.24.14.100 : ok=5 changed=0 unreachable=0 failed=0 172.24.14.105 : ok=4 changed=1 unreachable=0 failed=0 |
As per output, we have skipped the task on line 23 for wordpress download, and then our hosts for root have been installed on lines 37-39. Let’s run it again and see what will happen:
|
1 2 3 4 5 6 7 8 9 10 11 12 13 14 15 16 17 18 19 20 21 22 23 24 25 26 27 28 29 30 31 32 33 34 35 36 37 38 39 40 41 42 43 44 45 46 |
$ $ ansible-playbook ~/ansible/playbooks/wordpress_on_apache.yml -u vagrant -k SSH password: Please enter the root password: PLAY [webservers] ************************************************************* GATHERING FACTS *************************************************************** ok: [172.24.14.100] TASK: [Install Apache] ******************************************************** ok: [172.24.14.100] TASK: [Install bunch of php packages] ***************************************** ok: [172.24.14.100] => (item=php5,php5-cli,php5-curl,php5-mcrypt,php5-mysql,php5-gd) TASK: [Install MySQL Client] ************************************************** ok: [172.24.14.100] TASK: [Checking if file already exists] *************************************** ok: [172.24.14.100] TASK: [Download wordpress latest zip] ***************************************** skipping: [172.24.14.100] PLAY [dbservers] ************************************************************** GATHERING FACTS *************************************************************** ok: [172.24.14.105] TASK: [Install MySQL Components] ********************************************** ok: [172.24.14.105] => (item=mysql-client,mysql-server,python-mysqldb) TASK: [delete anonymous mysql user] ******************************************* failed: [172.24.14.105] => {"failed": true} msg: unable to connect to database, check login_user and login_password are correct or ~/.my.cnf has the credentials ...ignoring TASK: [install Percona Root user] ********************************************* skipping: [172.24.14.105] => (item=127.0.0.1) skipping: [172.24.14.105] => (item=::1) skipping: [172.24.14.105] => (item=localhost) PLAY RECAP ******************************************************************** 172.24.14.100 : ok=5 changed=0 unreachable=0 failed=0 172.24.14.105 : ok=5 changed=0 unreachable=0 failed=0 |
According to the experiment we still have your skipped task on line 23, we have also ignored our mysql user task on 36 and skipped the hosts from line 39 to 41. Let’s now create our wordpress user: wp_user and our wordpress database wp_db.
In normal circumstances we would have logged into MySQL and create the wp_user with its privileges like shown below but don’t do it though, we will have Ansible handle that:
|
1 2 |
mysql> create database wp_db; mysql> GRANT ALL PRIVILEGES ON wp_db.* TO 'wp_user'@'localhost' IDENTIFIED BY 'wppassword'; |
The equivalent in Ansible of the statement above is shown below but with Ansible, we handle the login to MySQL database as well that’s why you can still see loging_user and login_password:
|
1 2 3 4 |
- name: install Mysql wordpress database mysql_db: name=wp_db state=present login_user=root login_password={{ mysql_root_password }} - name: install Mysql wordpress user mysql_user: name=wp_user priv=wp_db.*:ALL host=localhost password={{ mysql_wp_password }} login_user=root login_password={{ mysql_root_password }} |
The full playbook as to this current state of our road to our wordpress installation should look like the following:
|
1 2 3 4 5 6 7 8 9 10 11 12 13 14 15 16 17 18 19 20 21 22 23 24 25 26 27 28 29 30 31 32 33 34 35 36 37 38 39 40 41 42 43 44 45 46 47 48 49 50 51 52 |
--- - hosts: webservers tasks: - name: Install Apache apt: pkg=apache2 update_cache=true state=installed - name: Install bunch of php packages apt: pkg={{ item }} update_cache=true state=installed with_items: - php5 - php5-cli - php5-curl - php5-mcrypt - php5-mysql - php5-gd - name: Install MySQL Client apt: pkg=mysql-client update_cache=true state=installed - name: Checking if file already exists stat: path=/home/vagrant/wordpress-latest.zip register: wordpress_file - name: Download wordpress latest zip get_url: dest=/home/vagrant/wordpress-latest.zip url=https://wordpress.org/latest.zip when: wordpress_file.stat.exists != true sudo: true - hosts: dbservers tasks: - name: Install MySQL Components apt: pkg={{ item }} update_cache=true state=installed with_items: - mysql-client - mysql-server - python-mysqldb - name: delete anonymous mysql user mysql_user: name="" state=absent register: command_result ignore_errors: true - name: install Mysql Root user mysql_user: name=root host={{ item }} password={{ mysql_root_password }} login_user=root login_password= when: command_result|success with_items: - 127.0.0.1 - ::1 - localhost - name: install Mysql wordpress database mysql_db: name=wp_db state=present login_user=root login_password={{ mysql_root_password }} - name: install Mysql wordpress user mysql_user: name=wp_user priv=wp_db.*:ALL host=localhost password={{ mysql_wp_password }} login_user=root login_password={{ mysql_root_password }} vars_prompt: - name: "mysql_root_password" prompt: "Please enter the root password" private: yes sudo: true |
Below shows how to run the above playbook as a new way of passing variables to the playbook has been introduced. Kindly notice that mysql_wp_password variable’s value has been passed through the extra argument switch -e.
|
1 2 3 4 5 6 7 8 9 10 11 12 13 14 15 16 17 18 19 20 21 22 23 24 25 26 27 28 29 30 31 32 33 34 35 36 37 38 39 40 41 42 43 44 45 46 47 48 49 50 51 52 |
$ $ ansible-playbook ~/ansible/playbooks/wordpress_on_apache.yml -u vagrant -k -e "mysql_wp_password=wppassword" SSH password: Please enter the root password: PLAY [webservers] ************************************************************* GATHERING FACTS *************************************************************** ok: [172.24.14.100] TASK: [Install Apache] ******************************************************** ok: [172.24.14.100] TASK: [Install bunch of php packages] ***************************************** ok: [172.24.14.100] => (item=php5,php5-cli,php5-curl,php5-mcrypt,php5-mysql,php5-gd) TASK: [Install MySQL Client] ************************************************** ok: [172.24.14.100] TASK: [Checking if file already exists] *************************************** ok: [172.24.14.100] TASK: [Download wordpress latest zip] ***************************************** skipping: [172.24.14.100] PLAY [dbservers] ************************************************************** GATHERING FACTS *************************************************************** ok: [172.24.14.105] TASK: [Install MySQL Components] ********************************************** ok: [172.24.14.105] => (item=mysql-client,mysql-server,python-mysqldb) TASK: [delete anonymous mysql user] ******************************************* failed: [172.24.14.105] => {"failed": true} msg: unable to connect to database, check login_user and login_password are correct or ~/.my.cnf has the credentials ...ignoring TASK: [install Mysql Root user] *********************************************** skipping: [172.24.14.105] => (item=127.0.0.1) skipping: [172.24.14.105] => (item=::1) skipping: [172.24.14.105] => (item=localhost) TASK: [install Mysql wordpress database] ************************************** changed: [172.24.14.105] TASK: [install Mysql wordpress user] ****************************************** changed: [172.24.14.105] PLAY RECAP ******************************************************************** 172.24.14.100 : ok=5 changed=0 unreachable=0 failed=0 172.24.14.105 : ok=6 changed=2 unreachable=0 failed=0 |
Let’s finally uncompress/unzip the wordpress package that we downloaded earlier. We will need to use creates argument of the unarchive module to prevent the overriding of the uncompressed files for subsequent run of the playbook. It’s also important to indicate here that unarchive depends on tar, unzip package an assumes they already exist on node. If you follow this post from its mother article then it will run as we have already used unzip package in one of our example. If that it’s not case then you might want to add unzip package before the unarchive package
|
1 2 3 4 5 6 7 8 9 10 11 12 13 14 15 |
#.... - name: Download wordpress latest zip get_url: dest=/home/vagrant/wordpress-latest.zip url=https://wordpress.org/latest.zip when: wordpress_file.stat.exists != true - name: Install Unzip package apt: pkg=unzip update_cache=true state=installed - name: Deploying wordpress unarchive: src="/home/vagrant/wordpress-latest.zip" dest={{ wordpress_dest_path }} copy=no creates={{ wordpress_dest_path_checker }} owner=www-data group=www-data mode=755 |
|
1 2 3 4 5 6 7 8 9 10 11 12 13 14 15 16 17 18 19 20 21 22 23 24 25 26 27 28 29 30 31 32 33 34 35 36 37 38 39 40 41 42 43 44 45 46 47 48 49 50 51 52 |
$ $ ansible-playbook ~/ansible/playbooks/wordpress_on_apache.yml -u vagrant -k -e "mysql_wp_password=wppassword wordpress_dest_path=/var/www/html/ wordpress_dest_path_checker=/var/www/html/wordpress" SSH password: Please enter the root password: PLAY [webservers] ************************************************************* GATHERING FACTS *************************************************************** ok: [172.24.14.100] TASK: [Install Apache] ******************************************************** ok: [172.24.14.100] TASK: [Install bunch of php packages] ***************************************** ok: [172.24.14.100] => (item=php5,php5-cli,php5-curl,php5-mcrypt,php5-mysql,php5-gd) TASK: [Install MySQL Client] ************************************************** ok: [172.24.14.100] TASK: [Download wordpress latest zip] ***************************************** ok: [172.24.14.100] TASK: [Install Unzip package] ************************************************* changed: [172.24.14.100] TASK: [Deploying wordpress] *************************************************** changed: [172.24.14.100] PLAY [dbservers] ************************************************************** GATHERING FACTS *************************************************************** ok: [172.24.14.105] TASK: [Install MySQL Components] ********************************************** ok: [172.24.14.105] => (item=mysql-client,mysql-server,python-mysqldb) TASK: [delete anonymous mysql user] ******************************************* failed: [172.24.14.105] => {"failed": true} msg: unable to connect to database, check login_user and login_password are correct or ~/.my.cnf has the credentials ...ignoring TASK: [install Mysql Root user] *********************************************** skipping: [172.24.14.105] => (item=127.0.0.1) skipping: [172.24.14.105] => (item=::1) skipping: [172.24.14.105] => (item=localhost) TASK: [install Mysql wordpress database] ************************************** ok: [172.24.14.105] TASK: [install Mysql wordpress user] ****************************************** ok: [172.24.14.105] #..... |
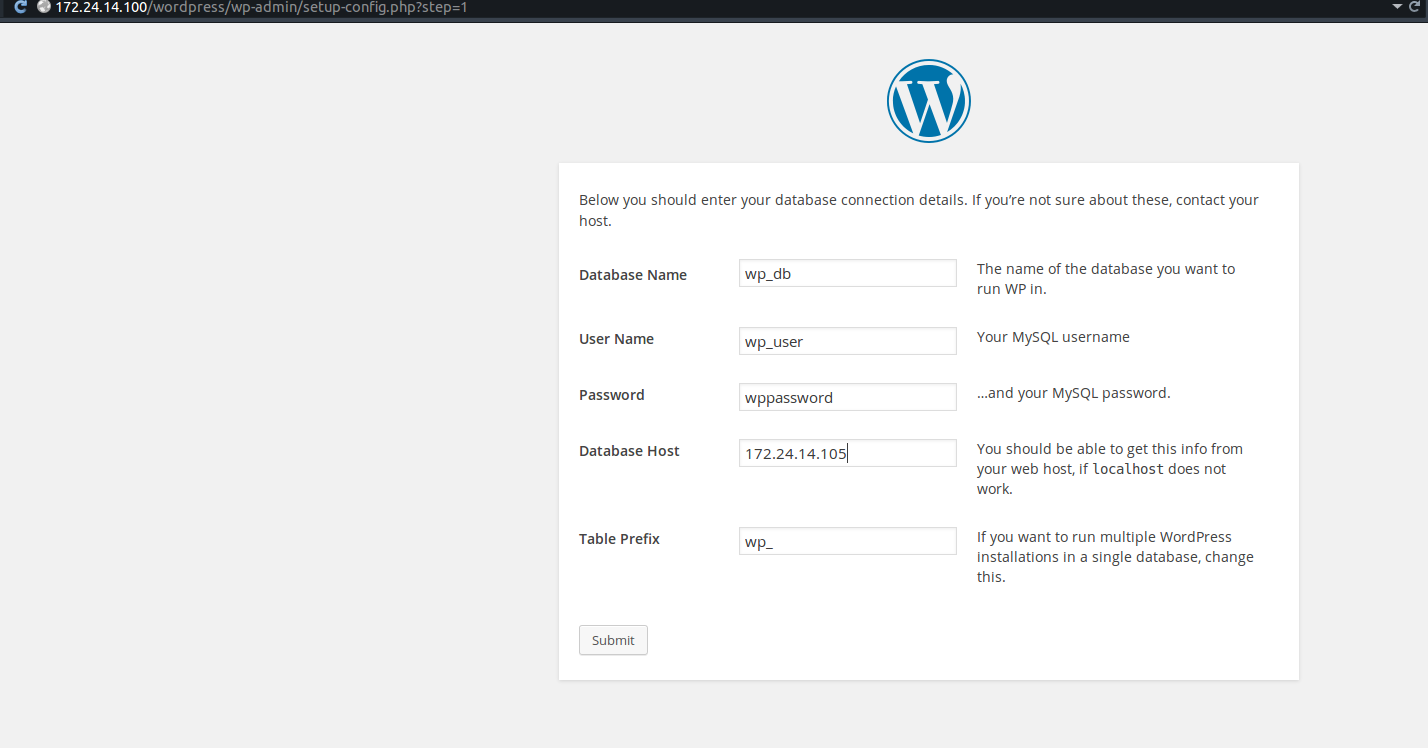
So far, we have not actually gone to check whether whatever we have been doing are not just lies to ourselves. At this point some verifications must happen. In the browser let’s go to the IP we have defined ourselves 172.24.14.100 this should show the usual apache 2 default page. Let’s then check on the wordpress folder : 172.24.14.100/wordpress . It should show you a wordpress welcome page with option for language. When clicked on continue button, it shows information about what you need to know for the installation to be completed successfully. That’s how we know on the web front we are safe :D. Let’s also follow the wordpress installation wizard to check whether we are safe on the db front too.
After clicking on submit I have seen a very nice failure message smiling at me. I have crossed checked all the parameters and they where all correct.
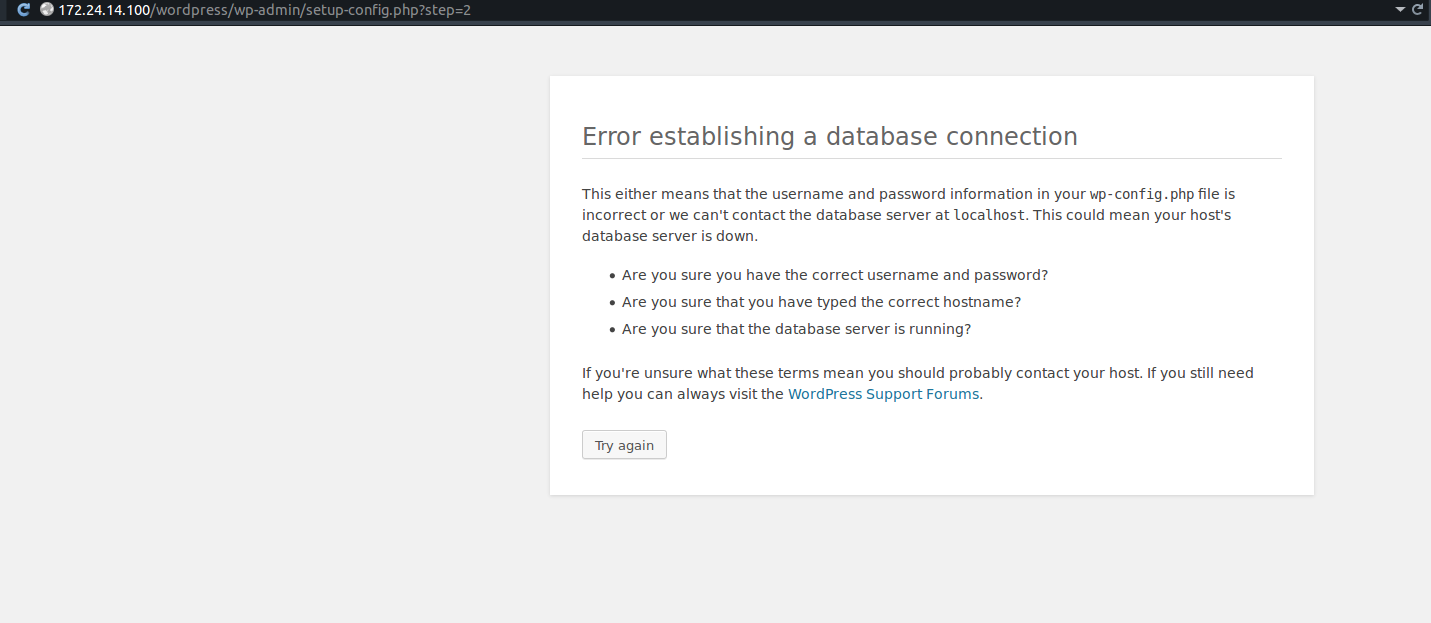
After pondering on this for a while , I checked pinging of 172.24.14.105 from 172.24.14.100 and it replied. I then tried to connect to mysql server on 172.24.14.105 from 172.24.14.100 and it bounced. So I went to check on the network settings of mysql server installed and just saw it doesn’t allow connection from anything else but loopback address 127.0.0.1 which is also localhost.
|
1 |
bind-address = 127.0.0.1 |
So we have identified 2 problems, first our wp_user is not allowed to connect from any host different from the server host, meanwhile the wordpress app which will use that user is on a different host: 172.24.14.100. The second issue is even if we have set that, we wouldn’t even be able to connect to the server because it doesn’t access any external connection.
let’s fix that. We will change the bind-address part and will add new host for the user wp_user with the following snippet:
|
1 2 3 4 5 6 7 8 9 10 11 12 13 14 15 16 17 18 19 |
#..... - name: install Mysql wordpress user mysql_user: name=wp_user priv=wp_db.*:ALL host={{ item }} password={{ mysql_wp_password }} login_user=root login_password={{ mysql_root_password }} with_items: - localhost - 172.24.14.100 - name: Openning our Mysql to the world replace: dest=/etc/mysql/my.cnf regexp="^bind-address.*" replace="#bind-address= 127.0.0.1" backup=yes notify: - Restart_Mysql #..... handlers: - name: Restart_Mysql service: name=mysql state=restarted sudo: true |
In the snippet above the host variable of the mysql_user module has changed to a placholder for a list item. We have also used the replace module to look for a particular beginning of a line of a file and replace that line with what is convenient for us. Then we have triggered and action with the keyword notify. That is a handler. Handlers are exactly like tasks, but where they differ is that they don’t run on their own as tasks would, instead they are called by other task(s). After changing our mysql network policy , we need to let mysql server itself know about it so it has to restart. That’s what our handler did for us. Below is how the full playbook should look like:
|
1 2 3 4 5 6 7 8 9 10 11 12 13 14 15 16 17 18 19 20 21 22 23 24 25 26 27 28 29 30 31 32 33 34 35 36 37 38 39 40 41 42 43 44 45 46 47 48 49 50 51 52 53 54 55 56 57 58 59 60 61 62 63 64 65 66 67 68 69 70 71 72 73 74 75 76 77 |
--- - hosts: webservers tasks: - name: Install Apache apt: pkg=apache2 update_cache=true state=installed - name: Install bunch of php packages apt: pkg={{ item }} update_cache=true state=installed with_items: - php5 - php5-cli - php5-curl - php5-mcrypt - php5-mysql - php5-gd - name: Install MySQL Client apt: pkg=mysql-client update_cache=true state=installed - name: Checking if file already exists stat: path=/home/vagrant/wordpress-latest.zip register: wordpress_file - name: Download wordpress latest zip get_url: dest=/home/vagrant/wordpress-latest.zip url=https://wordpress.org/latest.zip when: wordpress_file.stat.exists != true - name: Install Unzip package apt: pkg=unzip update_cache=true state=installed - name: Deploying wordpress unarchive: src="/home/vagrant/wordpress-latest.zip" dest={{ wordpress_dest_path }} copy=no creates={{ wordpress_dest_path_checker }} owner=www-data group=www-data mode=755 sudo: true - hosts: dbservers tasks: - name: Install MySQL Components apt: pkg={{ item }} update_cache=true state=installed with_items: - mysql-client - mysql-server - python-mysqldb - name: delete anonymous mysql user mysql_user: name="" state=absent register: command_result ignore_errors: true - name: install Mysql Root user mysql_user: name=root host={{ item }} password={{ mysql_root_password }} login_user=root login_password= when: command_result|success with_items: - 127.0.0.1 - ::1 - localhost - name: install Mysql wordpress database mysql_db: name=wp_db state=present login_user=root login_password={{ mysql_root_password }} - name: install Mysql wordpress user mysql_user: name=wp_user priv=wp_db.*:ALL host={{ item }} password={{ mysql_wp_password }} login_user=root login_password={{ mysql_root_password }} with_items: - localhost - 172.24.14.100 - name: Openning our Mysql to the world replace: dest=/etc/mysql/my.cnf regexp="^bind-address.*" replace="#bind-address= 127.0.0.1" backup=yes notify: - Restart_Mysql vars_prompt: - name: "mysql_root_password" prompt: "Please enter the root password" private: yes handlers: - name: Restart_Mysql service: name=mysql state=restarted sudo: true |
|
1 2 3 4 5 6 7 8 9 10 11 12 13 14 15 16 17 18 19 20 21 22 23 24 25 26 27 28 29 30 31 32 33 34 35 36 37 38 39 40 41 42 43 44 45 46 47 48 49 50 51 52 53 54 55 56 57 58 59 60 61 62 |
$ $ ansible-playbook ~/ansible/playbooks/wordpress_on_apache.yml -u vagrant -k -e "mysql_wp_password=wppassword wordpress_dest_path=/var/www/html/ wordpress_dest_path_checker=/var/www/html/wordpress" SSH password: Please enter the root password: PLAY [webservers] ************************************************************* GATHERING FACTS *************************************************************** ok: [172.24.14.100] TASK: [Install Apache] ******************************************************** ok: [172.24.14.100] TASK: [Install bunch of php packages] ***************************************** ok: [172.24.14.100] => (item=php5,php5-cli,php5-curl,php5-mcrypt,php5-mysql,php5-gd) TASK: [Install MySQL Client] ************************************************** ok: [172.24.14.100] TASK: [Checking if file already exists] *************************************** ok: [172.24.14.100] TASK: [Download wordpress latest zip] ***************************************** skipping: [172.24.14.100] TASK: [Install Unzip package] ************************************************* ok: [172.24.14.100] TASK: [Deploying wordpress] *************************************************** ok: [172.24.14.100] PLAY [dbservers] ************************************************************** GATHERING FACTS *************************************************************** ok: [172.24.14.105] TASK: [Install MySQL Components] ********************************************** ok: [172.24.14.105] => (item=mysql-client,mysql-server,python-mysqldb) TASK: [delete anonymous mysql user] ******************************************* failed: [172.24.14.105] => {"failed": true} msg: unable to connect to database, check login_user and login_password are correct or ~/.my.cnf has the credentials ...ignoring TASK: [install Mysql Root user] *********************************************** skipping: [172.24.14.105] => (item=127.0.0.1) skipping: [172.24.14.105] => (item=::1) skipping: [172.24.14.105] => (item=localhost) TASK: [install Mysql wordpress database] ************************************** ok: [172.24.14.105] TASK: [install Mysql wordpress user] ****************************************** ok: [172.24.14.105] => (item=localhost) changed: [172.24.14.105] => (item=172.24.14.100) TASK: [Openning our Mysql to the world] *************************************** changed: [172.24.14.105] NOTIFIED: [Restart_Mysql] ***************************************************** changed: [172.24.14.105] #...... |
Let’s resume our journey of installing wordpress, after these modifications, we should be fine. After retrying it we should be seeing a page similar to the one below:
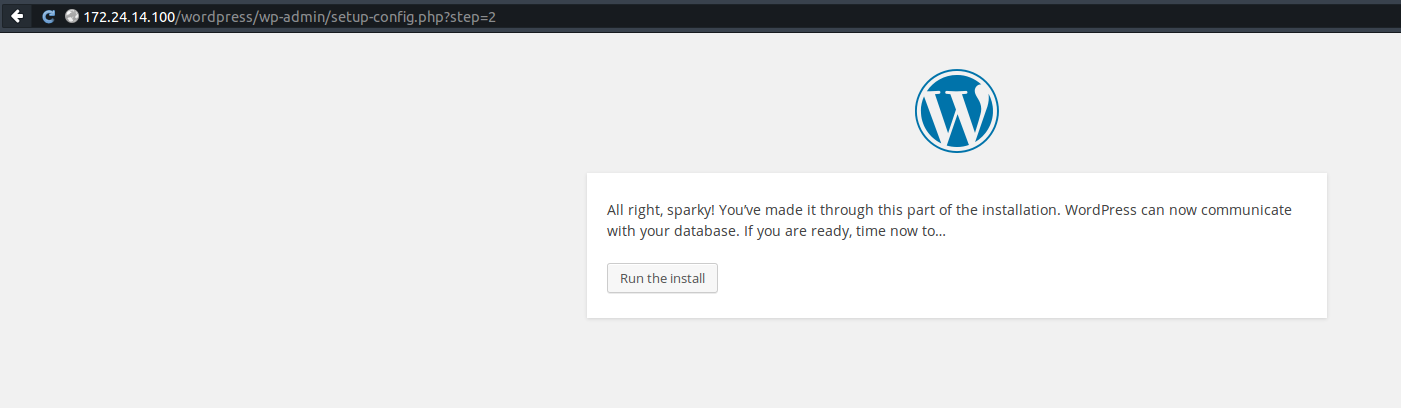
After 1 or 2 steps, we have wordpress installed
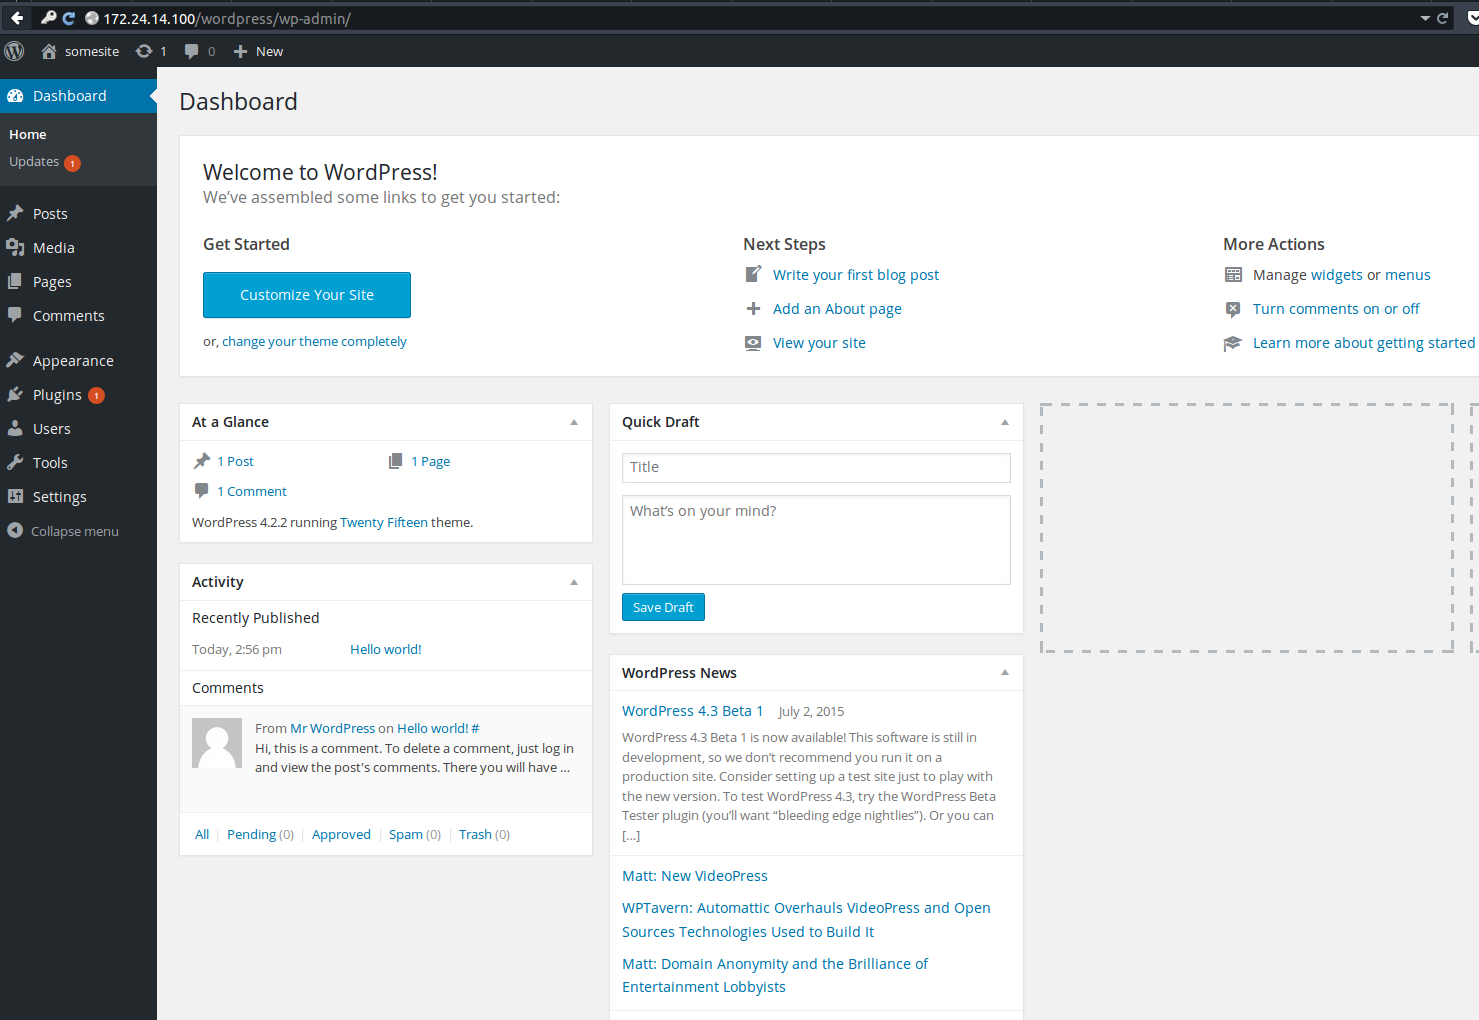
Voila folks, this has shown how powerful ansible is, we have taken some steps to simulate our flow,debugged it just like in real usage just like big boys. By the way, please don’t go brag anywhere that you know how to use ansible, we have barely scratched the surface of what ansible can do 😀 . In the next tutorial , we will try more advance concept of ansible thus of configuration management in general showing how to use roles, group_vars/host_vars. I hope you had fun and thanks to the Ansible IRC chat room folks, they have been of a great help 😉