Infrastructure as Code: Deployment to AWS using Terraform Part 2
In the part1 section of this tutorial series, I have taken time to explain how to set up Terraform to be working with AWS using AMI and creating a simple instance running as classic EC2.
This series aims to be a gentle walk-through of Terraform with full code available on git htttps://github.com/kdjomeda/intro-to-terraform.
In part 2, I will try to evolve the architecture a little bit and use a scenario that’s a bit close to reality. It will not be as detailed as in part1 and I will only highlight parts that I thought are important. The git branch for this part 2 is at https://github.com/kdjomeda/intro-to-terraform/tree/ec2-in-vpc
Creating a simple infra in a VPC
When you create a VPC from the wizard in AWS console a whole lot is done for you in the background. But when you are using the aws-cli to create it, it’s a bit more detailed compared to the console, but it gives you more control over the network. We will be creating a VPC with 2 public and 3 private subnets. Below are the VPC components to explicitly create when using CLI:
- Network Address range
- Subnet and their range
- Internet Gateway
- Optionally a Nat Gateway
- A routing table and its route for public traffic
- A routing table and its route for private traffic
- Routing table and subnets association
Our network CIDR will be 10.10.0.0/16 and below are the subnets we will be creating:
- public subnet in AZ A. cidr: 10.10.0.0/24
- public subnet in AZ B. cidr: 10.10.2.0/24
- private subnet in AZ A. cidr: 10.10.10.0/24
- private subnet in AZ B. cidr: 10.10.11.0/24
- private subnet in AZ C. cidr: 10.10.12.0/24
Creating the VPC
To create our subnets in different availability zones, we are going to need to use the hashicorp aws_availability_zones data source to pull the data from AWS
# main.tf
/**
    Using Terraform data source of type aws_availability_zones to
    pull the availability zones (AZs) that available in our AWS
    region.
*/
data "aws_availability_zones" "azones" {}

/**
  Creating our vpc with it's IP range.
  We enabled a vpc dns support
  We also enabled the dns hostname support
  Tags are also used to map the resource with specific groupings
*/
resource "aws_vpc" "terraform_vpc" {
  cidr_block = "10.10.0.0/16"
  enable_dns_hostnames = true
  enable_dns_support = true

  tags = {
    Name        = "handson_tutorial_terraform_vpc"  // this Name tag is what is displayed as name of the VPC
    Env         = "tutorial"
    Product     = "handson"
    Terraform   = true
  }
}
Creating the Internet Gateway
For our network to be accessible from internet we need to create an internet gateway in the vpc. We referred to the vpc id by using a resource interpolation [type(ie aws_vpc)].[name(terraform_vpc)].[attribute(id)]
#main.tf
//....
/**
  Creating an aws internet gateway to allow communicationn between the vpc and internet
  We launched it in the vpc using its id
*/
resource "aws_internet_gateway" "terraform_igw" {
  vpc_id = aws_vpc.terraform_vpc.id //This is a reference to the id of VPN which is known at runtime
  tags = {
    Name        = "handson_tutorial_terraform_vpc_igw"
    Env         = "tutorial"
    Product     = "handons"
    Terraform   = true
  }
}
Creating the Elastic IP to be used on the Nat Gateway
#main.tf
//....
/**
  This is the IP that will be attached to our NAT Gateway
  for outbounds calls for nodes in private subnets
*/
resource "aws_eip" "terraform_nat_eip" {
  vpc = true
  tags = {
    Name        = "handson_tutorial_terraform_nat_iep"
    Env         = "tutorial"
    Product     = "handson"
    Terraform   = true
  }
}
Creating a route table with a public route
#main.tf
//....


resource "aws_route_table" "terraform_public_route_table" {
  vpc_id = aws_vpc.terraform_vpc.id

  tags = {
    Name        = "handson_tutorial_terraform_public_rtable"
    Env         = "tutorial"
    Product     = "handons"
    Terraform   = true
  }
}

/**
  Creating a public route in the public route table
  This uses the internet gateway created above
*/
resource "aws_route" "terraform_public_route" {
  route_table_id = aws_route_table.terraform_public_route_table.id
  destination_cidr_block = "0.0.0.0/0"
  gateway_id = aws_internet_gateway.terraform_igw.id
}
Creating subnets and making it public
When creating a subnet in a vpc, unless you assign it a route table that has a public route, it can’t really be called public subnet
#main.tf
//....
/**
  Creating a subnet with it's IP range
  In our VPC using its id. Assigning the first availability
  name from our AZs data source to its AZ name.
  Note though its name says so,there is nothing public or private about it
*/
resource "aws_subnet" "terraform_public_subnet_a" {
  cidr_block = "10.10.0.0/24"
  vpc_id = aws_vpc.terraform_vpc.id
  availability_zone = data.aws_availability_zones.azones.names[0]
  map_public_ip_on_launch = true

  tags = {
    Name        = "handson_tutorial_terraform_public_subnet_a"
    Env         = "tutorial"
    Product     = "handons"
    Terraform   = true
  }
}

/**
  Creating a subnet with it's IP range
  In our VPC using its id. Assigning the second availability
  name from our AZs data source to its AZ name.
  Note though its name says so,there is nothing public or private about it
*/
resource "aws_subnet" "terraform_public_subnet_b" {
  cidr_block = "10.10.1.0/24"
  vpc_id = aws_vpc.terraform_vpc.id
  availability_zone = data.aws_availability_zones.azones.names[1]
  map_public_ip_on_launch = true

  tags = {
    Name        = "handson_tutorial_terraform_public_subnet_b"
    Env         = "tutorial"
    Product     = "handons"
    Terraform   = true
  }
}

/**
  Making public subnet A actually public
  by associating it with the public route table
*/
resource "aws_route_table_association" "terraform_public_subnet_a_rtable_assoc" {
  route_table_id = aws_route_table.terraform_public_route_table.id
  subnet_id = aws_subnet.terraform_public_subnet_a.id
}

/**
  Making public subnet B actually public
  by associating it with the public route table
*/
resource "aws_route_table_association" "terraform_public_subnet_b_rtable_assoc" {
  route_table_id = aws_route_table.terraform_public_route_table.id
  subnet_id = aws_subnet.terraform_public_subnet_b.id
}
Creating a NAT Gateway
For the NAT Gateway to do its work, it has to be located in a place where it has internet access itself. That’s why it wasn’t created immediately after the internet gateway was created. It needs to live inside a public subnet
/**
     Creating the NAT Gateway in a public subnet for it
     to have access to internet through the Internet Gateway
*/
resource "aws_nat_gateway" "terraform_nat_gtw" {
  allocation_id = aws_eip.terraform_nat_eip.id
  subnet_id = aws_subnet.terraform_public_subnet_a.id
}
Creating a route table with private route
#main.tf
//...

resource "aws_route_table" "terraform_private_route_table" {
  vpc_id = aws_vpc.terraform_vpc.id

  tags = {
    Name        = "handson_tutorial_terraform_private_rtable"
    Env         = "tutorial"
    Product     = "handons"
    Terraform   = true
  }
}

/**
  Creating a private route towards internet
  This uses the nat gateway created above
*/
resource "aws_route" "terraform_private_route" {
  route_table_id = aws_route_table.terraform_private_route_table.id
  nat_gateway_id = aws_nat_gateway.terraform_nat_gtw.id
  destination_cidr_block = "0.0.0.0/0"
}
creating subnets and making them private
#main.tf
//...

/**
  Creating a subnet meant to be associated with our private route table
  Making it a private subnet in the AZ index 0 thus AZ A
*/
resource "aws_subnet" "terraform_private_subnet_a" {
  cidr_block = "10.10.10.0/24"
  vpc_id = aws_vpc.terraform_vpc.id
  availability_zone = data.aws_availability_zones.azones.names[0]

  tags = {
    Name        = "handson_tutorial_terraform_private_subnet_a"
    Env         = "tutorial"
    Product     = "handons"
    Terraform   = true
  }
}

/**
  Making private subnet A actually private
  by associating it with the private route table
*/
resource "aws_route_table_association" "terraform_private_subnet_a_rtable_assoc" {
  route_table_id = aws_route_table.terraform_private_route_table.id
  subnet_id = aws_subnet.terraform_private_subnet_a.id
}
/**
  Creating a subnet meant to be associated with our private route table
  Making it a private subnet in the AZ index 0 thus AZ A
*/
resource "aws_subnet" "terraform_private_subnet_b" {
  cidr_block = "10.10.11.0/24"
  vpc_id = aws_vpc.terraform_vpc.id
  availability_zone = data.aws_availability_zones.azones.names[1]

  tags = {
    Name        = "handson_tutorial_terraform_private_subnet_b"
    Env         = "tutorial"
    Product     = "handons"
    Terraform   = true
  }
}

/**
  Making private subnet B actually private
  by associating it with the private route table
*/
resource "aws_route_table_association" "terraform_private_subnet_b_rtable_assoc" {
  route_table_id = aws_route_table.terraform_private_route_table.id
  subnet_id = aws_subnet.terraform_private_subnet_b.id
}
/**
  Creating a subnet meant to be associated with our private route table
  Making it a private subnet in the AZ index 0 thus AZ A
*/
resource "aws_subnet" "terraform_private_subnet_c" {
  cidr_block = "10.10.12.0/24"
  vpc_id = aws_vpc.terraform_vpc.id
  availability_zone = data.aws_availability_zones.azones.names[2]

  tags = {
    Name        = "handson_tutorial_terraform_private_subnet_c"
    Env         = "tutorial"
    Product     = "handons"
    Terraform   = true
  }
}

/**
  Making private subnet C actually private
  by associating it with the private route table
*/
resource "aws_route_table_association" "terraform_private_subnet_c_rtable_assoc" {
  route_table_id = aws_route_table.terraform_private_route_table.id
  subnet_id = aws_subnet.terraform_private_subnet_c.id
}
Creating an EC2 instance in the VPC
This time along, I will be using an Ubuntu node that I normally use for my production workload. Here the same principle applies. You need a security group, a public ssh key, etc. But since we want to create the instance inside a VPC, the security group obviously should be created in that same VPC. The Id of the subnet we want the node to be created in is used and the attribute we used for assigning the security_group in part 1 of this series is different from the vpc_security_group_ids used now.
<# main.tf
//.....
/**
    Creating an security group allowing aside from the standard ssh port,
    http and http ports.
*/
resource "aws_security_group" "terraform_app_sec_group" {
  name = "terraform_app_db_sec_group"
  description = "simple Security Group for the single node"
  vpc_id = aws_vpc.terraform_vpc.id

  ingress {
    from_port = 80
    to_port = 80
    protocol = "tcp"
    cidr_blocks = ["0.0.0.0/0"]
    description = "opening http port to the world"
  }

  ingress {
    from_port = 443
    to_port = 443
    protocol = "tcp"
    cidr_blocks = ["0.0.0.0/0"]
    description = "opening https port to the world"
  }

  ingress {
    from_port = 22 // port to allow connection from ie to allow port range such as 20-26. this will be 20
    to_port = 22 // port to allow connection to ie to allow port range such as 20-26. this will be 26
    protocol = "tcp"
    cidr_blocks = ["0.0.0.0/0"]  // This opens the node to the world. This is not good for production systems
    description = "allow connection to ssl port"
  }

  egress {  // most of the time the egress is always needed. Here you can restrict the node out bound connection
    from_port = 0
    protocol = "-1"
    to_port = 0
    cidr_blocks = ["0.0.0.0/0"]
  }

  tags = {
    Name        = "handson_tutorial_terraform_db_sec_group"
    Env         = "tutorial"
    Product     = "handons"
    Terraform   = true
  }
}

/**
   Uploading the public key of our generated ssh key pair with the name MyIdentity.pem
*/
resource "aws_key_pair" "my-identity-pem" {
  public_key = "ssh-rsa AAAAB3NzaC1yc2EAAAADAQABAAACAQC8YsFK22z0OAJ1YdsBESQDnwJxTb/36EN1Zeymo2CksmPtURxp524nud0cI6uBCsCAgsYXaT3p7ijtmkDKA8tnIWr9pjfswUByUaJPKhnxp2r/V16U/VjgDs0RyTxQ0lo+hoy0OUVgapw9cXrtGBPukAT4qRVe8JLM7FDEMmGu8pkntgBbFneuj84YTHR4jcLzpF1FdoS+88ks9Oaw76bVlvJfLEeSDV7xdvF8IXqMznfoLPfe0gP0PTJ+bmLYwXfjlP7CUPPYEKG1sQHGEcKCs81QyncK6IwKSTwnpZX4YD/m45Yi0xi22tqI4qJ4oSN8Q2hNoAhS3/gCZXd6AiKDVJoVe6gQ5QpfCA+ZP21AH6z0T6HmPSvu6dbCm+qDfDGckysqwQBpHQANMLhWDEA7uVjr9Wpgyx60H1oCl2zYW40kcwBqO2i4tqQ+BnpZBgEPTn8DA0rn8LcfTNS/blrDIfJTYuYgW8HnCeT8hshelbux9B2YhAQE3AF1hQzFlgu23RHDcRHNQemkC20f4C8RAZcoY6ET99Xe+Ke46bHUcqOMK3oLKcCKfER3HLDHdAnaw5hJ2qkQEnDfYGBRCSRfetM0sCB7f3peYoH7WyTSR0/Qhn5iDWdjTqeopcIDY4KwEqag6rm3evLawnarUxnkvM6ez+A0OVTiUn7ZcndCTw== AWS Tutorial Usage"
  key_name = "MyIdentity.pem"
}

/**
  Creating a VM inside a VPC using a security group created within the VPC
  But more importantly using the subnet id of the subnet we want the node to
  be created in. Special notice on the subnet_id and the vpc_security_groups_ids
*/
resource "aws_instance" "terraform_ec2_instance" {
  ami = "ami-085925f297f89fce1"
  instance_type = "t2.nano"
  associate_public_ip_address = true // This allows the AWS to assign a public IP to the nonde
  vpc_security_group_ids = [aws_security_group.terraform_app_sec_group.id]
  key_name = aws_key_pair.my-identity-pem.key_name
  subnet_id = aws_subnet.terraform_public_subnet_b.id

  tags = {
    Name        = "handson_tutorial_terraform_app_instance"
    Env         = "tutorial"
    Product     = "handons"
    Terraform   = true
  }

}
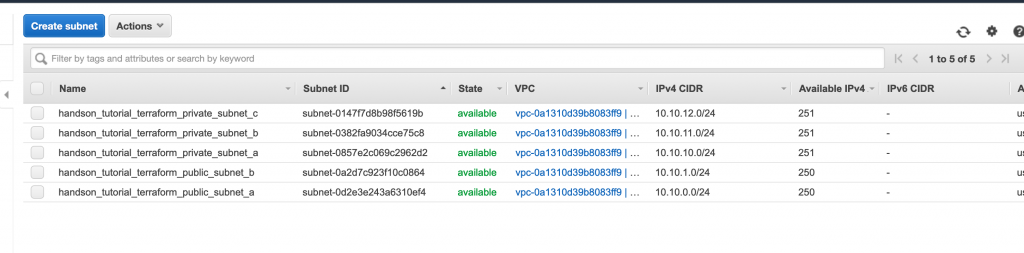
Creating the infrastructure
A quick terraform apply command and we should be up and running in no time and our instance and our vpc should look like the following: