Step by step ECS Fargate setup from scratch using AWS CLI
In this post, the first of a series of 3, we are essentially going to create the whole ECS Fargate setup from ground up using the aws cli only. There are a lot of tutorials out there that explain how to install and configure the aws cli, either version 1 or version 2. So I would not be showing that here. I use pyenv so I am sticking with the version 1 that can be created using the python utility pip. In case you need help setting your aws profile up ,please look up the link https://www.simplified.guide/aws/cli/configure-multiple-profiles.
I will be breaking the tutorial into the following sub section in order to compartmentalise it but also in order to provide meaningful explanation on each section. You can call it our plan of actions.
- Creating the VPC
- Creating all the subnets
- Creating the Internet Gateway
- Creating the NAT Gateway
- Mapping the public and the private subnets
- Creating all security groups
- Creating CloudWatch Log group
- Creating secrets using secrets manager
- Creating Parameter Store
- Creating Load Balancer
- Creating Target Groups
- Creating Listener
- Creating ECR Repositories
- Preparing the docker images
- Creating IAM Roles and Policies
- Creating ECS cluster
- Creating ECS task definitions
- Creating ECS services
We will be using the network CIDR 172.18.0.0/16. Typically, I use a /24 for subnets. We will be using the Virginia region us-east-1 and will be using 3 availability zones a, b and c. I will be using an aws profile for this setup. You can duplicate one of your existing profile to yevi-test so copy and paste will be a bit more easier.
Creating the VPC
 YEVI_VPC_ID=aws ec2 create-vpc \
--cidr-block 172.18.0.0/16 \
--tag-specifications ResourceType=vpc,Tags='[{Key=ENV,Value="test"},{Key=Name,Value="yevi-test-vpc"}]' \
--region us-east-1 \
--profile yevi-test \
--query Vpc.VpcId \
--output text
We have saved the VPC ID into a variable called $YEVI_VPC_ID we will be using this instead of the actual VPC ID that we will have to copy and paste throughout.
Creating all the subnets
We know we have plans to create public and private subnets. But at the time of creation without route tables and internet gateways we can’t differentiate public from private subnets. We will however create them later in this post. All the public subnets would sit in 172.18.[0-9].0/24 subnets and the private ones will sit in 172.18.[10-xxx].0/24. There is also a map between availability zones and subnets.
Creating the public subnets
Under this section we will create a bunch of subnets that we will be adding as our public subnets. But as mentioned before there is nothing currently public or private about them. They are just subnets created one into each of the 3 availability zones.
YEVI_PUBLIC_SUBNET_A=aws ec2 create-subnet \
--vpc-id $YEVI_VPC_ID \
--availability-zone us-east-1a \
--cidr-block 172.18.0.0/24 \
--tag-specifications ResourceType=subnet,Tags='[{Key=ENV,Value="test"},{Key=Name,Value="yevi-test-public-us-east-1a"}]' \
--region us-east-1 \
--profile yevi-test \
--query Subnet.SubnetId \
--output text
YEVI_PUBLIC_SUBNET_B=aws ec2 create-subnet \
--vpc-id $YEVI_VPC_ID \
--availability-zone us-east-1b \
--cidr-block 172.18.1.0/24 \
--tag-specifications ResourceType=subnet,Tags='[{Key=ENV,Value="test"},{Key=Name,Value="yevi-test-public-us-east-1b"}]' \
--region us-east-1 \
--profile yevi-test \
--query Subnet.SubnetId \
--output text
YEVI_PUBLIC_SUBNET_C=aws ec2 create-subnet \
--vpc-id $YEVI_VPC_ID \
--availability-zone us-east-1c \
--cidr-block 172.18.2.0/24 \
--tag-specifications ResourceType=subnet,Tags='[{Key=ENV,Value="test"},{Key=Name,Value="yevi-test-public-us-east-1c"}]' \
--region us-east-1 \
--profile yevi-test \
--query Subnet.SubnetId \
--output text
Creating the private subnets
Similarly to the previous section we will be creating a second set of subnets. But these subnets will destined to be private subnets.
YEVI_PRIVATE_SUBNET_A=aws ec2 create-subnet \
--vpc-id $YEVI_VPC_ID \
--availability-zone us-east-1a \
--cidr-block 172.18.10.0/24 \
--tag-specifications ResourceType=subnet,Tags='[{Key=ENV,Value="test"},{Key=Name,Value="yevi-test-private-us-east-1a"}]' \
--region us-east-1 \
--profile yevi-test \
--query Subnet.SubnetId \
--output text
YEVI_PRIVATE_SUBNET_B=aws ec2 create-subnet \
--vpc-id $YEVI_VPC_ID \
--availability-zone us-east-1b \
--cidr-block 172.18.11.0/24 \
--tag-specifications ResourceType=subnet,Tags='[{Key=ENV,Value="test"},{Key=Name,Value="yevi-test-private-us-east-1b"}]' \
--region us-east-1 \
--profile yevi-test \
--query Subnet.SubnetId \
--output text
YEVI_PRIVATE_SUBNET_C=aws ec2 create-subnet \
--vpc-id $YEVI_VPC_ID \
--availability-zone us-east-1c \
--cidr-block 172.18.12.0/24 \
--tag-specifications ResourceType=subnet,Tags='[{Key=ENV,Value="test"},{Key=Name,Value="yevi-test-private-us-east-1c"}]' \
--region us-east-1 \
--profile yevi-test \
--query Subnet.SubnetId \
--output text
Creating the Internet Gateway
In order for our subnets to be reachable from the internet , it needs an internet gateway. Without it, no resource created within them will be able to make request out to the internet. Just like regular network, you need to instruct your nodes which device, such as a router, will be acting as a gateway.
YEVI_INTERNET_GW=aws ec2 create-internet-gateway \
--query InternetGateway.InternetGatewayId \
--tag-specifications ResourceType=internet-gateway,Tags='[{Key=ENV,Value="test"},{Key=Name,Value="yevi-test-igw"}]' \
--region us-east-1 \
--profile yevi-test \
--output text
After creating the internet gateway device we need to attach it to our network.
aws ec2 attach-internet-gateway \
--vpc-id $YEVI_VPC_ID \
--internet-gateway-id $YEVI_INTERNET_GW \
--region us-east-1 \
--profile yevi-test
Now that we have created and associated our internet gateway. We have to create the route table with at least a route to point all route over to the internet to it. Let’s go ahead and create the route table and a public route.
YEVI_PUBLIC_ROUTE_TABLE=aws ec2 create-route-table \
--vpc-id $YEVI_VPC_ID \
--query RouteTable.RouteTableId \
--tag-specifications ResourceType=route-table,Tags='[{Key=ENV,Value="test"},{Key=Name,Value="yevi-test-public-route-table"}]' \
--region us-east-1 \
--profile yevi-test \
--output text
We need the route to the internet gateway
aws ec2 create-route \
--route-table-id $YEVI_PUBLIC_ROUTE_TABLE \
--destination-cidr-block 0.0.0.0/0  \
--gateway-id $YEVI_INTERNET_GW \
--region us-east-1 \
--profile yevi-test
Creating the NAT Gateway
The NAT gateway will be created inside of a public subnet to have access to the internet for itself. The NAT gateway is used for all the instances and devices launched into the private subnets. That will allow them to still make request to the internet through the it. For example a linux server launched into a private subnet which needs to update its packages using yum or apt-get for example. Before we create our gateway we need to create its public static IP. That’s called in AWS terminology an Elastic IP (EIP)
YEVI_EIP_ALLOC_ID=aws ec2 allocate-address \
--tag-specifications ResourceType=elastic-ip,Tags='[{Key=ENV,Value="test"},{Key=Name,Value="yevi-test-nat-eip"}]' \
--query AllocationId \
--region us-east-1 \
--profile yevi-test \
--output text
With the allocation ID, we can create the NAT gateway with the EIP assigned to it at the creation time. The NAT gateway will live inside the public subnet A
YEVI_NAT_GATEWAY=aws ec2 create-nat-gateway \
--allocation-id $YEVI_EIP_ALLOC_ID \
--subnet-id $YEVI_PUBLIC_SUBNET_A \
--tag-specifications ResourceType=natgateway,Tags='[{Key=ENV,Value="test"},{Key=Name,Value="yevi-test-nat-gateway"}]' \
--region us-east-1 \
--profile yevi-test \
--query NatGateway.NatGatewayId \
--output text
That NAT gateway needs to be associated to a private route table with a route to it. That’s because all the subnets associated to the route table can have their route to internet through the NAT Gateway.
YEVI_PRIVATE_ROUTE_TABLE=aws ec2 create-route-table \
--vpc-id $YEVI_VPC_ID \
--query RouteTable.RouteTableId \
--tag-specifications ResourceType=route-table,Tags='[{Key=ENV,Value="test"},{Key=Name,Value="yevi-test-private-route-table"}]' \
--region us-east-1 \
--profile yevi-test \
--output text
let’s create the route to internet through it.
aws ec2 create-route \
--route-table-id $YEVI_PRIVATE_ROUTE_TABLE \
--destination-cidr-block 0.0.0.0/0  \
--gateway-id $YEVI_NAT_GATEWAY \
--region us-east-1 \
--profile yevi-test
Mapping the public and the private subnets
Any subnet attached to the public route table becomes our public subnets and the same way any subnet associated with the private route table becomes private subnet. Let’s associate the first 3 subnets to the public route table and the remaining 3 to the private route table.
Let’s start with the public one.
aws ec2 associate-route-table \
--subnet-id $YEVI_PUBLIC_SUBNET_A \
--route-table-id $YEVI_PUBLIC_ROUTE_TABLE \
--region us-east-1 \
--profile yevi-test
aws ec2 associate-route-table \
--subnet-id $YEVI_PUBLIC_SUBNET_B \
--route-table-id $YEVI_PUBLIC_ROUTE_TABLE \
--region us-east-1 \
--profile yevi-test
aws ec2 associate-route-table \
--subnet-id $YEVI_PUBLIC_SUBNET_C \
--route-table-id $YEVI_PUBLIC_ROUTE_TABLE \
--region us-east-1 \
--profile yevi-test
Now the private subnets’ turn
aws ec2 associate-route-table \
--subnet-id $YEVI_PRIVATE_SUBNET_A \
--route-table-id $YEVI_PRIVATE_ROUTE_TABLE \
--region us-east-1 \
--profile yevi-test
aws ec2 associate-route-table \
--subnet-id $YEVI_PRIVATE_SUBNET_B \
--route-table-id $YEVI_PRIVATE_ROUTE_TABLE \
--region us-east-1 \
--profile yevi-test
aws ec2 associate-route-table \
--subnet-id $YEVI_PRIVATE_SUBNET_C \
--route-table-id $YEVI_PRIVATE_ROUTE_TABLE \
--region us-east-1 \
--profile yevi-test
Creating all security groups
We will start with creating the security group needed by the load balancer , followed by the one used by the apps.
YEVI_ELB_SECGROUP_ID=aws ec2 create-security-group \
--group-name yevi-test-lb-secgroup \
--description "Security group for the ALB" \
--vpc-id $YEVI_VPC_ID \
--tag-specifications "ResourceType=security-group,Tags=[{Key=Name,Value=yevi-test-lb-secgroup},{Key=ENV,Value=test}]" \
--region us-east-1 \
--query GroupId \
--output text \
--profile yevi-test
To this load balancer security group we are adding rules to allow connections from the whole world to classic http and https ports. That is 80 and 443. Usually if you are using a Web Application Firewall (WAF) the security group to the load balancer should be a whitelist of the IPs of the WAF.
aws ec2 authorize-security-group-ingress \
--group-id $YEVI_ELB_SECGROUP_ID \
--ip-permissions IpProtocol=tcp,FromPort=80,ToPort=80,IpRanges='[{CidrIp=0.0.0.0/0,Description="Allowing 0.0.0.0/0 to the LB port"}]' IpProtocol=tcp,FromPort=443,ToPort=443,IpRanges='[{CidrIp=0.0.0.0/0,Description="Allowing 0.0.0.0/0 to the LB port"}]' \
--tag-specifications "ResourceType=security-group-rule,Tags=[{Key=Name,Value=yevi-test-allow-the-world},{Key=ENV,Value=test}]" \
--region us-east-1 \
--profile yevi-test
Now we are about to create the App security group, the one used by the ECS services. We need to allow connection from the load balancer to a range to IPs. Since the targets are going to be microservices, we will be using ranges like 8000-10000. After the rule is created we will created another rule for self. That will mean that should the microservices talk to one another, they can do so without blocks from the security groups’s perspective.
YEVI_APP_SECGROUP_ID=aws ec2 create-security-group \
--group-name yevi-test-app-secgroup \
--description "Security group for the application workload" \
--vpc-id $YEVI_VPC_ID \
--tag-specifications "ResourceType=security-group,Tags=[{Key=Name,Value=yevi-test-app-secgroup},{Key=ENV,Value=test}]" \
--region us-east-1 \
--query GroupId \
--output text \
--profile yevi-test
aws ec2 authorize-security-group-ingress \
--group-id $YEVI_APP_SECGROUP_ID \
--port 8000-10000 \
--source-group $YEVI_ELB_SECGROUP_ID \
--protocol tcp \
--tag-specifications "ResourceType=security-group-rule,Tags=[{Key=Name,Value=yevi-test-allow-the-lb},{Key=ENV,Value=test}]" \
--region us-east-1 \
--profile yevi-test
aws ec2 authorize-security-group-ingress \
--group-id $YEVI_APP_SECGROUP_ID \
--port 8000-10000 \
--source-group $YEVI_APP_SECGROUP_ID \
--protocol tcp \
--tag-specifications "ResourceType=security-group-rule,Tags=[{Key=Name,Value=yevi-test-allow-self},{Key=ENV,Value=test}]" \
--region us-east-1 \
--profile yevi-test
Creating Cloudwatch Log group
Log is everything when running an application. It provides a lot of insights on “happenings” within the app and gives you all the information for next iteration of the lifecycle of any application. We are going to get our ECS tasks write their logs (usually from standard output) to log streams they will be creating into the designated log group. Let’s create the log group
aws logs create-log-group \
--log-group-name yevi-test-log \
--tags "Name=yevi-test-log,ENV=test" \
--region us-east-1 \
--profile yevi-test
Creating secrets using secrets manager
Though we don’t use any database in this tutorial, let’s assume it is the case and that you need to protect the credentials to that database. In order to prevent the credential from showing in plain text in the environment variable section of the tasks, we will be making use of secrets section. AWS provides a managed vault for storing secrets of all kinds. For this simulation, we are going to store a username/password pair in a form of json in the secret manager. Let’s create our creds.json file with the following content.
{
    "username": "yevi",
    "password": "go-lo-toé"
}
We will then need to create the aws secrets with our content in the secrets manager service.
YEVI_SECRETSMANAGER_DB_DETAILS=aws secretsmanager create-secret \
--name yevi-test-database-details \
--secret-string file://creds.json \
--tags '[{"Key":"Name","Value":"yevi-test-database-details"},{"Key":"ENV","Value": "test"}]' \
--region us-east-1 \
--profile yevi-test \
--query ARN \
--output text
It will produce an output similar to the following. Kindly copy it and paste it somewhere for quick reference later. We will be using it during our roles and permission creation section:
arn:aws:secretsmanager:us-east-1:xxxxxxx:secret:yevi-test-database-details-dOdBNq
Creating Parameter Store
Similarly to the secrets manager, the parameter store is a way to manage variables, parameters for application on the aws. We will use the parameter store to simulate the storage of the database host. We will therefore create our imaginary parameter store. Let’s assume our host is test-yevi-postgres.xxxxx.us-east-1.rds.amazonaws.com
aws ssm put-parameter \
--name yevi-test-database-host \
--value test-yevi-postgres.xxxxx.us-east-1.rds.amazonaws.com \
--description "hold the database host for the test environment" \
--type SecureString \
--region us-east-1 \
--profile yevi-test \
--tags '[{"Key":"Name","Value":"yevi-test-database-host"},{"Key":"ENV","Value": "test"}]' \
--tier Advanced
Creating Load Balancer
We are gradually reaching the point where all the various items created will start making sense. The purpose of the load balancer is to distribute requests from the to the backend servers. It also helps us expose our microservices. The load balancer will be created inside of the public subnets that we created earlier. If not they will not be reachable from the internet. We will need an application load balancer
YEVI_LOAD_BALANCER=aws elbv2 create-load-balancer \
--name yevi-test-endpoint \
--subnets $YEVI_PUBLIC_SUBNET_A $YEVI_PUBLIC_SUBNET_B $YEVI_PUBLIC_SUBNET_C \
--tags '[{"Key":"Name", "Value":"yevi-test-endpoint"},{"Key":"ENV", "Value":"test"}]' \
--type application \
--scheme internet-facing \
--security-groups $YEVI_ELB_SECGROUP_ID \
--region us-east-1 \
--profile yevi-test \
--query "LoadBalancers[0].LoadBalancerArn" \
--output text
Creating Target Groups
The target groups represent the destination the load balancer forwards request to based on configuration of per the load balancer listeners. We will need 2 target groups as we will be using 2 different microservices. Let’s go ahead and create the first one.
Creating Java based target group
In this target group, I plan on using java/tomcat which by default runs on port 8080. We will call it yevi-test-javaTG .
YEVI_JAVA_TARGET_GROUP=aws elbv2 create-target-group \
--vpc-id $YEVI_VPC_ID \
--name yevi-test-javaTG \
--protocol HTTP \
--port 80 \
--target-type ip \
--health-check-enabled \
--health-check-protocol HTTP \
--health-check-port 8080 \
--health-check-path / \
--health-check-interval-seconds 6 \
--health-check-timeout-seconds 5 \
--healthy-threshold-count 3 \
--unhealthy-threshold-count 3 \
--tags '[{"Key":"Name", "Value":"yevi-test-javaTG"},{"Key":"ENV", "Value":"test"}]' \
--region us-east-1 \
--profile yevi-test \
--query "TargetGroups[0].TargetGroupArn" \
--output text
Creating Golang based target group
the golang target group on the other hand runs on port 9099. We call it yevi-test-golangTG.
YEVI_GOLANG_TARGET_GROUP=aws elbv2 create-target-group \
--vpc-id $YEVI_VPC_ID \
--name yevi-test-golangTG \
--protocol HTTP \
--port 80 \
--target-type ip \
--health-check-enabled \
--health-check-protocol HTTP \
--health-check-port 9099 \
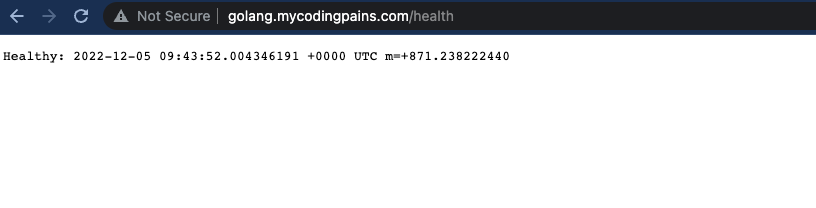
--health-check-path /health \
--health-check-interval-seconds 6 \
--health-check-timeout-seconds 5 \
--healthy-threshold-count 3 \
--unhealthy-threshold-count 3 \
--tags '[{"Key":"Name", "Value":"yevi-test-golangTG"},{"Key":"ENV", "Value":"test"}]' \
--region us-east-1 \
--profile yevi-test \
--query "TargetGroups[0].TargetGroupArn" \
--output text
Creating Listener
The listener is like instructing the load balancer on which port it should run or listen on. For the purpose of this ECS tutorial the port 80 is used . We could use the port 443 but that will make our already long tutorial longer . We would have needed to then create a certificate through the Amazon Certificate Manager(ACM) or upload our existing one onto it.
YEVI_HTTP_LISTENER=aws elbv2 create-listener \
--load-balancer-arn $YEVI_LOAD_BALANCER \
--protocol HTTP \
--port 80 \
--default-actions Type=forward,TargetGroupArn=$YEVI_JAVA_TARGET_GROUP \
--region us-east-1 \
--profile yevi-test \
--query "Listeners[0].ListenerArn" \
--output text
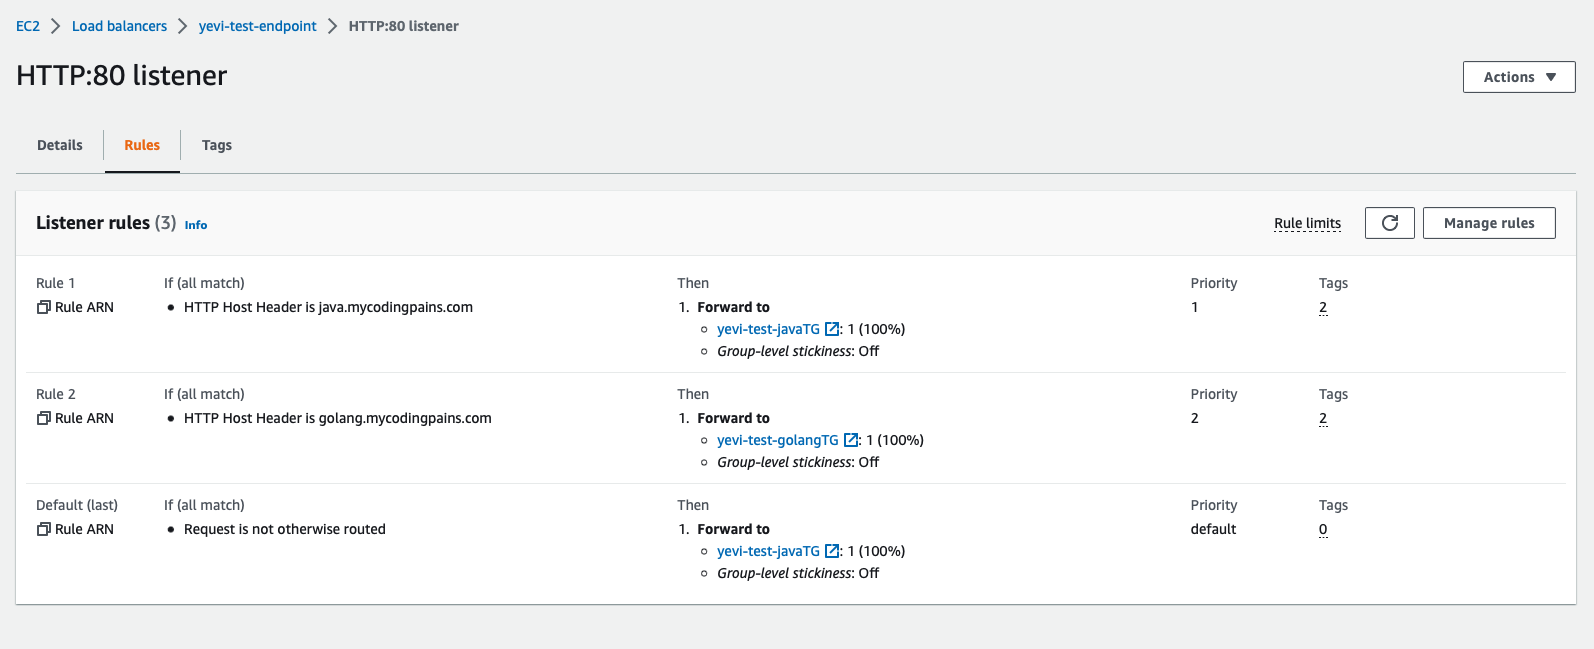
As you may have noticed creating the listener also wires it with the default action. Our action here is to forward the requests to the ECS service that should be running under the JAVA Target Group. We will need to link the Golang service to the listener as well. Since it’s the same listener, without any other help, it will be confused as to what to forward to the javaTG or to the golangTG. So we will need to use some of the constructs already made available by AWS. We will either use path or host name conditions on the listener rules.
Java listener rule
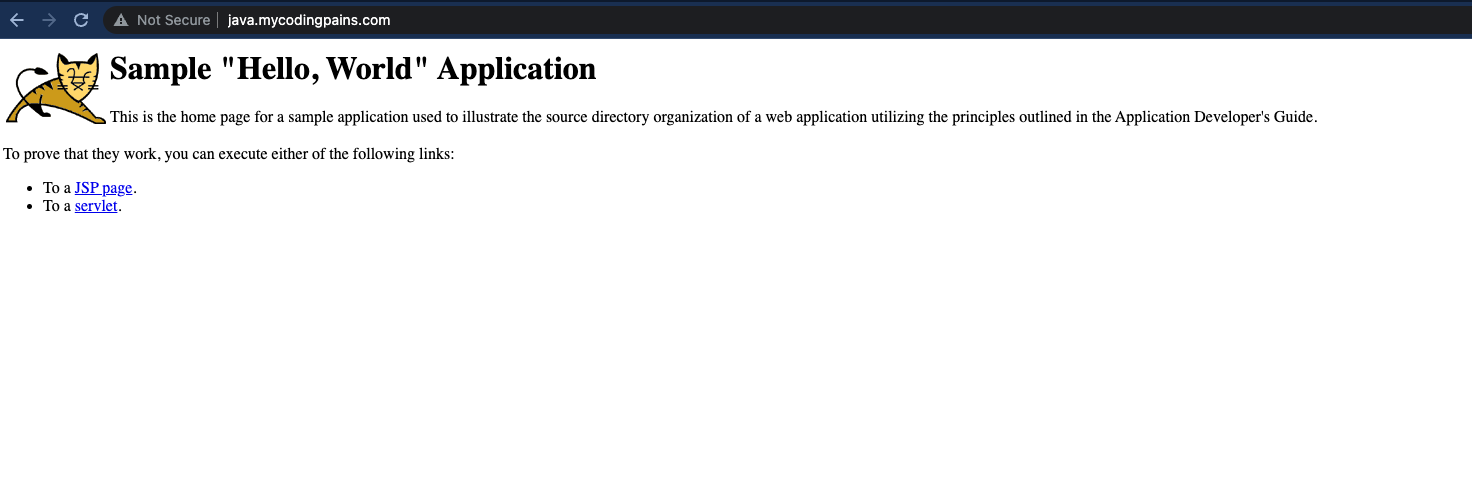
Though we are already forwarding to the java target group as a default action from the listener, let’s properly configure the listener to know what to do for on various instances. We will be using the host-header as a condition for the forwarding of the listener to the java target group. For that matter we will be pointing a sub domain such as java.mycodingpains.com to the load balancer.
aws elbv2 create-rule \
--listener-arn $YEVI_HTTP_LISTENER \
--priority 1 \
--conditions Field=host-header,Values=java.mycodingpains.com \
--actions Type=forward,TargetGroupArn=$YEVI_JAVA_TARGET_GROUP \
--tags '[{"Key":"Name", "Value":"yevi-test-java-tg-rule"},{"Key":"ENV", "Value":"test"}]' \
--region us-east-1 \
--profile yevi-test
Golang listener rule
Similarly we will be instructing the listener to forward requests to our golang target group by on the host-header condition. When the domain golang.mycodingpains.com is used, the listener will forward to the golang target group.
aws elbv2 create-rule \
--listener-arn $YEVI_HTTP_LISTENER \
--priority 2 \
--conditions Field=host-header,Values=golang.mycodingpains.com \
--actions Type=forward,TargetGroupArn=$YEVI_GOLANG_TARGET_GROUP \
--tags '[{"Key":"Name", "Value":"yevi-test-golang-tg-rule"},{"Key":"ENV", "Value":"test"}]' \
--region us-east-1 \
--profile yevi-test
Creating ECR Repositories
We need to make use of the Elastic Container Registry(ECR) to keep our docker images for us. We will be creating 2 different repository into it so we can push both the java and the golang apps to it.
YEVI_JAVA_REPOSITORY_URI=aws ecr create-repository \
--repository-name yevi-test-ecr-repo/java-app \
--image-scanning-configuration scanOnPush=true \
--tags '[{"Key":"Name","Value":"yevi-test-ecr-repo/java-app"},{"Key":"ENV","Value": "test"}]' \
--region us-east-1 \
--profile yevi-test \
--query repository.repositoryUri \
--output text
YEVI_GOLANG_REPOSITORY_URI=aws ecr create-repository \
--repository-name yevi-test-ecr-repo/golang-app \
--image-scanning-configuration scanOnPush=true \
--tags '[{"Key":"Name","Value":"yevi-test-ecr-repo/golang-app"},{"Key":"ENV","Value": "test"}]' \
--region us-east-1 \
--profile yevi-test \
--query repository.repositoryUri \
--output text
Preparing the docker images
We need a java application or any other application that runs on port 8080 and a golang or any that runs on port 9099. For a java application I chose to go with a a simple java sample application and for the golang I chose to pick it from another tutorial I pushed recently that can be found at multistage dockerisation of a golang application. The dockerfile needed for the java application is as follow. In order to push to AWS ECR, you need to authenticate using their own construct. That can be found on the ECR console itself.
Java App
FROM tomcat:9.0.68-jre8-temurin

RUN mkdir /opt/tomcat
ADD https://tomcat.apache.org/tomcat-9.0-doc/appdev/sample/sample.war /opt/tomcat/

#RUN cp -R /opt/tomcat/sample/* /usr/local/tomcat/webapps/
RUN apt-get update && apt-get install -y \
    unzip && \
    mkdir /usr/local/tomcat/webapps/ROOT && \
    unzip /opt/tomcat/sample.war -d /usr/local/tomcat/webapps/ROOT/ && \
    rm -rf /var/lib/apt/lists/*


CMD ["catalina.sh","run"]
To build and push it to the ECR we need to do the following:
docker build -t yevi-test-ecr-repo/java-app .
docker tag yevi-test-ecr-repo/java-app:latest xxxxx.dkr.ecr.us-east-1.amazonaws.com/yevi-test-ecr-repo/java-app:latest
docker push xxxx.dkr.ecr.us-east-1.amazonaws.com/yevi-test-ecr-repo/java-app:latest
Golang App
Let’s build and push the golang app to the ECR
docker build -t yevi-test-ecr-repo/golang-app .
docker tag yevi-test-ecr-repo/golang-app:latest xxxx.dkr.ecr.us-east-1.amazonaws.com/yevi-test-ecr-repo/golang-app:latest
docker push xxxxx.dkr.ecr.us-east-1.amazonaws.com/yevi-test-ecr-repo/golang-app:latest
Creating IAM Roles and Policies
In this section we define what our resources have access to what permission they come will. We are going to create a custom policy that allows access to our ECR repositories, that can create log streams and push logs to it in our log group and that can pull parameter store and secretsmanager. We will create a role for the task and attach the policy to that role.
Custom Policy
Let’s create a file yevi-test-custom-policy.json and let’s configure the various permission levels. We need the ARN of the ECR repositories, The ARN of the log group and ARNs of both the secretmanager and the parameter groups.
{
    "Version": "2012-10-17",
    "Statement": [
        {
            "Effect": "Allow",
            "Action": [
                "ecr:GetAuthorizationToken"
            ],
            "Resource": "*"
        },
        {
            "Effect": "Allow",
            "Action": [
                "ecr:BatchCheckLayerAvailability",
                "ecr:GetDownloadUrlForLayer",
                "ecr:BatchGetImage"
            ],
            "Resource": [
            "arn:aws:ecr:us-east-1:xxxx:repository/yevi-test-ecr-repo/golang-app",
            "arn:aws:ecr:us-east-1:xxxx:repository/yevi-test-ecr-repo/java-app"
            ]
        },
        {
            "Effect": "Allow",
            "Action": [
                "logs:CreateLogStream",
                "logs:PutLogEvents"
            ],
            "Resource": "arn:aws:logs:us-east-1:xxxx:log-group:yevi-test-log:*"
        },
        {
            "Effect": "Allow",
            "Action": [
                "ssm:GetParameters",
                "secretsmanager:GetSecretValue"
            ],
            "Resource": [
            "arn:aws:ssm:us-east-1:xxxx:parameter/yevi-test-database-host",
            "arn:aws:secretsmanager:us-east-1:xxxx:secret:yevi-test-database-details-KOOztg"
            ]

        }
    ]
}
Let’s go ahead and create the custom policy
YEVI_CUSTOM_IAM_POLICY_ARN=aws iam create-policy \
--policy-name yevi-test-custom-policy \
--policy-document file://yevi-test-custom-policy.json \
--tags '[{"Key": "Name","Value": "yevi-test-custom-policy"},{"Key": "ENV","Value": "test"}]' \
--region us-east-1 \
--profile yevi-test \
--query Policy.Arn \
--output text
Let’s also create the ECS task trust policy. Let’s create the file yevi-test-ecs-task-trust-policy.json and put the following inside.
{
  "Version": "2012-10-17",
  "Statement": [
    {
      "Effect": "Allow",
      "Principal": {
        "Service": "ecs-tasks.amazonaws.com"
      },
      "Action": "sts:AssumeRole"
    }
  ]
}
YEVI_TASKS_IAM_ROLE_ARN=aws iam create-role \
--role-name yevi-test-ecs-task-role \
--assume-role-policy-document file://yevi-test-ecs-task-trust-policy.json \
--description "Role to be used by the ecs task in order to interact with various AWS resouces and services" \
--tags '[{"Key": "Name","Value": "yevi-test-ecs-task-role"},{"Key": "ENV","Value": "test"}]' \
--region us-east-1 \
--profile yevi-test \
--query Role.Arn \
--output text
Let’s associate the policy to the role
aws iam attach-role-policy \
--role-name yevi-test-ecs-task-role \
--policy-arn $YEVI_CUSTOM_IAM_POLICY_ARN \
--region us-east-1 \
--profile yevi-test
Creating ECS cluster
Let’s finally create our ECS cluster
aws ecs create-cluster \
--cluster-name yevi-test-ecs-cluster \
--tags '[{"key":"Name", "value":"yevi-test-ecs-cluster"},{"key":"ENV", "value":"test"}]' \
--region us-east-1 \
--profile yevi-test
Creating ECS task definitions
We will need to create 2 tasks definition for both our Java and Golang apps. In order to create the task definition we will need couple IDs and ARNs. To make the work easy, let’s output some of them that we already have saved in an environment variable.
We will need the image that we pushed into the ECR
echo $YEVI_JAVA_REPOSITORY_URI
xxxx.dkr.ecr.us-east-1.amazonaws.com/yevi-test-ecr-repo/java-app
echo $YEVI_GOLANG_REPOSITORY_URI
xxxx.dkr.ecr.us-east-1.amazonaws.com/yevi-test-ecr-repo/golang-app
We just need to append :latest to it to have our full image URI
we will need the task role ARN
echo $YEVI_TASKS_IAM_ROLE_ARN
arn:aws:iam::xxxx:role/yevi-test-ecs-task-role
We will also need the secrets manager as well
echo $YEVI_SECRETSMANAGER_DB_DETAILS
arn:aws:secretsmanager:us-east-1:xxxx:secret:yevi-test-database-details-KOOztg
You will have to replace your version of the above values inside the task definition at the following sections
- image
- secrets’s valueFrom
- taskRoleArn
- executionRoleArn
Java App task definition
let’s create yevi-test-java-app-taskdefinition.json and replace the listed above section from it.
{
    "containerDefinitions": [
        {
            "name": "java-appserver",
            "image": "849083044424.dkr.ecr.us-east-1.amazonaws.com/yevi-test-ecr-repo/java-app:latest",
            "cpu": 256,
            "memory": 512,
            "portMappings": [
                {
                    "containerPort": 8080,
                    "hostPort": 8080,
                    "protocol": "tcp"
                }
            ],
            "essential": true,
            "environment": [
                {
                    "name": "SAMPLE_ENVIRONMENT",
                    "value": "this_is_a_sample"
                }
            ],

            "secrets": [
                {
                    "name": "DB_USERNAME",
                    "valueFrom": "arn:aws:secretsmanager:us-east-1:849083044424:secret:yevi-test-database-details-KOOztg:username::"
                },
                {
                    "name": "DB_PASSWORD",
                    "valueFrom": "arn:aws:secretsmanager:us-east-1:849083044424:secret:yevi-test-database-details-KOOztg:password::"
                },
                {
                    "name": "DB_HOST",
                    "valueFrom": "yevi-test-database-host"
                }
            ],
            "logConfiguration": {
                "logDriver": "awslogs",
                "options": {
                    "awslogs-group": "yevi-test-log",
                    "awslogs-region": "us-east-1",
                    "awslogs-stream-prefix": "java-app-log"
                }
            }
        }
    ],
    "family": "yevi-test-java-appserver",
    "taskRoleArn": "arn:aws:iam::849083044424:role/yevi-test-ecs-task-role",
    "executionRoleArn": "arn:aws:iam::849083044424:role/yevi-test-ecs-task-role",
    "networkMode": "awsvpc",
    "requiresCompatibilities": [
        "FARGATE"
    ],
    "cpu": "256",
    "memory": "512",
    "tags": [
        {
          "key": "Name",
          "value": "yevi-test-java-appserver"
        },
        {
            "key":"ENV",
            "value":"test"
        }
    ]
}
Let’s register our task definition for the java app and keep the output somewhere like in a notepad or textedit. We will need it in the service file
aws ecs register-task-definition \
--family yevi-test-java-appserver \
--cli-input-json file://yevi-test-java-app-taskdefinition.json \
--region us-east-1 \
--profile yevi-test \
--query taskDefinition.taskDefinitionArn \
--output text
arn:aws:ecs:us-east-1:xxxx:task-definition/yevi-test-java-appserver:1
Golang App task definition
Let’s create yevi-test-golang-app-taskdefinition.json and replace the listed above section from it
{
    "containerDefinitions": [
        {
            "name": "golang-appserver",
            "image": "849083044424.dkr.ecr.us-east-1.amazonaws.com/yevi-test-ecr-repo/golang-app:latest",
            "cpu": 256,
            "memory": 512,
            "portMappings": [
                {
                    "containerPort": 9099,
                    "hostPort": 9099,
                    "protocol": "tcp"
                }
            ],
            "essential": true,
            "environment": [
                {
                    "name": "PORT",
                    "value": "9099"
                }
            ],

            "secrets": [
                {
                    "name": "DB_USERNAME",
                    "valueFrom": "arn:aws:secretsmanager:us-east-1:849083044424:secret:yevi-test-database-details-KOOztg:username::"
                },
                {
                    "name": "DB_PASSWORD",
                    "valueFrom": "arn:aws:secretsmanager:us-east-1:849083044424:secret:yevi-test-database-details-KOOztg:password::"
                },
                {
                    "name": "DB_HOST",
                    "valueFrom": "yevi-test-database-host"
                }
            ],
            "logConfiguration": {
                "logDriver": "awslogs",
                "options": {
                    "awslogs-group": "yevi-test-log",
                    "awslogs-region": "us-east-1",
                    "awslogs-stream-prefix": "golang-app-log"
                }
            }
        }
    ],
    "family": "yevi-test-golang-appserver",
    "taskRoleArn": "arn:aws:iam::849083044424:role/yevi-test-ecs-task-role",
    "executionRoleArn": "arn:aws:iam::849083044424:role/yevi-test-ecs-task-role",
    "networkMode": "awsvpc",
    "requiresCompatibilities": [
        "FARGATE"
    ],
    "cpu": "256",
    "memory": "512",
    "tags": [
        {
          "key": "Name",
          "value": "yevi-test-golang-appserver"
        },
        {
            "key":"ENV",
            "value":"test"
        }
    ]
}
Let’s register the task definition and store it’s ARN
aws ecs register-task-definition \
--family yevi-test-golang-appserver \
--cli-input-json file://yevi-test-golang-app-taskdefinition.json \
--region us-east-1 \
--profile yevi-test \
--query taskDefinition.taskDefinitionArn \
--output text
arn:aws:ecs:us-east-1:xxxx:task-definition/yevi-test-golang-appserver:1
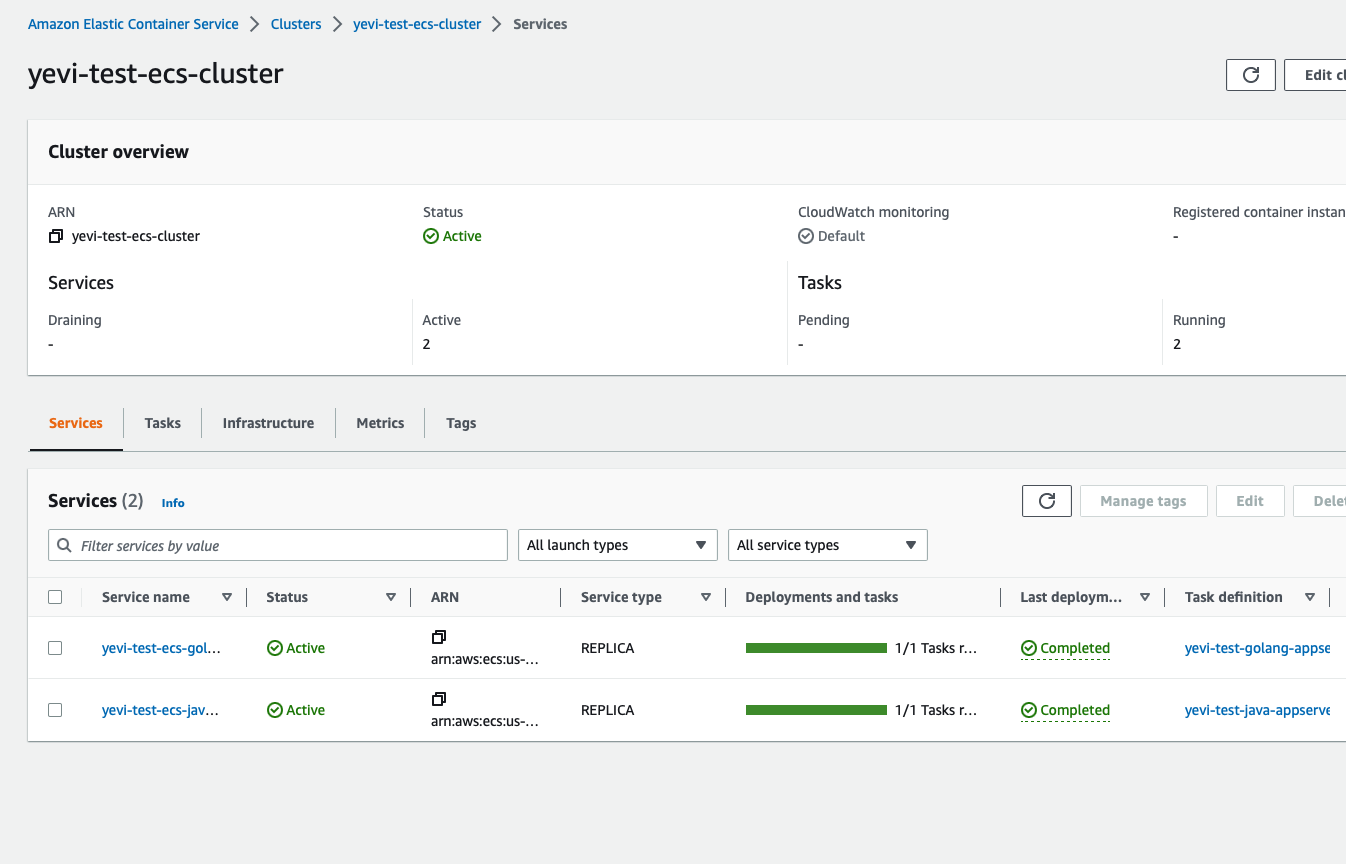
Creating ECS services
We are now are the point where all the tasks we create been working on so far will all make sense. In order to create services we will need the task definition arn that we obtained above but as well , we need the security groups and the subnet IDs. Like mentioned before we will be creating our subnets inside the private subnets. That’s one further security step to consider when creating the microservice to reduce further how they can be attacked by external threats.
Let’s pull the security group ID
echo $YEVI_APP_SECGROUP_ID
sg-028fxxx73c0
We need to also pull the subnet ids
❯ echo $YEVI_PRIVATE_SUBNET_A
subnet-094xxxx596949d
❯ echo $YEVI_PRIVATE_SUBNET_B
subnet-07cxxxxef5b753bc
❯ echo $YEVI_PRIVATE_SUBNET_C
subnet-00xxxxfc1b1607ef
We also need the target group the service will attach the running container to. That how the task get plugged into the load balancer.
echo $YEVI_JAVA_TARGET_GROUP
arn:aws:elasticloadbalancing:us-east-1:xxxx:targetgroup/yevi-test-javaTG/5e3dxxxx035c2
echo $YEVI_GOLANG_TARGET_GROUP
arn:aws:elasticloadbalancing:us-east-1:xxxx:targetgroup/yevi-test-golangTG/b720xxxxb6205
You will need to replace the following section in the service definition with your version of values above
- taskDefinition
- securityGroups
- subnets
- targetGroupArn
Java App service
Let’s create the yevi-test-java-app-service-create.json file with the following inside. As usual you will need to replace part of the content listed above.
{
    "cluster": "yevi-test-ecs-cluster",
    "serviceName": "yevi-test-ecs-java-appservice",
    "taskDefinition": "arn:aws:ecs:us-east-1:xxxx:task-definition/yevi-test-java-appserver:1",
    "launchType": "FARGATE",
    "platformVersion": "1.4.0",
    "networkConfiguration": {
       "awsvpcConfiguration": {
          "assignPublicIp": "DISABLED",
          "securityGroups": [ "sg-028xxxxb2073c0" ],
          "subnets": [ "subnet-094xxxx5f596949d","subnet-07cxxxxef5b753bc","subnet-00exxxx1b1607ef" ]
       }
    },
    "loadBalancers": [
      {
         "targetGroupArn": "arn:aws:elasticloadbalancing:us-east-1:xxxx:targetgroup/yevi-test-javaTG/5e3xxxx035c2",
         "containerName": "java-appserver",
         "containerPort": 8080
      }
    ],
    "desiredCount": 1,
    "healthCheckGracePeriodSeconds": 300,
    "tags": [
        {
          "key": "Name",
          "value": "yevi-test-ecs-java-appservice"
        },
        {
            "key":"ENV",
            "value":"test"
        }
    ]
}
let’s create the service with the following
aws ecs create-service \
--service-name yevi-test-ecs-java-appservice \
--cli-input-json file://yevi-test-java-app-service-create.json \
--region us-east-1 \
--profile yevi-test
Golang App service
Let’s create golang service defintion file yevi-test-golang-app-service-create.json
{
    "cluster": "yevi-test-ecs-cluster",
    "serviceName": "yevi-test-ecs-golang-appservice",
    "taskDefinition": "arn:aws:ecs:us-east-1:xxxx:task-definition/yevi-test-golang-appserver:1",
    "launchType": "FARGATE",
    "platformVersion": "1.4.0",
    "networkConfiguration": {
       "awsvpcConfiguration": {
          "assignPublicIp": "DISABLED",
          "securityGroups": [ "sg-028xxxxab2073c0" ],
          "subnets": [ "subnet-094xxxx596949d","subnet-07cxxxx5b753bc","subnet-00exxxx1b1607ef" ]
       }
    },
    "loadBalancers": [
      {
         "targetGroupArn": "arn:aws:elasticloadbalancing:us-east-1:xxxx:targetgroup/yevi-test-golangTG/b72xxxx6205",
         "containerName": "golang-appserver",
         "containerPort": 9099
      }
    ],
    "desiredCount": 1,
    "healthCheckGracePeriodSeconds": 300,
    "tags": [
        {
          "key": "Name",
          "value": "yevi-test-ecs-golang-appservice"
        },
        {
            "key":"ENV",
            "value":"test"
        }
    ]
}
Let’s now create the service with the following command
aws ecs create-service \
--service-name yevi-test-ecs-golang-appservice \
--cli-input-json file://yevi-test-golang-app-service-create.json \
--region us-east-1 \
--profile yevi-test
Let’s show what we have been able to achieve so far.
Let’s use our browsers to do some quick tests
We are at the end of our tutorial. I must admit that with the level of detail I had planned for this, this is arguably a bit lengthy. I have show case couple of practice here as well when faced with the task to create ECS services. The role I am hoping this tutorial will play will be not only providing you with the right understanding on how different AWS components are wired together but as well show some good habit in creating aws resources. The IAM section is important as it’s looked up our tasks to only resouces and items they strictly need. As well, there are really only few times in a DevOps lifetime that one would want to deploy services using command line . I would rather automate this using ansible or terraform which hopefully will be the next article I will be writing on.