Welcome to the part3 of our Infrastructure as Code using Terraform series. All our scenarios so far are to execute on AWS. This series aims to be a gentle walk-through of Terraform with full code available on git htttps://github.com/kdjomeda/intro-to-terraform.
In part1 of the series, I have evolved from a proof of concept to a real EC2 instance running outside of an AWS VPC.
in part2, I have essentially, from an EC2 classic instance, delved into the world of AWS VPC, creating subnets, creating internet and nat gateways, route and route tables, and creating the instance in one of the availability zones.
In this part of our series, I would like to introduce the notion of re-usability with the help of variables. They allow us to share this very code with multiple projects and serve different configurations. We will also be creating a database service intended for use by the application instance. at the completion of our Terraform code, we need to retrieve the DB’s endpoint and possibly pass it to other tools in our automation chain if need be or use it directly with a MySQL client. The retrieval of all information pertaining to resources created can be done using outputs which are essentially like returned values from a method in programming. The corresponding code to this article can be found here https://github.com/kdjomeda/intro-to-terraform/tree/ec2-and-rds-in-vpc
There will be a change in our project file structure we have so far and we will be adding 3 types of files:
- variables.tf (Where variables are declared)
- outputs.tf (Where outputs from execution are published)
- terraform.tfvars (Which holds the default values of the variables)
I will also introduce a folder called files where I will keep the userdata shell script. Our new project structure will look like below:
|
1 2 3 4 5 6 7 8 9 10 11 |
intro-to-terraform-aws . |-- README.md |-- _main.tf |-- files | `-- ubuntu_userdata.sh |-- main.tf |-- outputs.tf |-- terraform.tfvars `-- variable.tf |
I will be using ubuntu 20.20 AMI and MySQL 8.0 as our RDS engine. Again to create an AWS service via API, you need to understand how its parameters and arguments are organized. To do so with RDS , you might want to have a look at this link https://docs.aws.amazon.com/AmazonRDS/latest/APIReference/API_CreateDBInstance.html
Creating our input variable file
Let’s start with our variable.tf file to declare variables to be used by resources’ arguments for the VPC and EC2 instance used in the part2 of the tutorials. We will also create the variables to be used for the RDS in it.
|
1 2 3 4 5 6 7 8 9 10 11 12 13 14 15 16 17 18 19 20 21 22 23 24 25 26 27 28 29 30 31 32 33 34 35 36 37 38 39 40 41 42 43 44 45 46 47 48 49 50 51 52 53 54 55 56 57 58 59 60 61 62 63 64 65 66 67 68 69 70 71 72 73 74 75 76 77 78 79 80 81 82 83 84 85 86 87 88 89 90 91 92 93 94 95 96 97 98 99 100 101 102 103 104 105 106 107 108 109 110 111 112 113 114 115 116 117 118 119 120 121 122 123 124 125 126 127 128 129 130 131 132 |
#variable.tf variable "aws_profile" { description = "the aws profile to be used in the setup" } variable "aws_region" { description = "the aws region to be used in the setup" } variable "vpc_cidr" { description = "the address range of our vpc" } variable "product" { description = "name of the product the setup is for" default = "handson" } variable "environment" { description = "the environment the setup it meant for" default = "tutorial" } variable "vpc_name_suffix" { description = "name to append to the vpc as part of the naming convention" } variable "vpc_subnets_cidr_map" { description = "dictionary of corresponding cidr subnets" type = map(string) } variable "service_secgroup_suffix" { description = "suffix to append to naming convention for the security group" } variable "service_http_port" { description = "http port to be opened for the service instance" } variable "service_https_port" { description = "https port to be opened for the service instance" } variable "service_ssh_port" { description = "ssh port to be opened for the service instance" } variable "service_ssh_key_name" { description = "name of the ssh key name to use" } variable "service_ami" { description = "ID of the OS AMI to use" } variable "service_instance_type" { description = "The type/size of the instance to use on AWS" } variable "service_storage_type" { description = "The type of storage to use standard,gp2 etc" } variable "service_storage_size" { description = "The size of the storage to use" } variable "service_intsance_tag_name_suffix" { description = "suffix to use for the tag name" } variable "db_subnet_group_name_suffix" { description = "name to append to the naming convention for the subnet group" } variable "db_param_group_name_suffix" { description = "identifier of the parameter group in AWS" } variable "db_param_group_family" { description = "engine family for which to create the parameter group for" } variable "db_access_port" { description = "database port" default = 7708 } variable "db_sec_group_name_suffix" { description = "actually the suffix of our db sec group name" } variable "db_instance_class" { description = "size of the db instance " } variable "db_instance_storage_type" { description = "type of db storage to use ie, magnetic,gp2 etc" } variable "db_instance_storage_size" { description = "size of the storage to use id 5GB, 10GB etc" } variable "db_instance_engine" { description = "name of the RDS compatible db to use, mysq,mssql,oracledb" } variable "db_instance_engine_version" { description = "version number corresponding to the engine chosen" } variable "db_instance_identifier" { description = "identifier name for the database instace on AWS" } variable "db_instance_username" { description = "superuser/root username of the database" } variable "db_instance_password" { description = "password of the superuser/root" } variable "db_instance_multiaz" { description = "boolean corresponding to lanching in AZ mode or not" } variable "db_instance_skip_finalsnapshot" { description = "boolean corresponding to choice of taking snapshot when db is being destroyed" type = bool } |
Using defaults and datatypes in variables
On the lines 14-22 and 84-87 of the variable file above, we are using the default attribute of a variable. This means when values are not assigned to the variable in question in the tfvars file (which we will use later), Terraform will use the values specified in the default attribute.
On its lines 28-31 and 129-132, I used type to specify the datatypes of the variables that are excepted.
Creating the RDS instance
We would now need to define our terraform instruction to create our DB instance. It’s going to be based on the smallest instance class (t2 micro) avaialable, based on MySQL version 8.0.
|
1 2 3 4 5 6 7 8 9 10 11 12 13 14 15 16 17 18 19 20 21 22 23 24 25 26 27 28 29 30 31 32 33 34 35 36 37 38 39 40 41 42 43 44 45 46 47 48 49 50 51 52 53 54 55 56 57 58 59 60 61 62 63 64 65 66 67 68 69 70 71 72 73 74 75 76 77 78 79 80 81 82 83 84 85 86 87 88 89 90 91 92 93 94 95 96 97 98 99 |
#main.tf //... /** Creating our subnet group based on private subnets created above. This is needed by the RDS to know in which subnet it's allow to launch our instance(s) */ resource "aws_db_subnet_group" "terraform_db_subnet_group" { name = "${var.product}_${var.environment}_${var.db_subnet_group_name_suffix}" subnet_ids = [aws_subnet.terraform_private_subnet_a.id, aws_subnet.terraform_private_subnet_b.id, aws_subnet.terraform_private_subnet_c.id ] tags = { Name = "${var.product}_${var.environment}_${var.db_subnet_group_name_suffix}" Env = var.environment Product = var.product Terraform = true } } /** Creating a copy of the default mysql5.7 specific configuration so should we need to set parameters different from the ones in the default group we can do so easily with this one that we are creating */ resource "aws_db_parameter_group" "terraform_db_param_group" { family = var.db_param_group_family name = "${var.product}-${var.environment}-${var.db_param_group_name_suffix}" tags = { Name = "${var.product}_${var.environment}_${var.db_param_group_name_suffix}" Env = var.environment Product = var.product Terraform = true } } /** Creating the security group for the rds instance defining which security group(s) or IP(s) are allowed to reach it. */ resource "aws_security_group" "terraform_db_sec_group" { name = "${var.product}_${var.environment}_${var.db_sec_group_name_suffix}" description = "security groups for the database" vpc_id = aws_vpc.terraform_vpc.id ingress { from_port = var.db_access_port to_port = var.db_access_port protocol = "tcp" security_groups = [aws_security_group.terraform_app_sec_group.id] description = "opening http port to the world" } egress { from_port = 0 protocol = "-1" to_port = 0 cidr_blocks = ["0.0.0.0/0"] } tags = { Name = "${var.product}_${var.environment}_${var.db_sec_group_name_suffix}" Env = var.environment Product = var.product Terraform = true } } /** Creating the db instance based on variable passed to it. */ resource "aws_db_instance" "terraform_db_instance" { instance_class = var.db_instance_class allocated_storage = var.db_instance_storage_size storage_type = var.db_instance_storage_type engine = var.db_instance_engine engine_version = var.db_instance_engine_version identifier = var.db_instance_identifier username = var.db_instance_username password = var.db_instance_password parameter_group_name = aws_db_parameter_group.terraform_db_param_group.name db_subnet_group_name = aws_db_subnet_group.terraform_db_subnet_group.name vpc_security_group_ids = [aws_security_group.terraform_db_sec_group.id] multi_az = var.db_instance_multiaz port = var.db_access_port skip_final_snapshot =var.db_instance_skip_finalsnapshot // Do not do this for production instance tags = { Name = "${var.product}_${var.environment}_${var.db_instance_identifier}" Env = var.environment Product = var.product Terraform = true } } |
On the code above we have the parameter group, subnet group and a security group as component dependencies for the RDS instance.
Creating our variable definition file (.tfvars)
The filename of the variable definition file can actually be called anything.tfvars or tuto_part2.tfvars. And for it’s to be picked up by Terraform, we would have to use the option -var-file anything.tfvars, when terraform apply, is executed. However, if we name the file terraform.tfvars or name any ended with .auto.tfvars, then terraform will automatically pick it up. Without this file, terraform apply command would be prompting us for the value of each and every variable from our input variable file (variable.tf). Below is our terraform.tfvars
|
1 2 3 4 5 6 7 8 9 10 11 12 13 14 15 16 17 18 19 20 21 22 23 24 25 26 27 28 29 30 31 32 33 34 35 36 37 38 39 |
#terraform.tfvars aws_profile = "blacksensei" aws_region = "us-east-1" vpc_cidr = "10.10.0.0/16" //product we have default value already set for this = " //environment we have default value already set for this = " vpc_name_suffix = "terraform_vpc" vpc_subnets_cidr_map = { "public_a" = "10.10.0.0/24" "public_b" = "10.10.1.0/24" "private_a" = "10.10.10.0/24" "private_b" = "10.10.11.0/24" "private_c" = "10.10.12.0/24" } service_secgroup_suffix = "terraform_app_secgroup" service_http_port = 80 service_https_port = 443 service_ssh_port = 22 service_ssh_key_name = "MyIdentity.pem" service_ami = "ami-068663a3c619dd892" service_instance_type = "t2.micro" service_storage_type = "gp2" service_storage_size = 30 service_intsance_tag_name_suffix = "terraform_app" db_subnet_group_name_suffix = "terraform_subnetgroup" db_param_group_name_suffix = "terraform-param-gr" db_param_group_family = "mysql8.0" //db_access_port has a default value = " db_sec_group_name_suffix = "terraform-db-sec-group" db_instance_class = "db.t2.micro" db_instance_storage_type = "gp2" db_instance_storage_size = 5 db_instance_engine = "mysql" db_instance_engine_version = "8.0" db_instance_identifier = "terraform-db" db_instance_username = "terraform_user" //db_instance_password = "" db_instance_multiaz = true db_instance_skip_finalsnapshot = true |
In the file above, I would like to highlight that from lines 8-14 we are using the map type defined in the input variable file for grouping cidr for all the subnets instead of using a different variable for each subnet. On line 37, I commented out the DB superuser password variable because I would like it to be prompted. So that’s the only variable that requires input prompt from our code execution.
Creating an EC2 instance with userdata
We have to slightly modify the instructions of our EC2 resource created in part2 to use variables defined in the input variable file
|
1 2 3 4 5 6 7 8 9 10 11 12 13 14 15 16 17 18 19 20 21 22 23 24 25 26 |
#main.tf /** Creating a VM inside a VPC using a security group created within the VPC But more importantly using the subnet id of the subnet we want the node to be created in. Special notice on the subnet_id and the vpc_security_groups_ids */ resource "aws_instance" "terraform_ec2_instance" { ami = var.service_ami instance_type = var.service_instance_type associate_public_ip_address = true // This allows the AWS to assign a public IP to the nonde vpc_security_group_ids = [aws_security_group.terraform_app_sec_group.id] key_name = aws_key_pair.my-identity-pem.key_name subnet_id = aws_subnet.terraform_public_subnet_b.id root_block_device { volume_type = var.service_storage_type volume_size = var.service_storage_size } user_data = file("files/ubuntu_userdata.sh") tags = { Name = "${var.product}_${var.environment}_${var.service_intsance_tag_name_suffix}" Env = var.environment Product = var.product Terraform = true } } |
The resource block for creating the instance above it had 2 noticeable new elements. One from the line 14-17 and the other one on 18. With the root_block_device attribute, we are defining how our EBS root device is to be configured. From the volume type to its size and other settings like whether it should be encrypted or not. With the userdata, we are using a shell script to “pre-install” some packages for us to be on the node by the time it’s ready to be used. That file is located in files/ubuntu_userdata.sh
|
1 2 3 4 |
//files/ubuntu_userdata.sh file <strong>#!/bin/bash </strong>apt-get update apt-get install -y mysql-client-core-8.0 htop fail2ban ec2-instance-connect |
The shell script above will create for us the following packages:
- htop: To check resource usage on the node
- fail2ban: A security utility that needs to be configured
- ec2-instance-connect: To make the node reachable using different instance connect methodology of AWS
- mysql-client-core: To make client requests to our RDS instance
Creating our output file
In all the previous posts, after the creation of our resources, we usually have to open AWS console before we see the IPs (both internal and external) of the EC2 instance and the endpoint URL assigned to the RDS instance. Below is our attempt on returning useful information from our just created stack
|
1 2 3 4 5 6 7 8 9 10 11 12 13 14 15 16 17 18 19 20 21 22 23 24 25 26 27 28 29 |
#outpus.tf /** Returning the EIP of the instance */ output "output_ec2_elastic_ip" { value = aws_instance.terraform_ec2_instance.public_ip } /** Returning the private IP of the instance */ output "output_ec2_private_ip" { value = aws_instance.terraform_ec2_instance.private_ip } /** Returning the endpoint of the DB instance */ output "output_db_endpoint" { value = aws_db_instance.terraform_db_instance.endpoint } /** Returning the port number of the DB instance */ output "output_db_actual_port" { value = aws_db_instance.terraform_db_instance.port } |
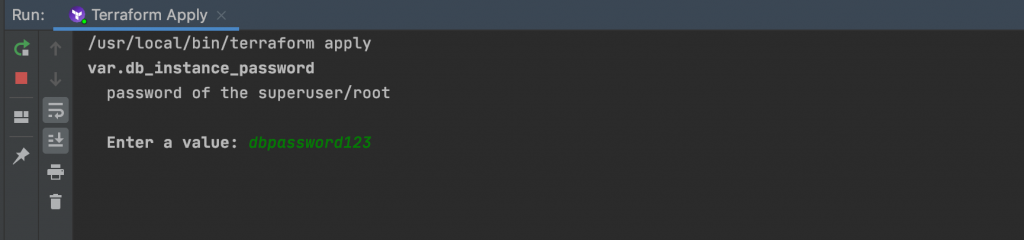
Now our code is ready to be executed. Because there is not value for the db_instance_password variable in the tfvars file, we will have to input our password at the prompt
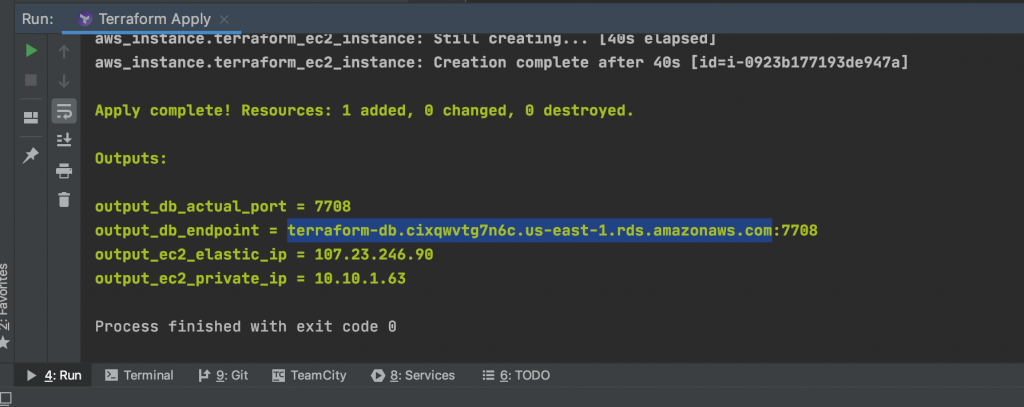
At the end of the execution, our outputted values should look similar to the image below:
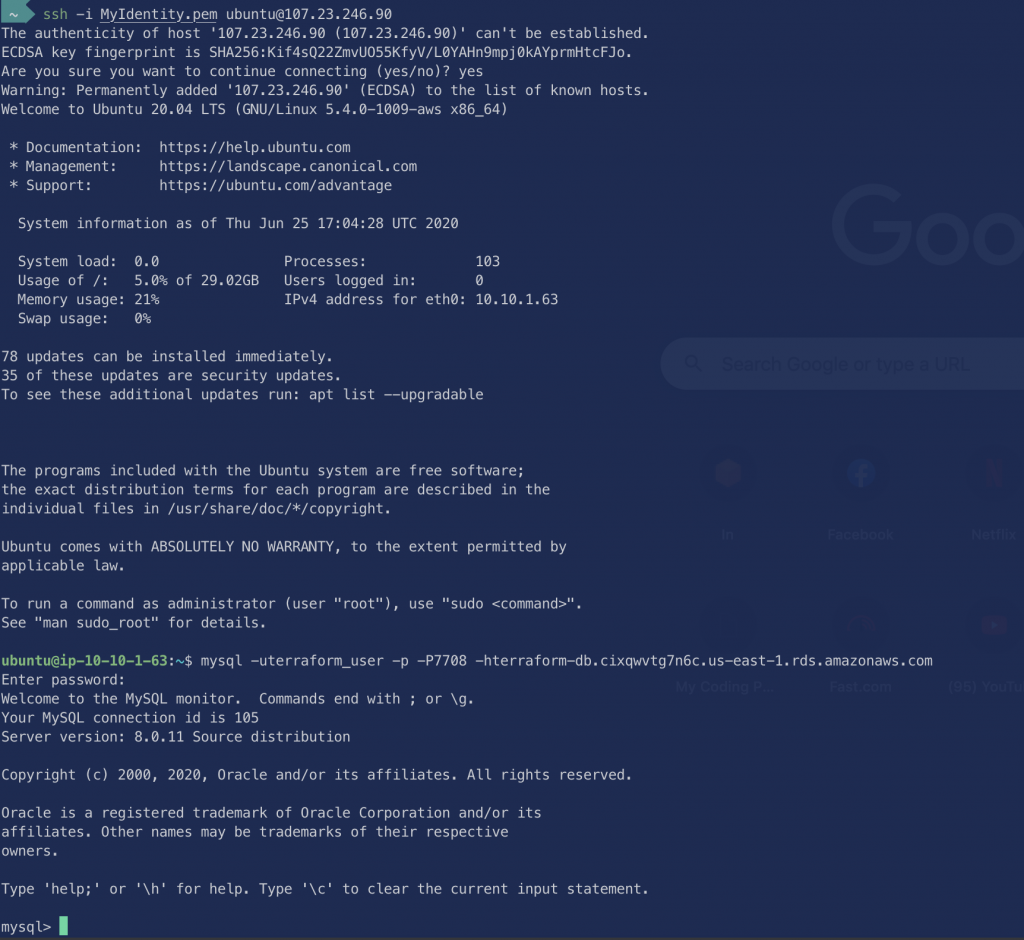
Let’s try and connect to our node and connect to our MySQL from it